Setup and Create Bots
Later after you set up your bot and create a flow, check how to build flow to send your first message.
tip
If you already made a flow before you connect to a channel, try publishing your flow as a template. Then use the "Create Flow" button to create a new flow base on that template. Check how to create template.
Omni Bots
Omnichannel gives you the ability to create 1 single bot and connect it to all channels supported in omnichannel.
Currently, there are 8 different channels but as we keep adding more you will be able to connect these as well.
So where you first needed 8 chatbots to each connect to their own channel you can now do the same with just 1 chatbot!
Unlike separate channels like Facebook, WhatsApp, Telegram and so on, you have 1 omnichannel per workspace. This might be subject to change in the future but keep this in mind for now when connecting your channels.
How to create a chatbot in omnnichannel
From the left-hand menu press omnichannel. You will then have two options to create your omnichannel chatbot.

You can create a completely new chatbot. If you are starting with an empty workspace where you don’t have any chatbots yet, this will be the most likely option you will choose.
If you already created a chatbot into a channel and want to use this same chatbot inside of your omnichannel, then you can choose the option “Convert Existing Chatbot”. This will also have the big advantage of importing the bot users you already have into the omnichannel chatbot.
Once you have chosen any of your preferred option you will continue to the next step.
If you selected the “create new bot” then you will be taken to the template store where you can select any of the available templates, or select the option “Blank Template”. This option lets you start from scratch and you can build the chatbot to your own liking.
Once you made your choice you will be taken to the window where you are able to name your chatbot, along with adding a description.
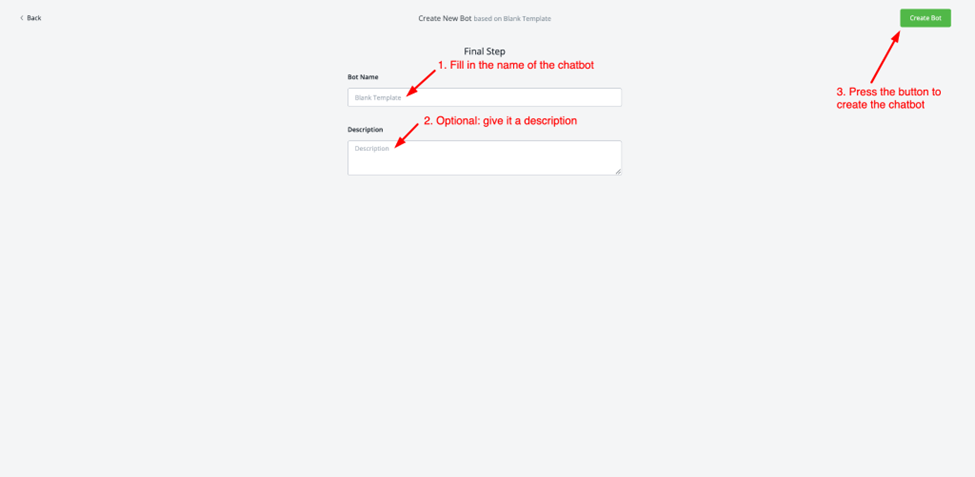
Once you are done press the green button named “create bot” and you will be able to connect the channels.
How to connect channels in omnichannel
Once your omnichannel chatbot has been created, head back to the main Dashboard to connect the channels you like the omnichannel to manage with this chatbot.
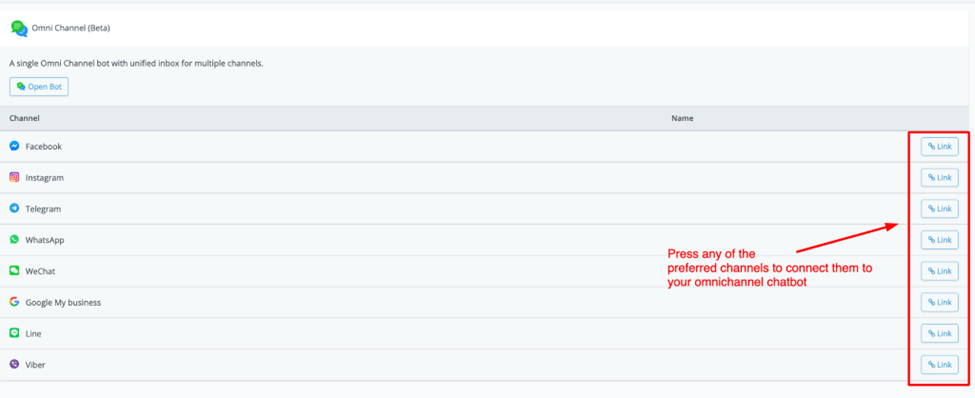
If you did not connect any channel yet to your workspace then it will take you to that specific channel to do so. Once you have added them you will be able to link them to this omnichannel chatbot.
You can unlink them at any time by pressing the button on the right-hand side.
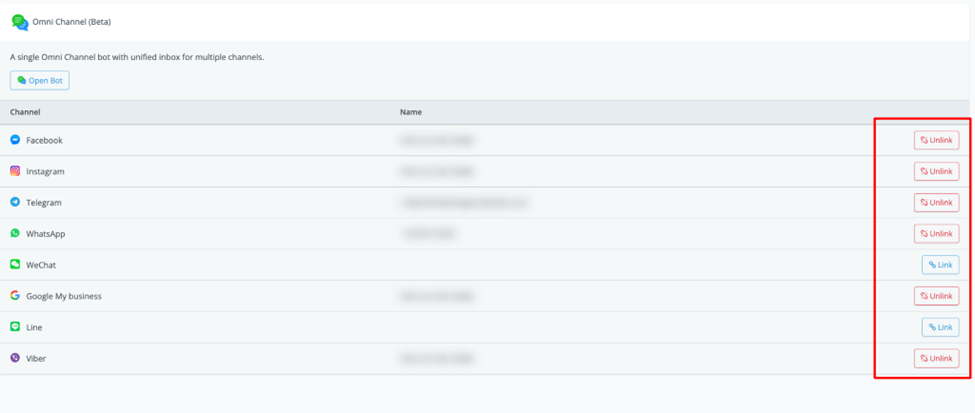
How to create an omnichannel flow
Now that you have created the chatbot and connected your channels you are ready to create your chatbot.
Now every single feature inside the flow builder will be available to you but do note that certain channels may not be able to use them.
Use conditions to determine where the user is coming from We have a condition you can use to determine which channel a user is coming from. Just go to creating a condition, then select the “channel” option.

Once selected you will be able to choose from the available channels in omnichannel.
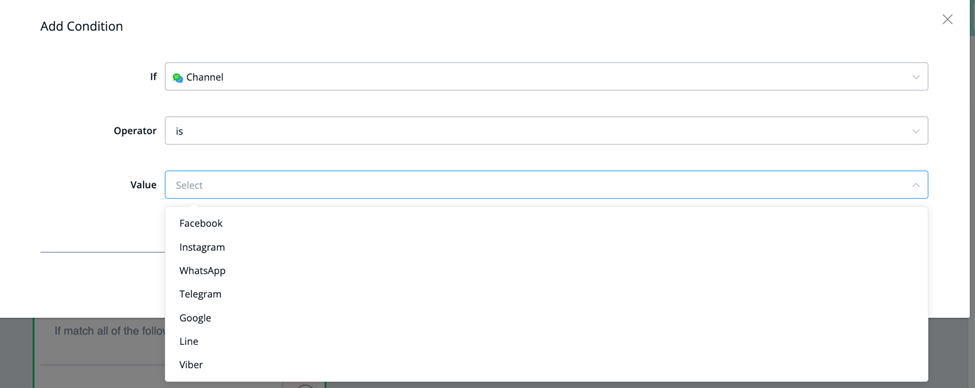
Once you set up this condition you can direct the user to specific channel features.
For example cards might be available to Messenger but not to Telegram. It does not show the same way.
So using this condition you can send a customized response for Telegram users
How to determine which channels support which features?
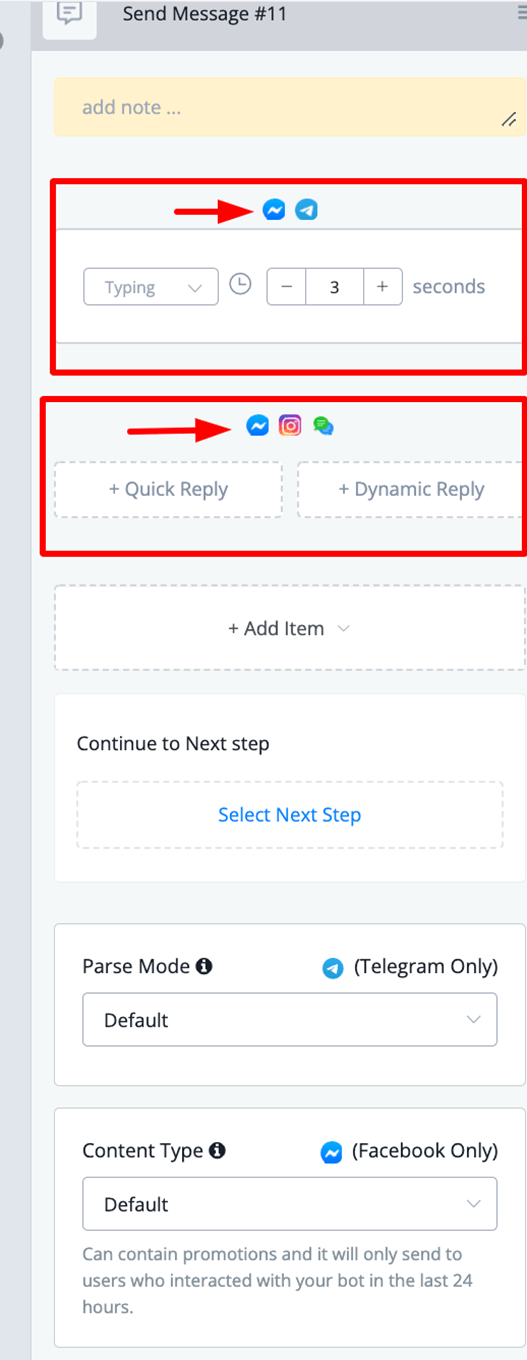
Every block when hovering over it will show the available channels by displaying the icons of those channels at the top.
You can also reference the same icons when inserting a node into the flow builder
Facebook Bot
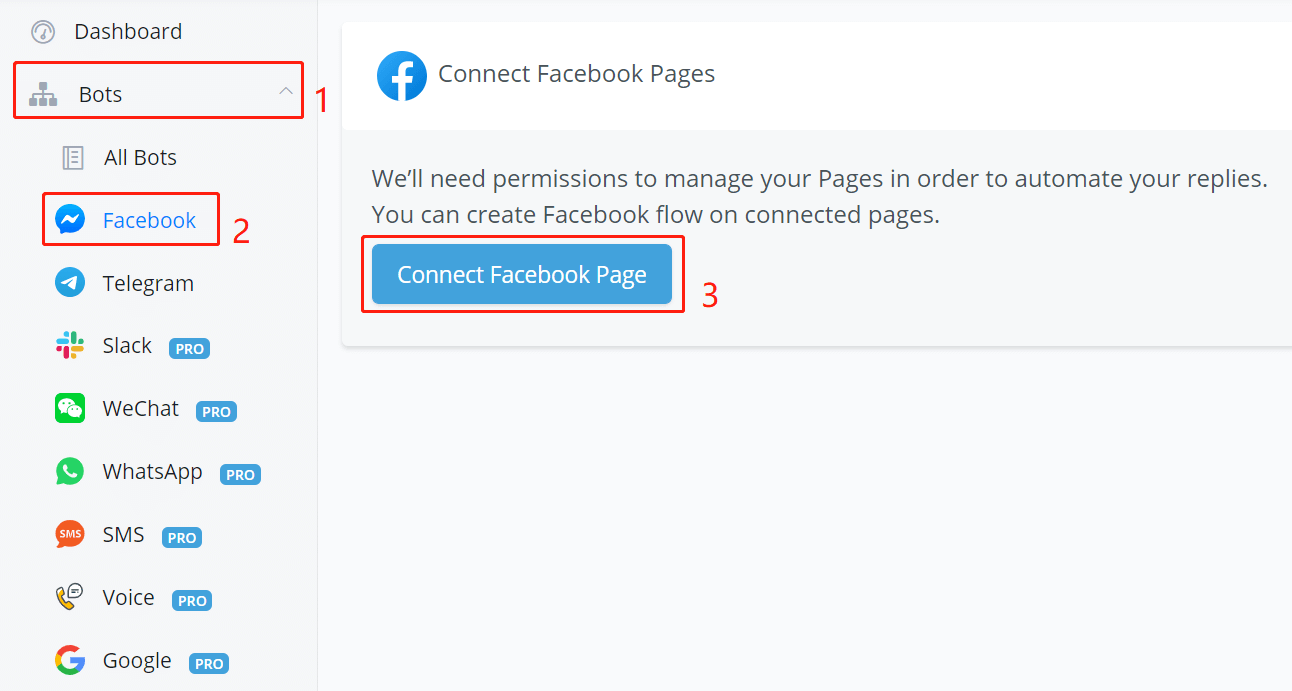
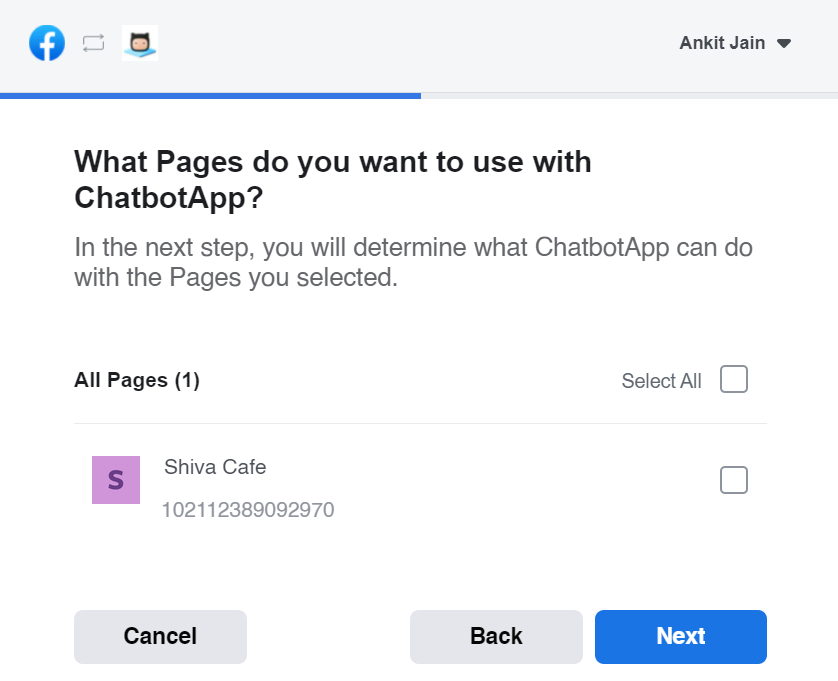
Follow steps 1, 2 and 3 in the above screenshot and jump to facebook.com Select all the pages in your page list, that you want AbsolutChat to help with the automation.
Important
If you connect your Facebook Account with more than one AbsolutChat user, remember to select all pages that require management regardless of users.
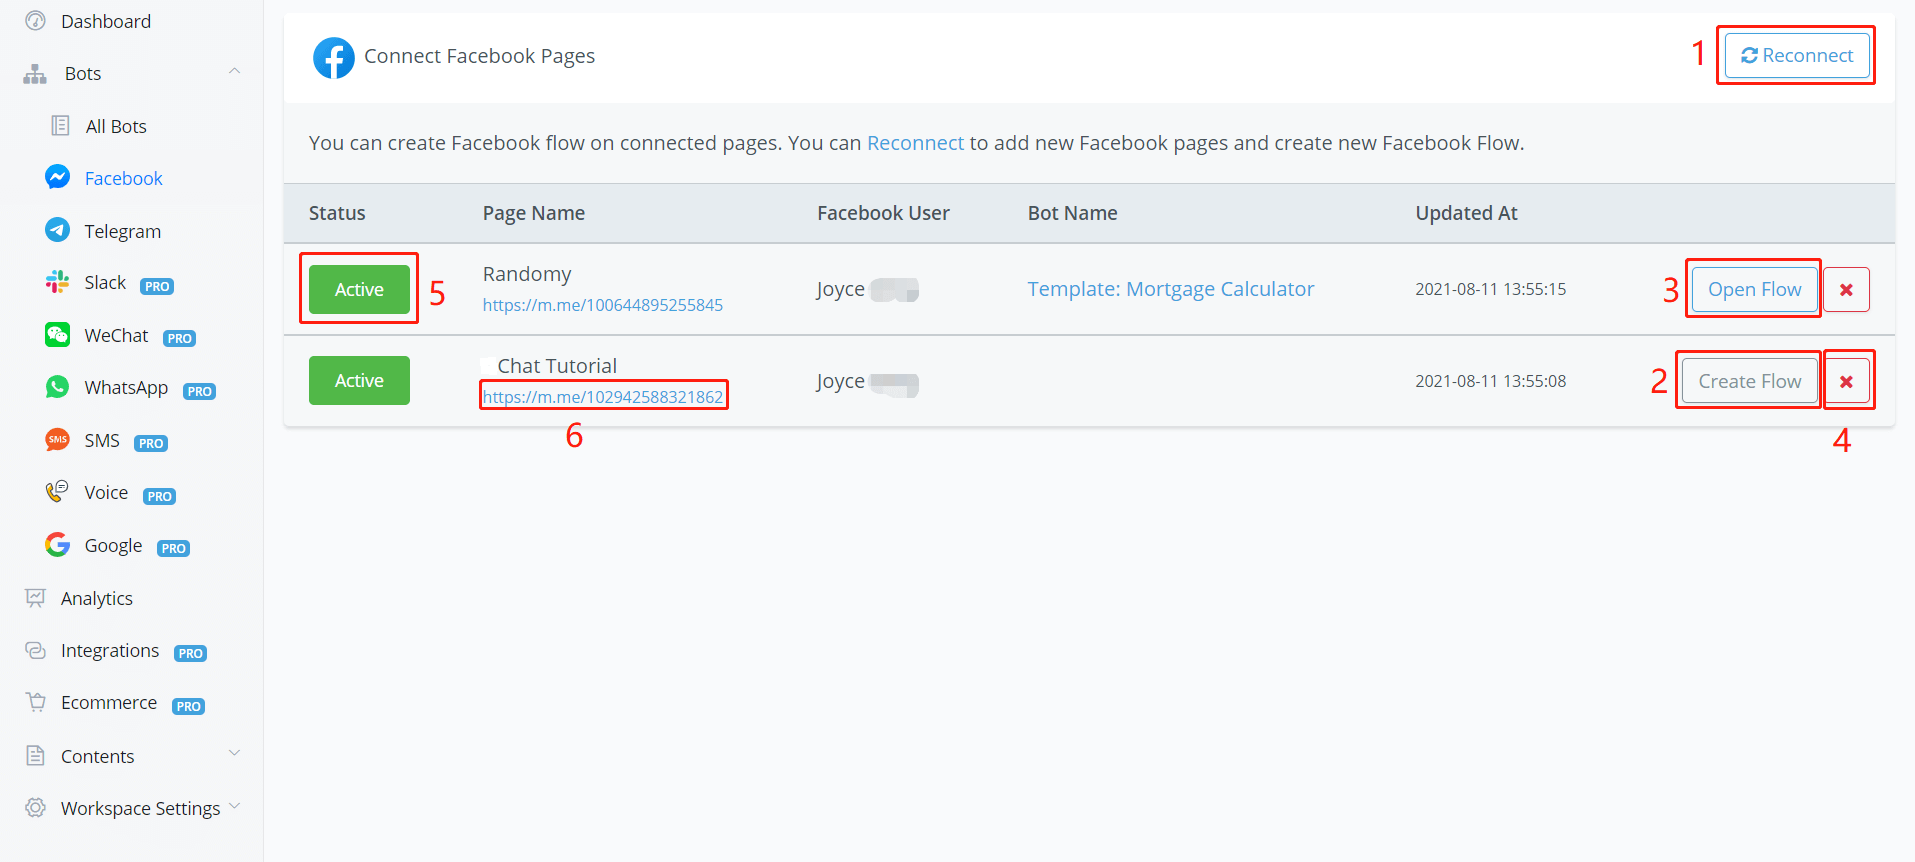
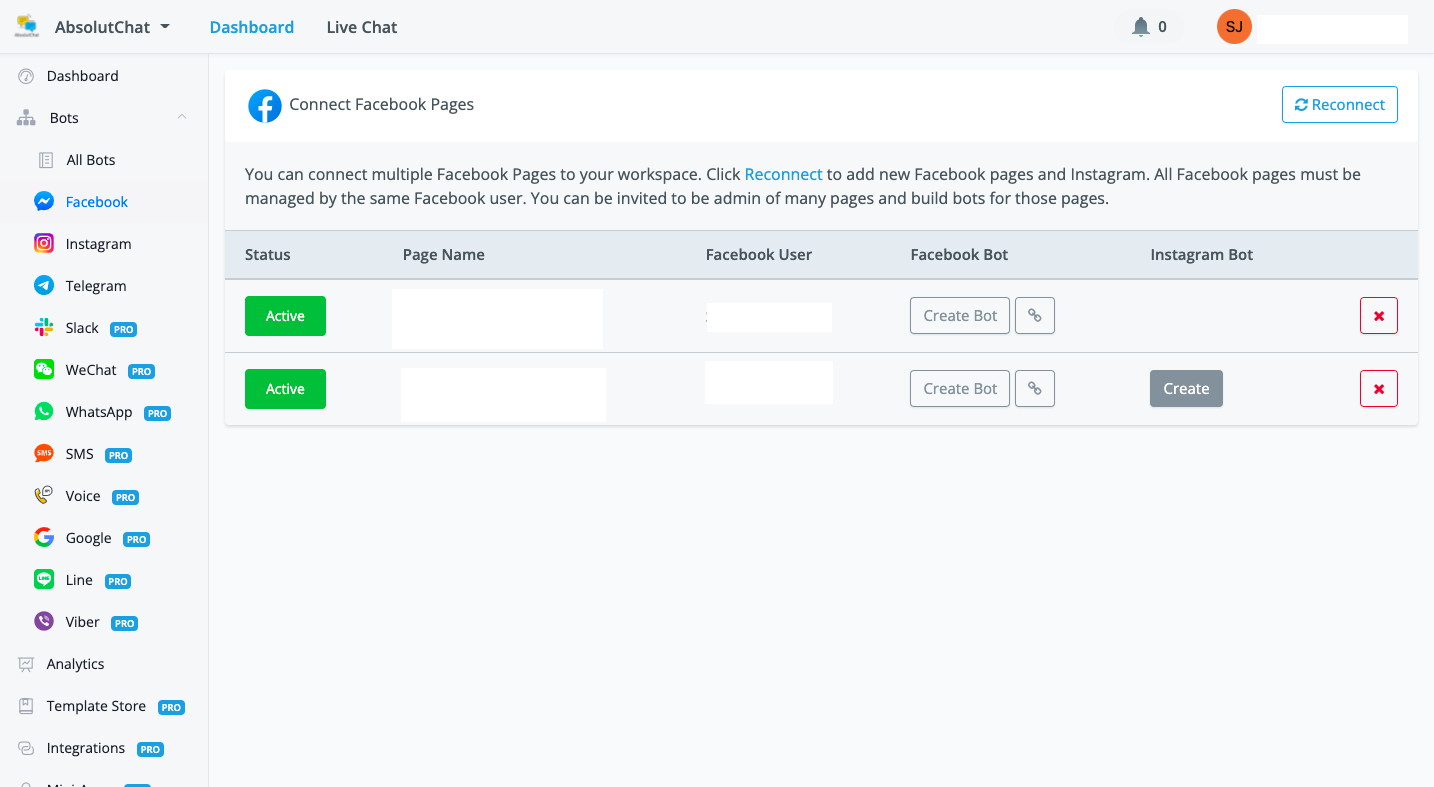
After connection, these are some of the operations in the screenshot above:
Click "Reconnect" when you want to add/remove a page or refresh.
Click "Create Flow" to create a new flow for the bot.
Click "Open Flow" to enter the flow.
Click the red x to remove the connection between the bot and your page.
Flip the status to stop/start the automation.
Click the link to talk to the bot. You can also share the link with other Facebook users.
Please note that the red x is for disconnecting the flow with your page only. Your flow won't be removed. It will still stay in your workspace remain intact (in "All Bots").
Instagram Bot
Firstly, you need an Instagram business account. To change from personal account to business account, follow steps 1, 2 and 3 in the following screenshot and choose "Business":
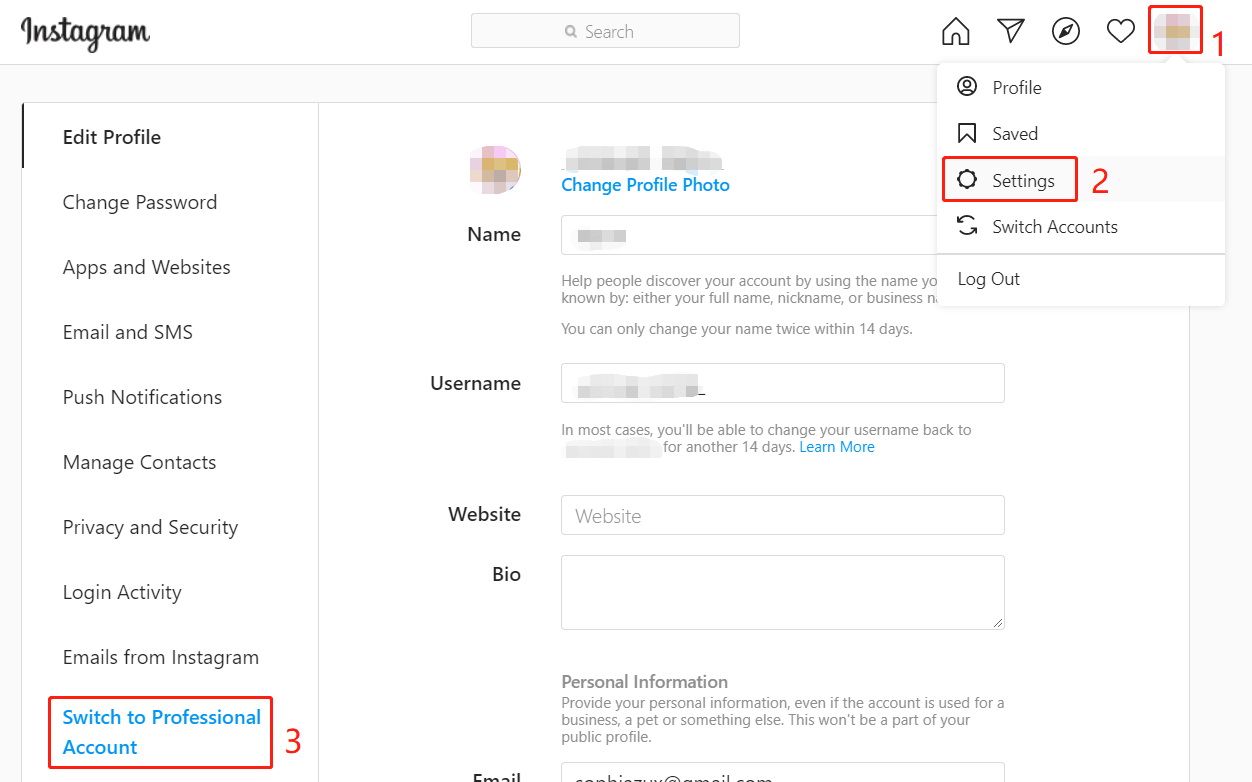
Then connect your Instagram business account with your Facebook page. A Facebook page is a must, if you don't have one, create a new page.
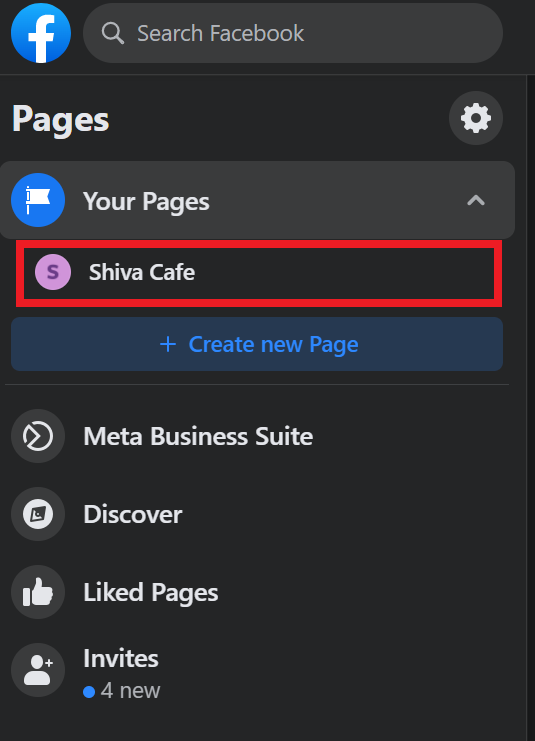
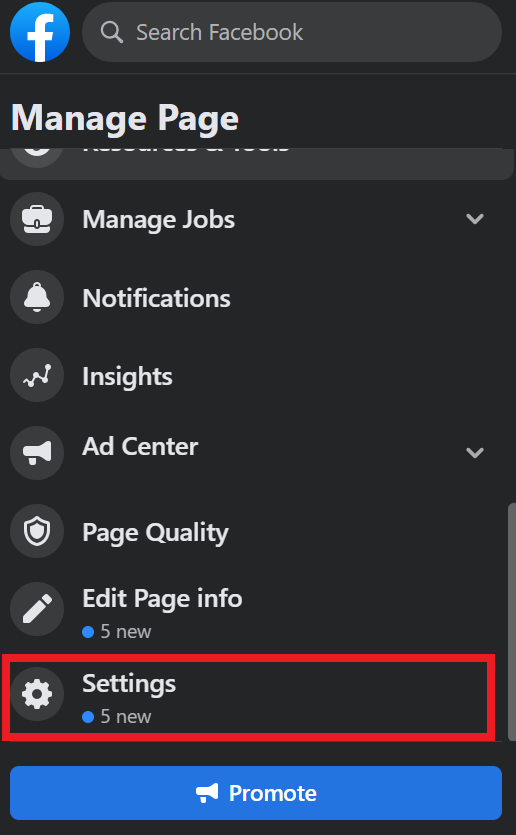
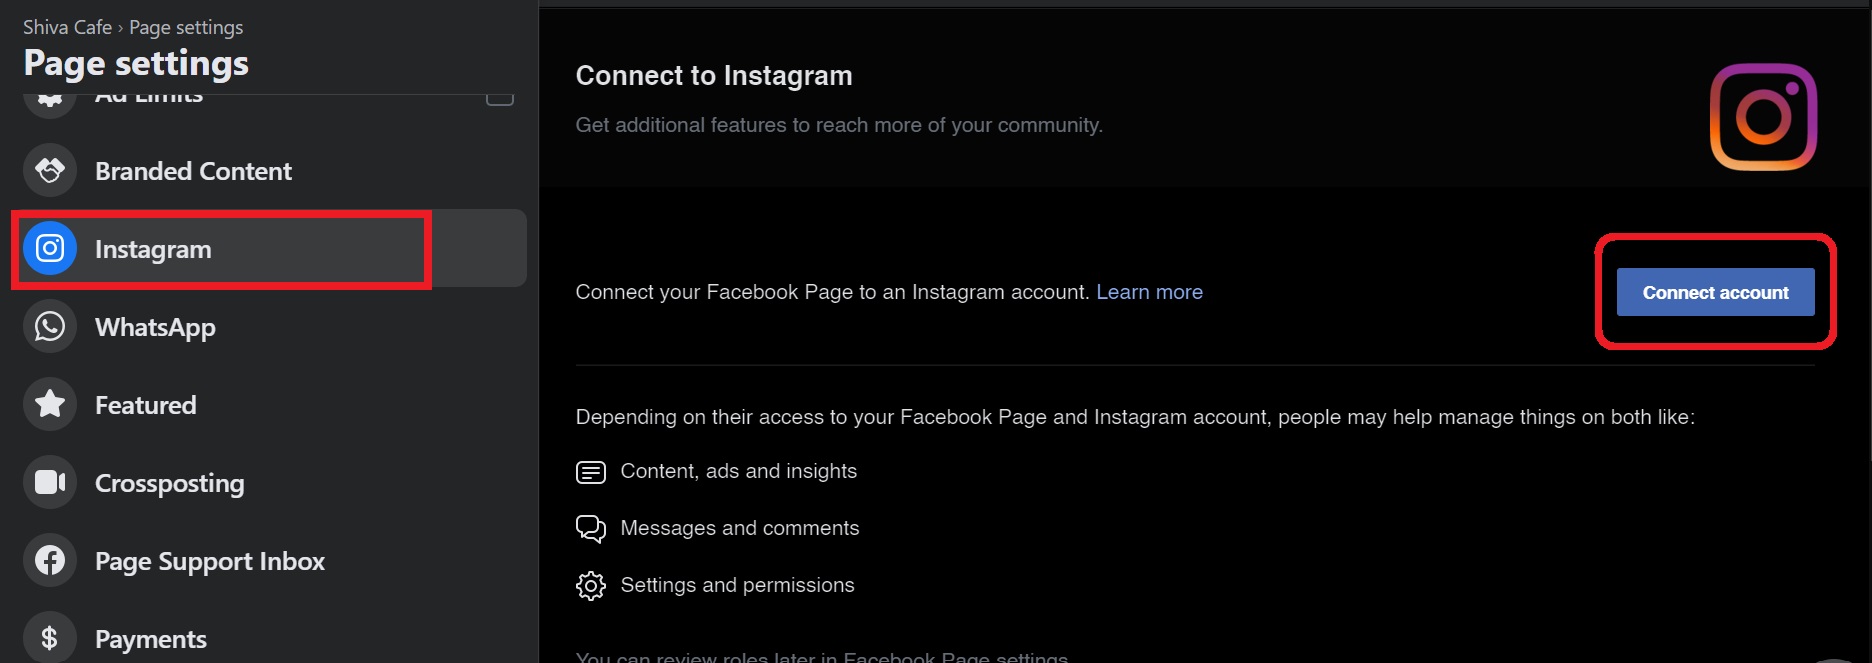
Go to the "Settings" of your Facebook page, then "Instagram", "Connect Account".
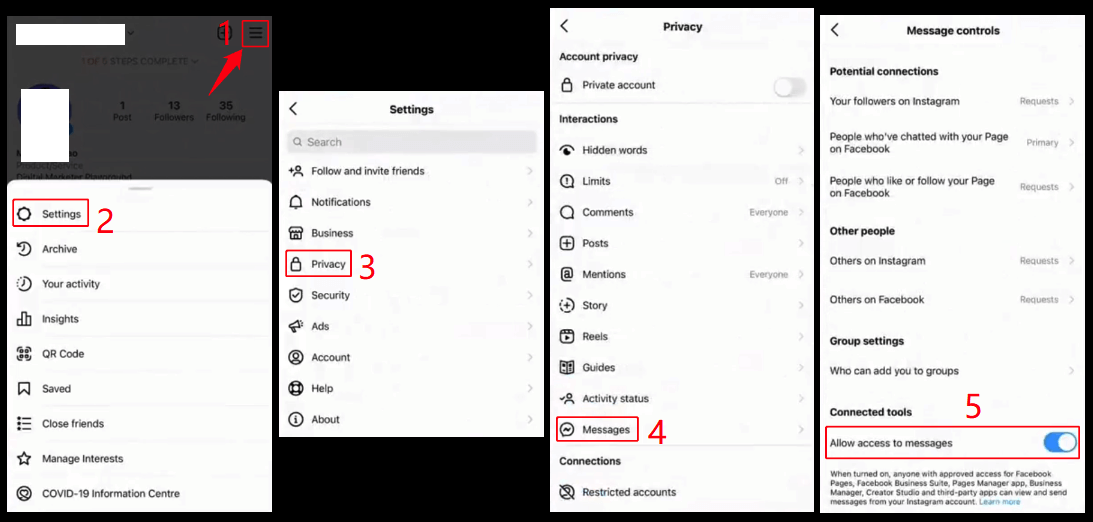
The next step is to turn on the "Allow access to messages" in your Instagram app, see steps 1 to 5 in the following screenshot: Menu - Settings - Privacy - Messages - Allow access to messages
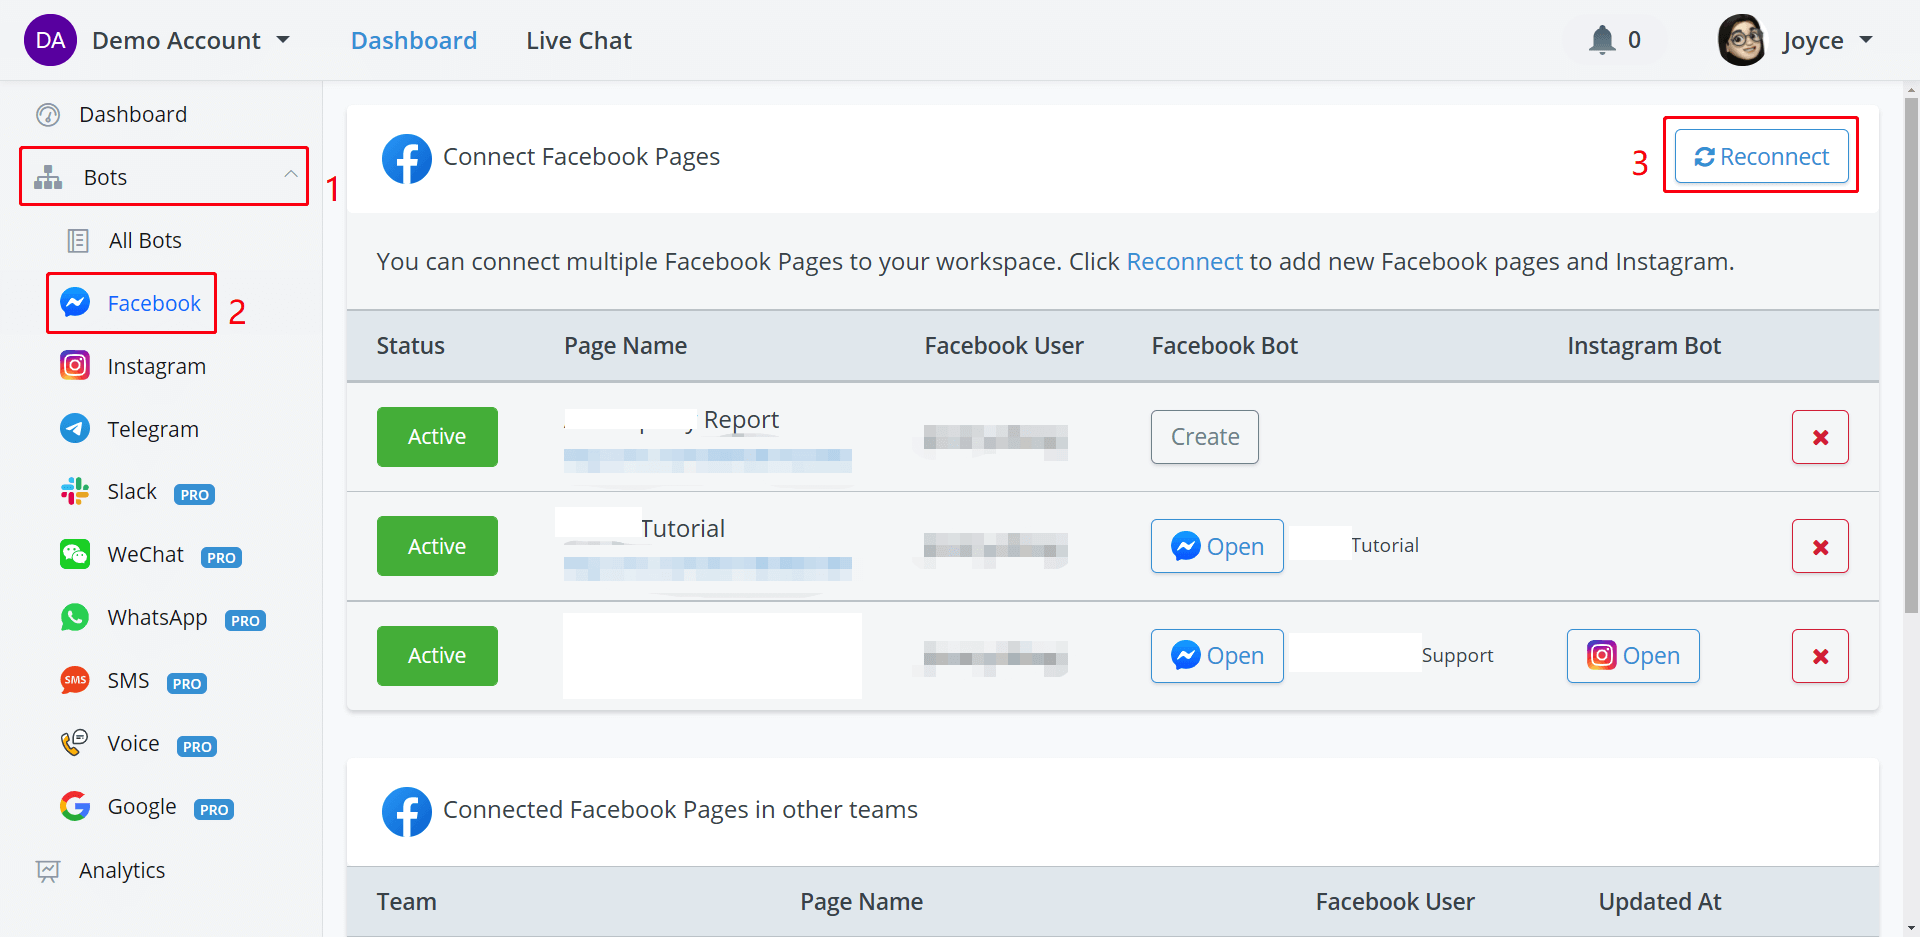
Finally, in AbsolutChat, let's connect your Instagram with AbsolutChat. Go "Facebook" and "Reconnect" (Yes, Facebook, not Instagram):
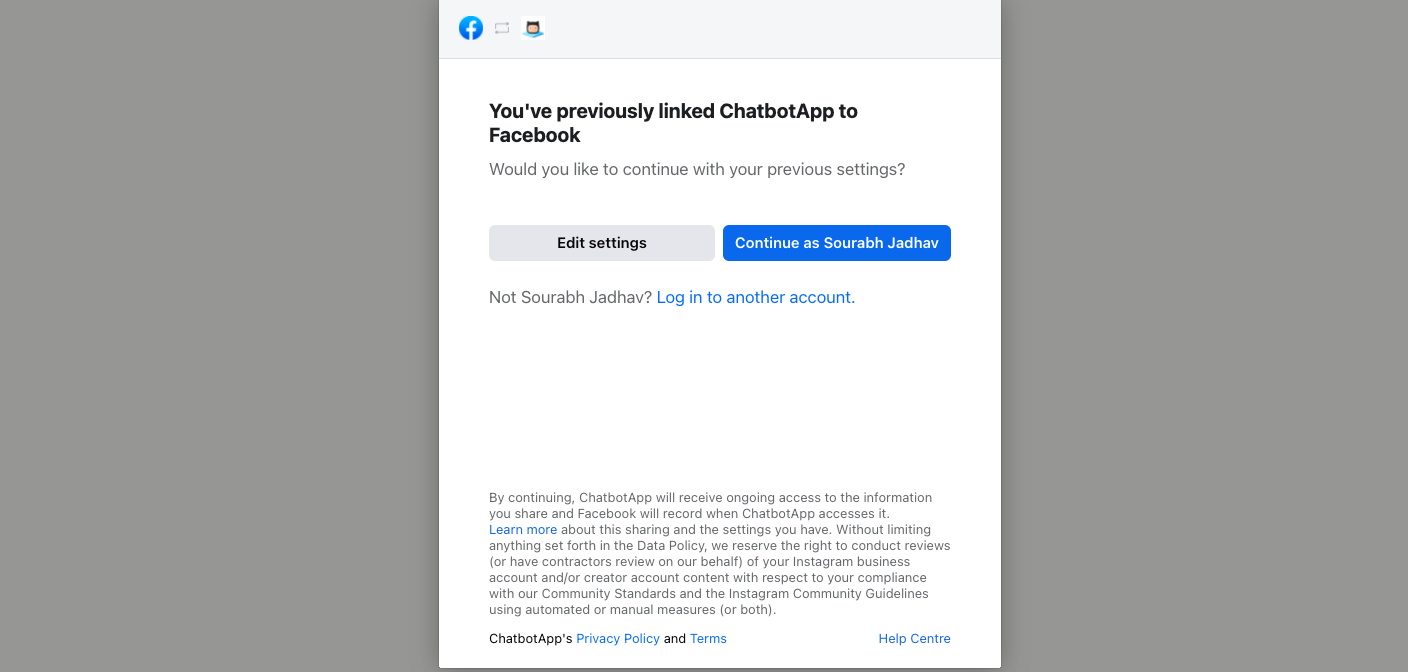
Continue as yourself or click "Edit Settings" if you've previously linked AbsolutChat to your Facebook.
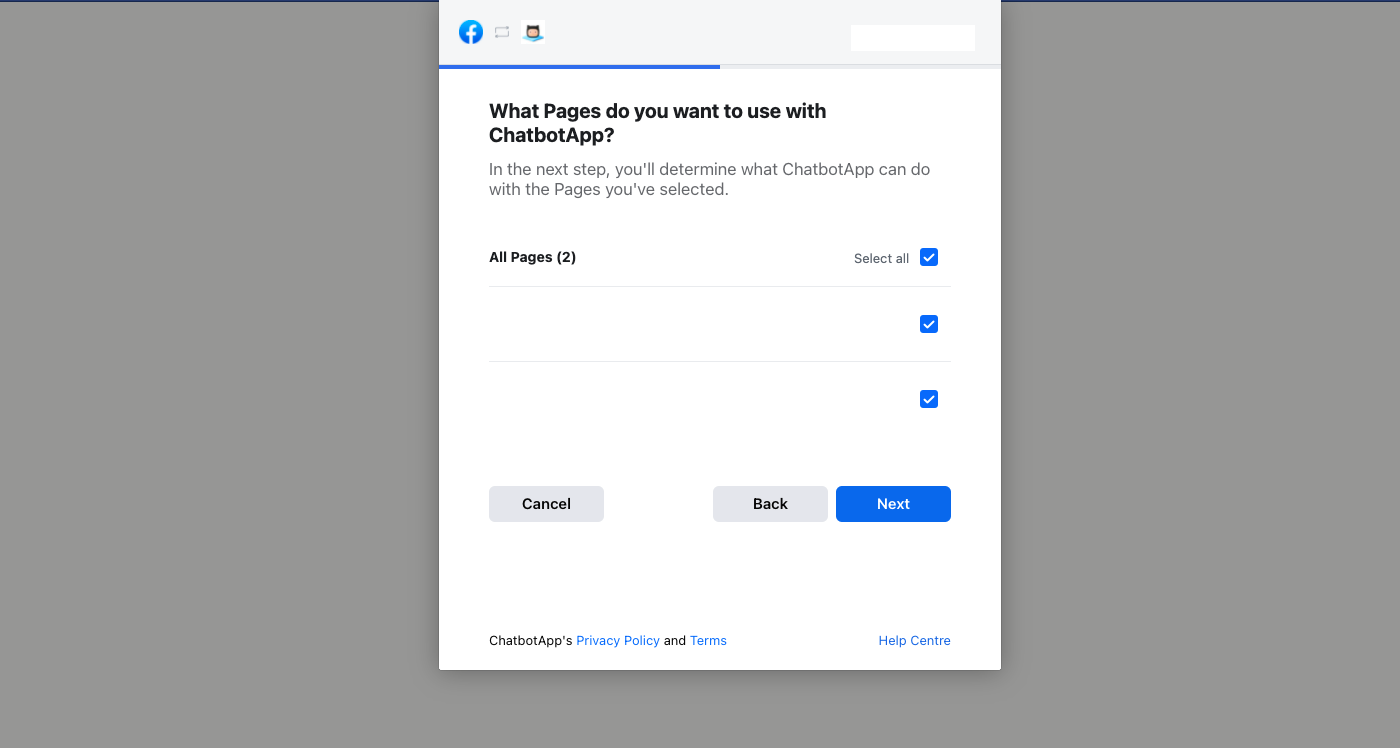
Important
In the above screenshot, select ALL the Instagram Business Accounts that you wanted to use with AbsolutChat, not just for the current workspace. See an example below.
e.g. You have workspace A and B, Facebook page X and Y under the same Facebook account and wanted to build Instagram bot X and Y (X on A and Y on B). What you need to do are:
- on workspace A, select only Instagram X and Facebook page X.
- on workspace B, select both Instagram X, Y and Facebook page X, Y. (otherwise you lose the connection between A and X because of the deselection)
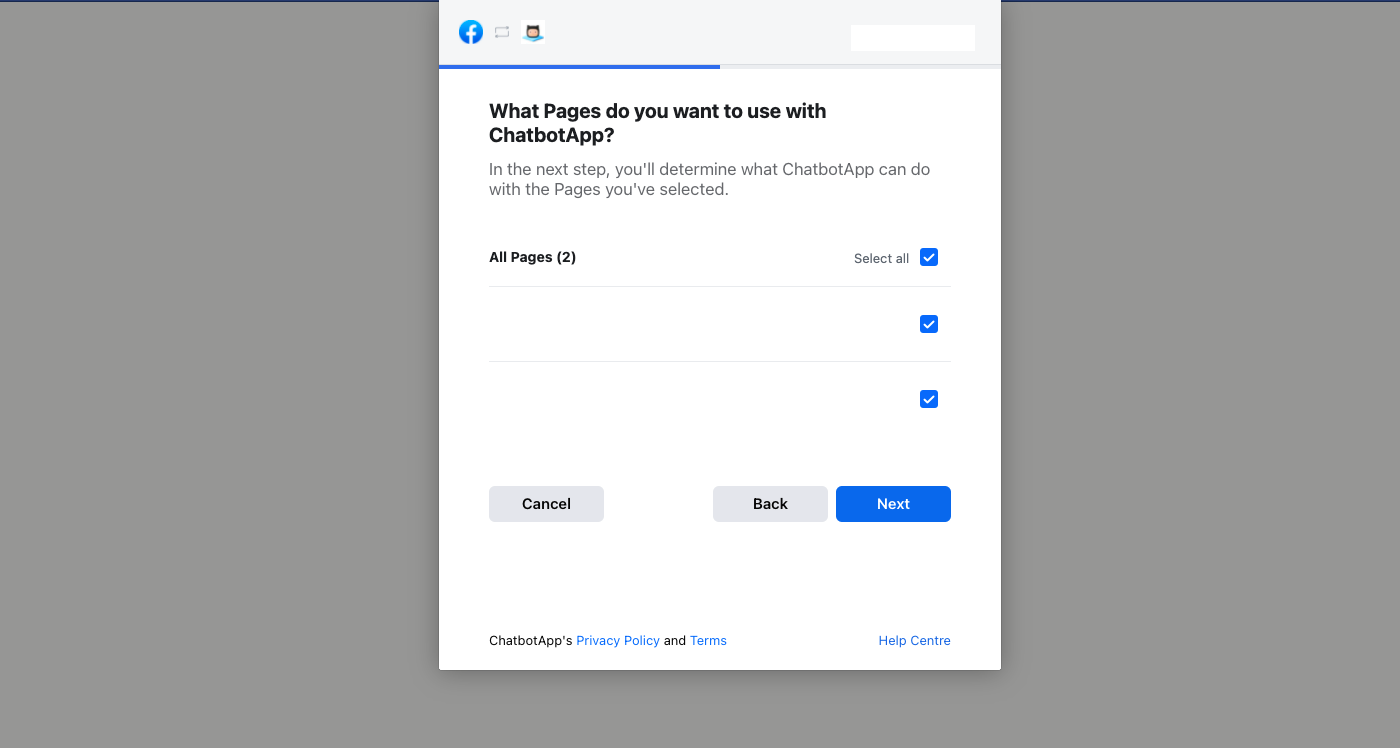
Important
Similarly, in the above screenshot, select ALL the Facebook pages that you wanted to use with AbsolutChat, not just the page that connects to the Instagram account.
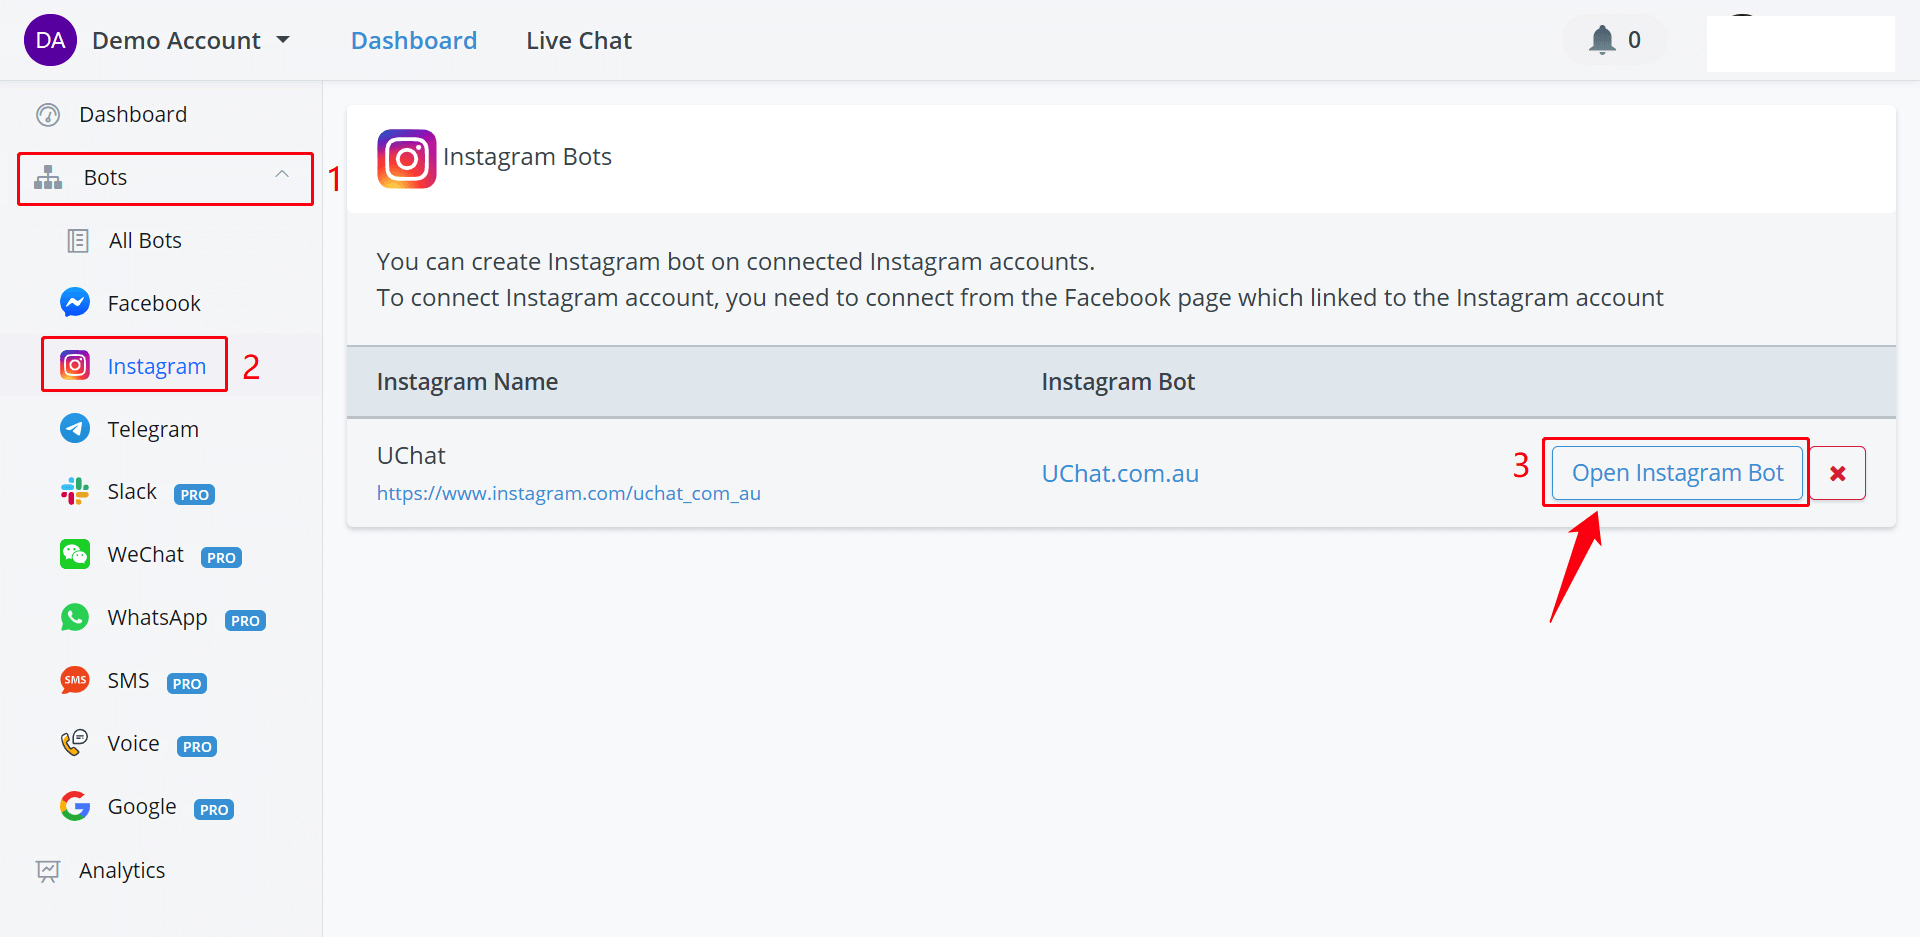
Give all permissions and after the connection, you are able to see your Instagram flow in both "Facebook" and "Instagram":
Telegram Bot
On your phone, visit https://t.me/BotFather (opens new window)from a browser. Click "SEND MESSAGE" and you will jump to the Telegram application. Click "Start" at the bottom to talk to @BotFather.
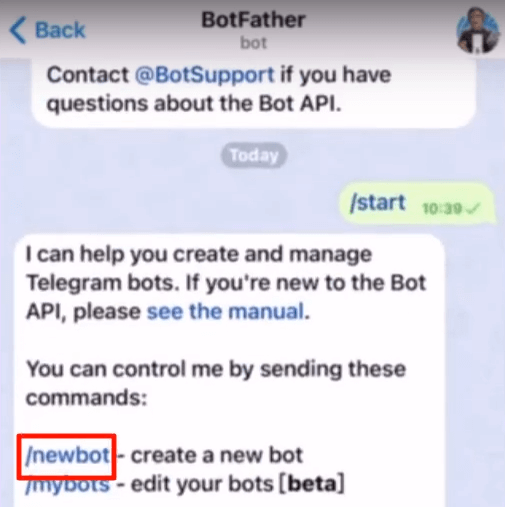
Send "/newbot", then a username for your bot. You will get a token like this:
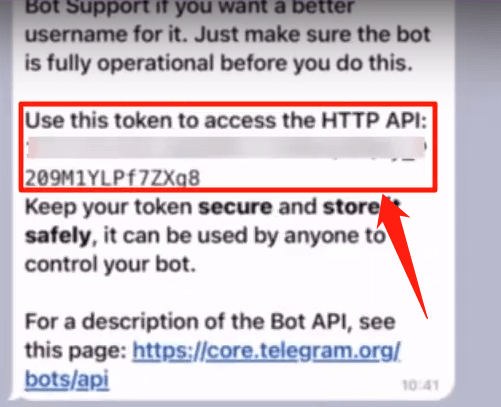
Copy the token and back to AbsolutChat.
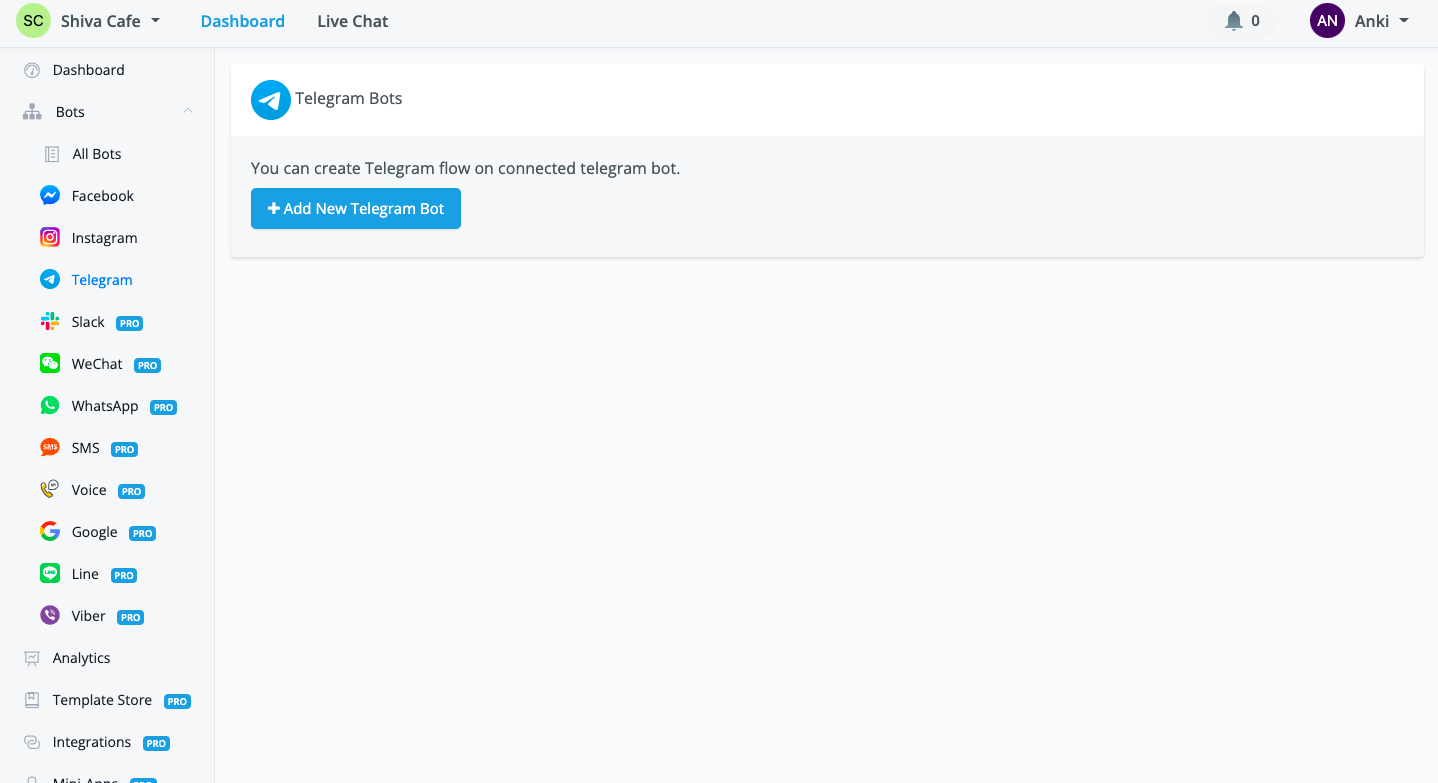
In AbsolutChat, click "Add New Telegram Bot" and put your token in the pop-up window. Finally, click "Create Flow" and there you go!
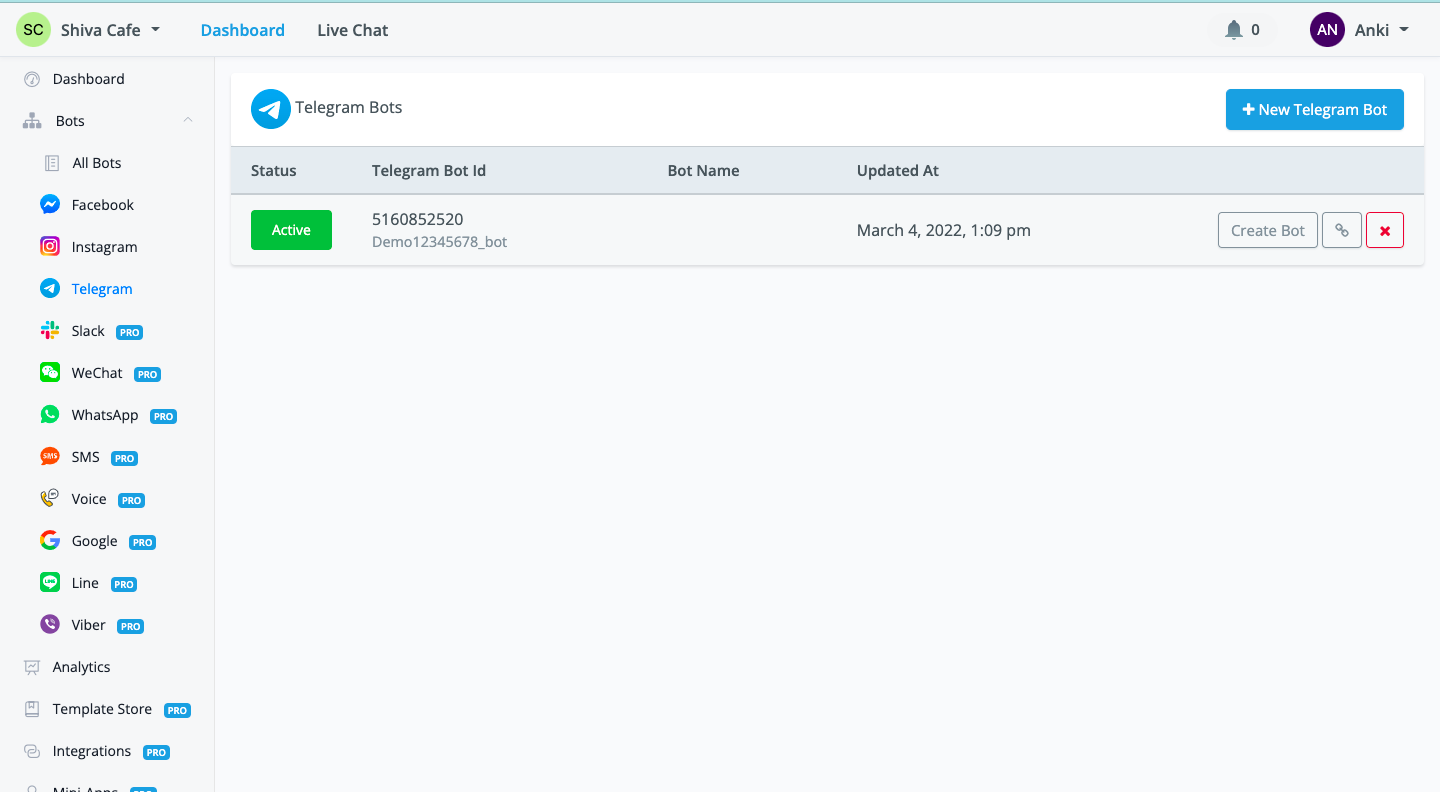
Flip the status to stop/start the automation and click the red x to remove the connection (your flow will be still in "All Bots")
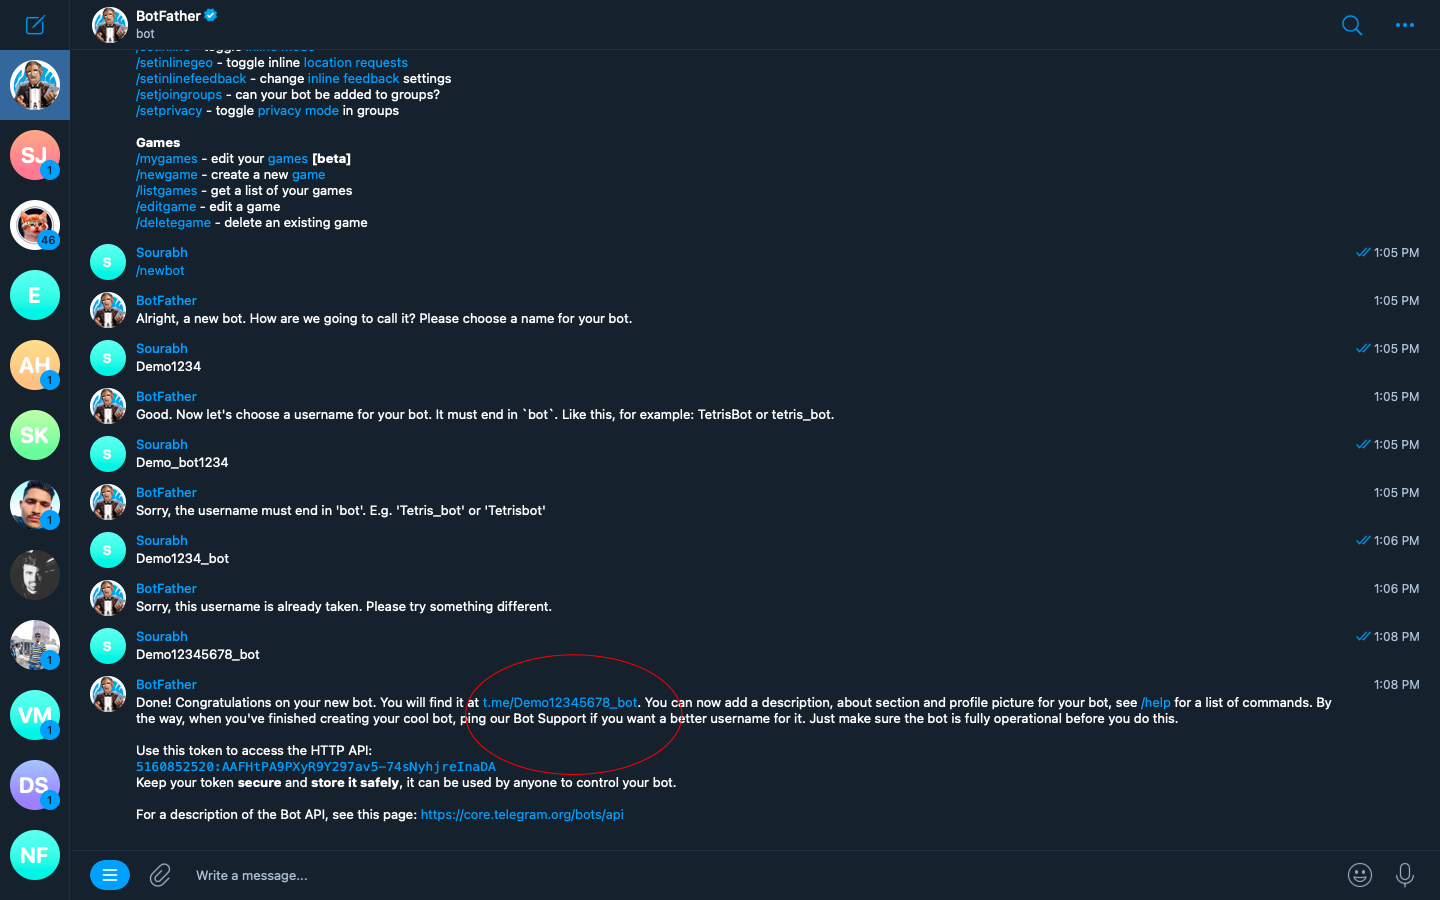
To talk to your bot, click the URL link above or you might want to share this link with others.
Slack Bot
For now, AbsolutChat is able to send various types of messages to your Slack group or contacts mainly for notification purposes.
note
We are working on building more functions for Slack bots. The documentation would be updated as soon as we have done that. Should you have any query, please feel free to contact us via email - support@absolutchat.com
Wechat Bot
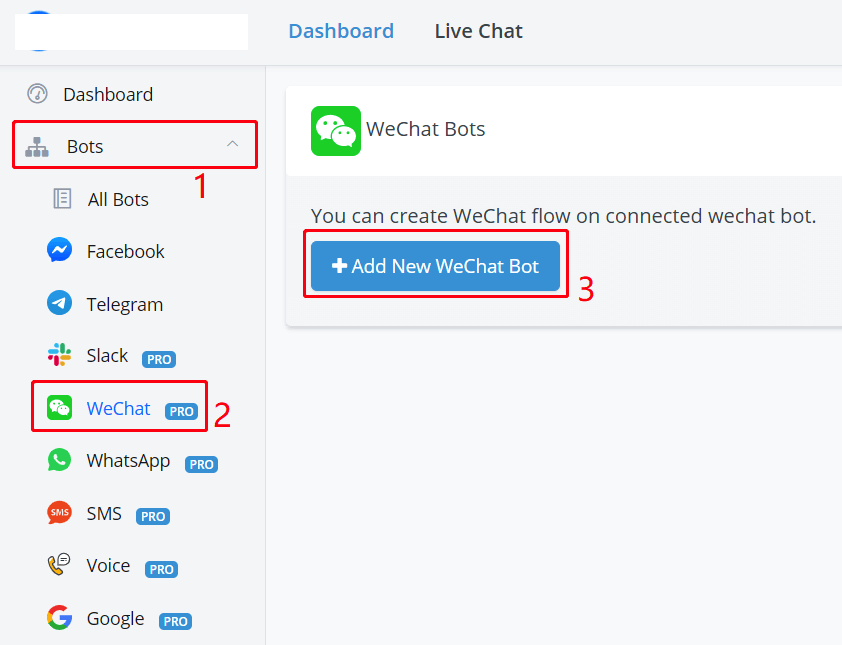
Follow steps 1, 2 and 3 in the above screenshot.
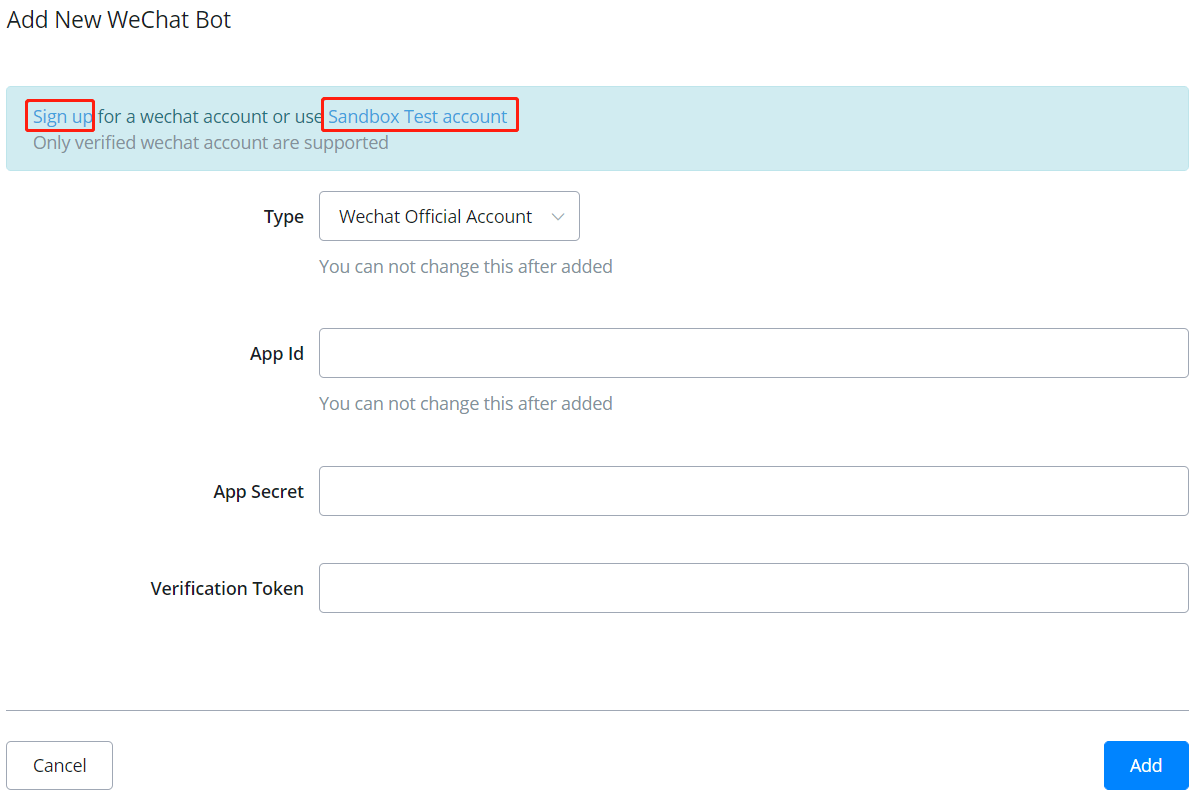
- If you already have a WeChat official account or wanted to register one, click "Sign up".
- If you don't have an official account yet, click "Sandbox Test account" to test the bot with your WeChat personal account.
tip
You can choose English on the WeChat website by clicking the globe icon on the upper right side. However, some pages do not support translation.
Login yourself with your WeChat account. On the top, you can see your "appID" and "appsecret" as below:
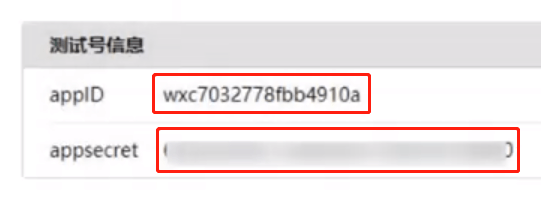
Copy them back to AbsolutChat. Follow the steps below:
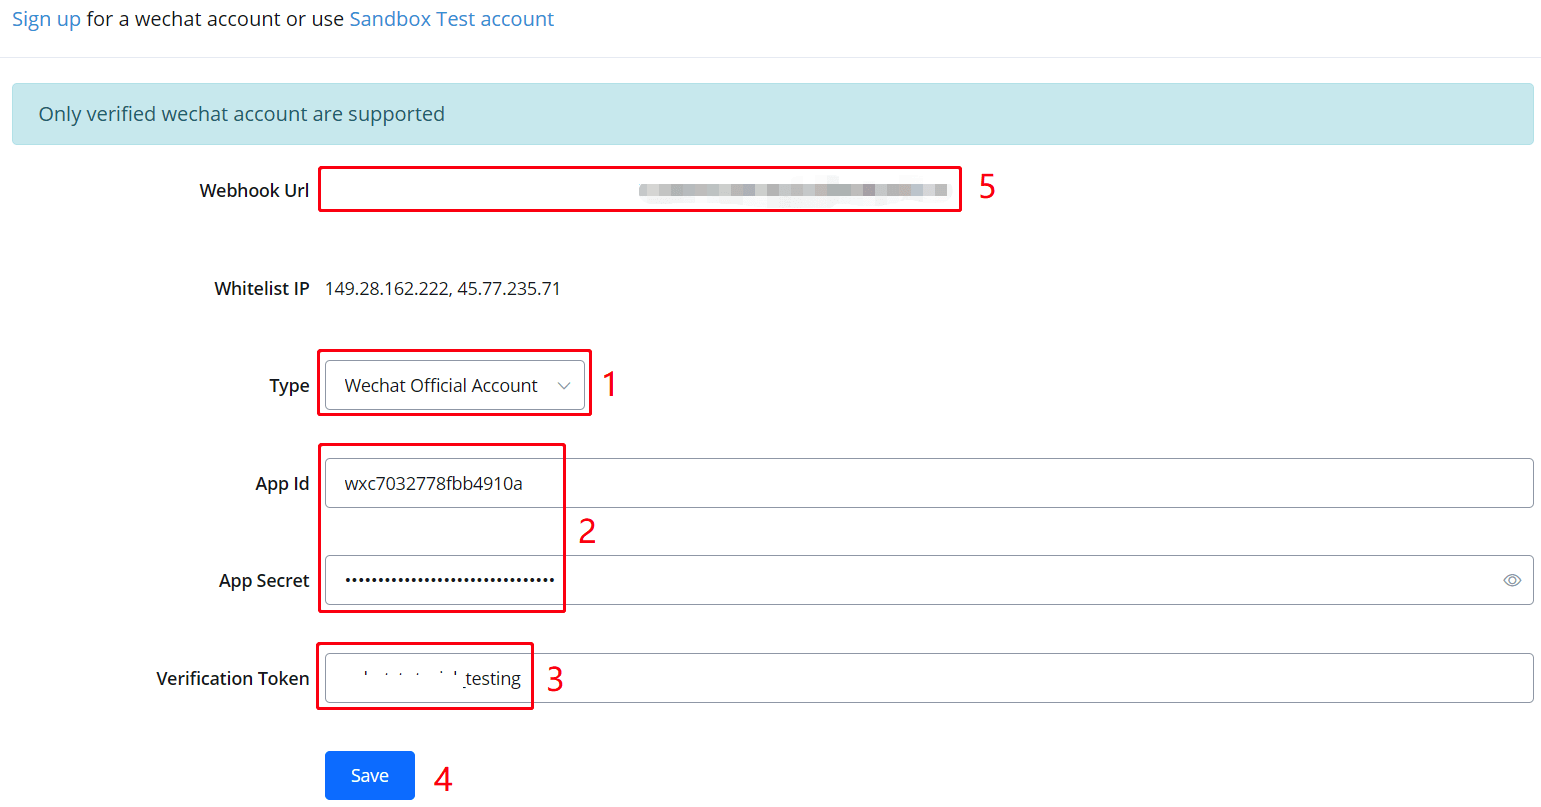
Choose a type
Paste your App ID and secret
Name a token yourself
Click "Save"
A webhook URL will show, copy it to the WeChat's website
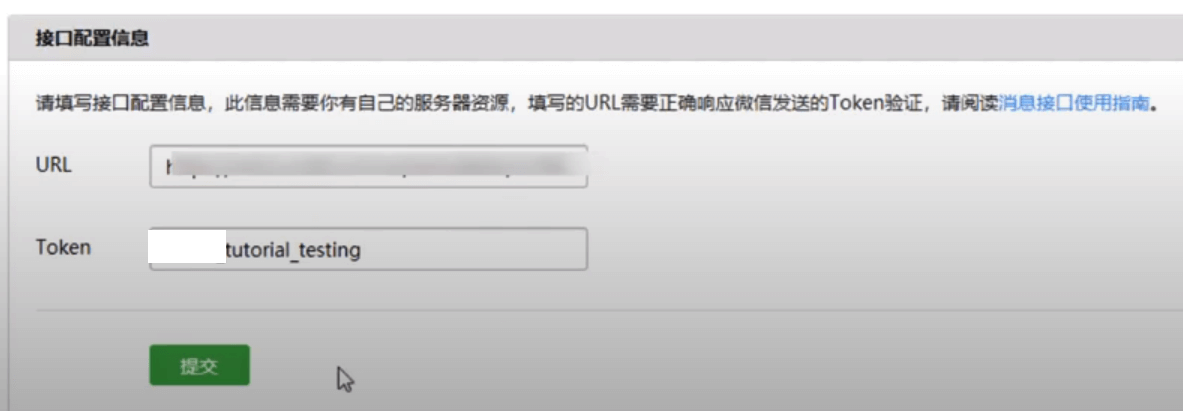
Paste the webhook URL (in step 5) and the token (in step 3) here then click the green "Submit" button. Finally, scroll down a bit, you can see your testing QR code:

Now you can share your QR code with any WeChat user. By scanning and following your official/testing account, they are able to talk to your bot. Besides, their nickname and WeChatID will be listed here (100 users maximum).
WhatsApp, SMS & Voice Bot
Pick Providers
As follow are the providers we currently work with. Different providers support different bots. Choose your provider according to your needs. Create an account with them and pick your number.
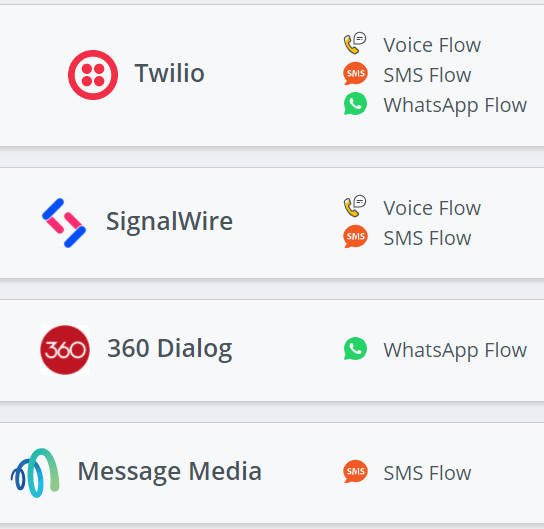
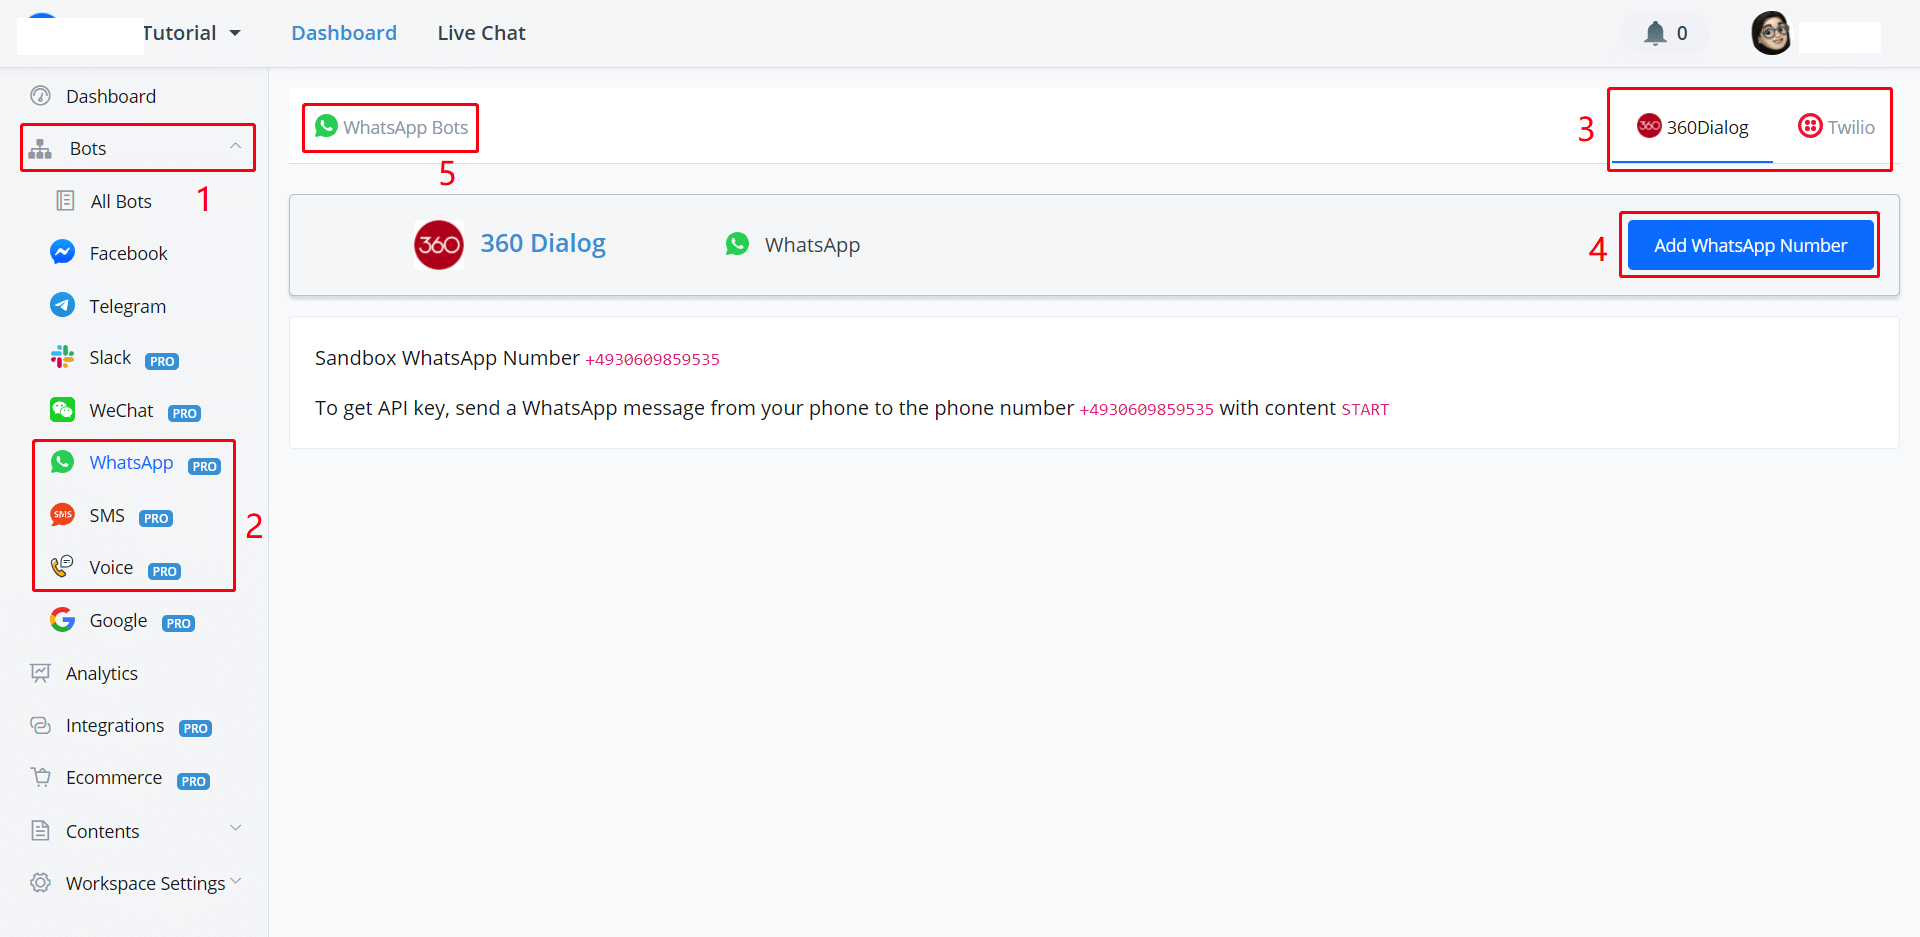
AbsolutChat has put links for you to jump to their official websites. You can either access them in the according channel (see screenshot above) or on the "Integration" page (see screenshot below).
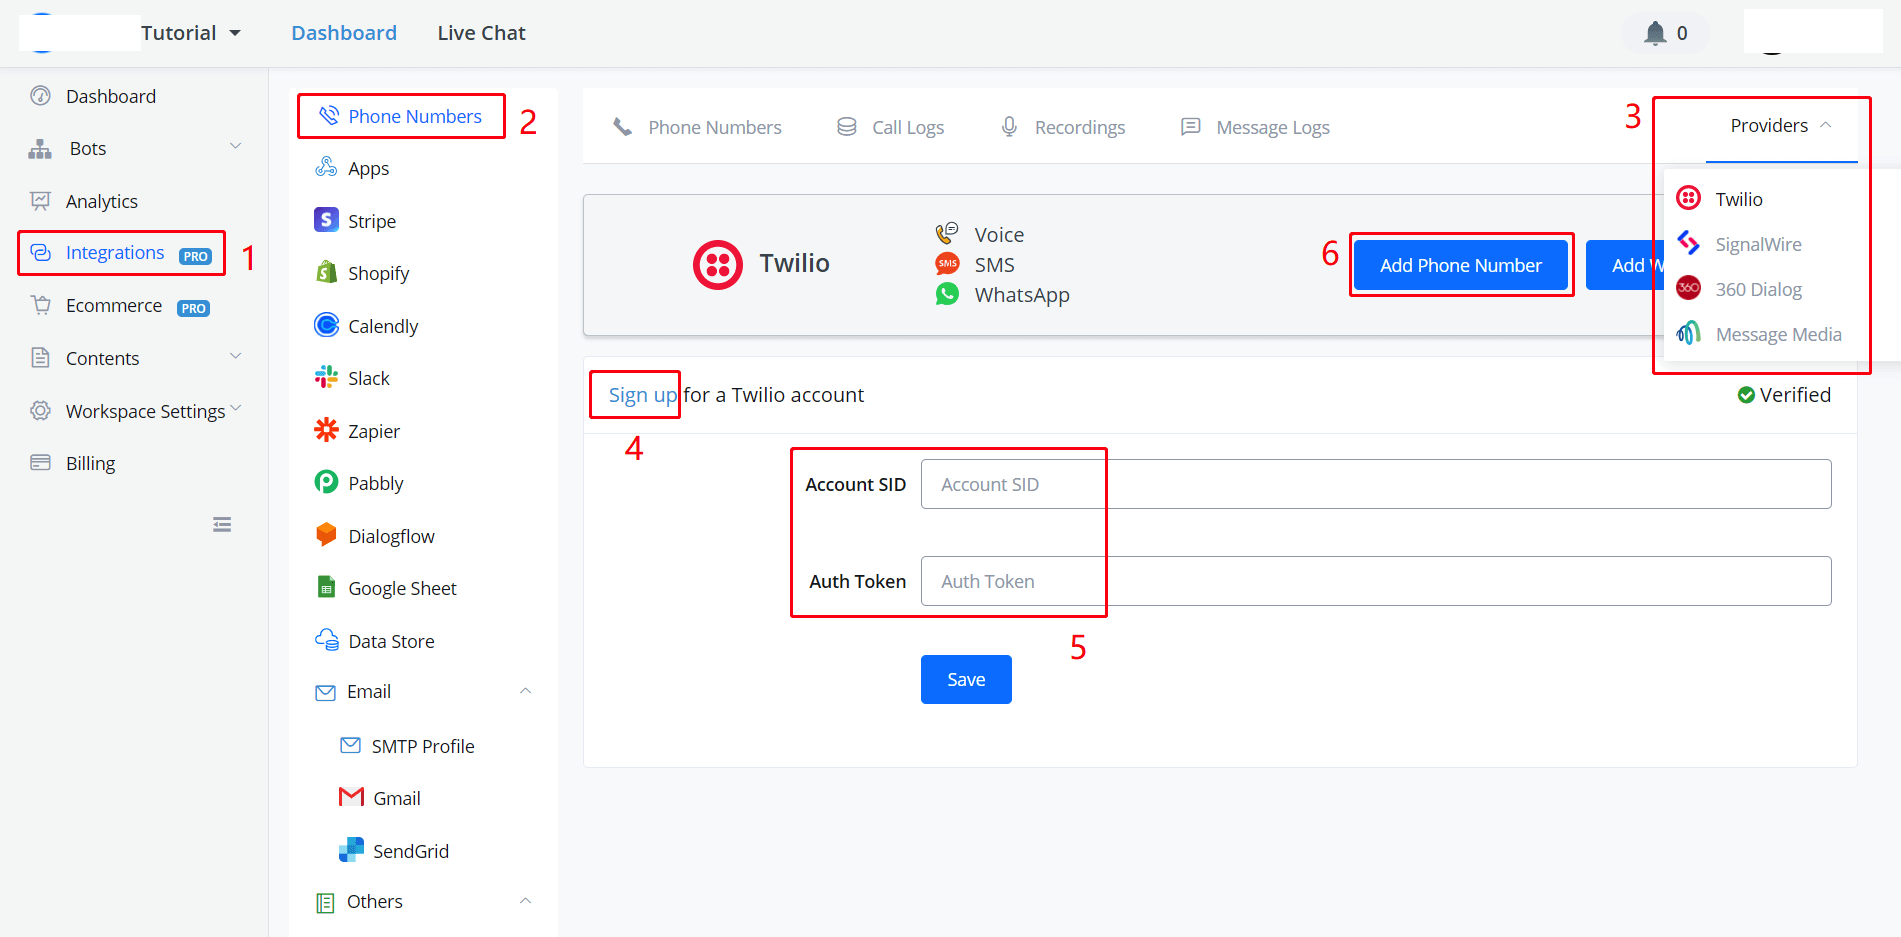
Follow the steps in the above screenshots to connect to the provider and add numbers.
Sign Up & Get Numbers
Take Twilio as an example. On their website, sign up, login in, then you will get to your Dashboard:
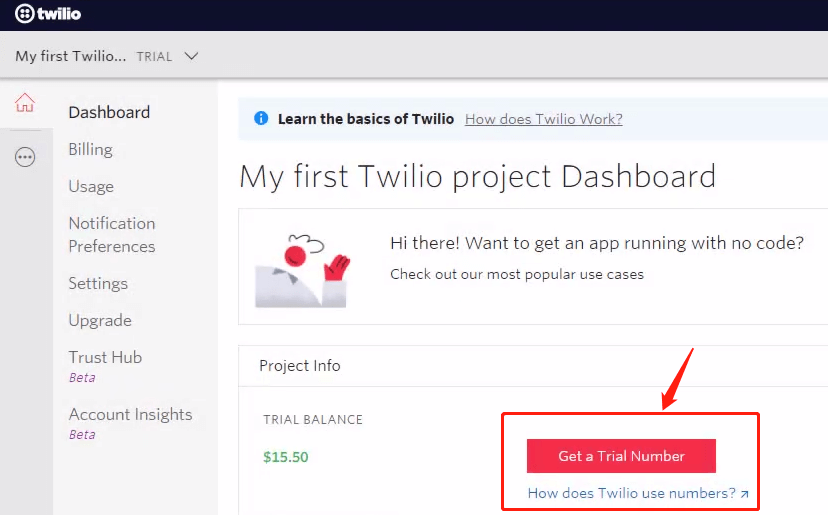
Click "Get a Trial Number".
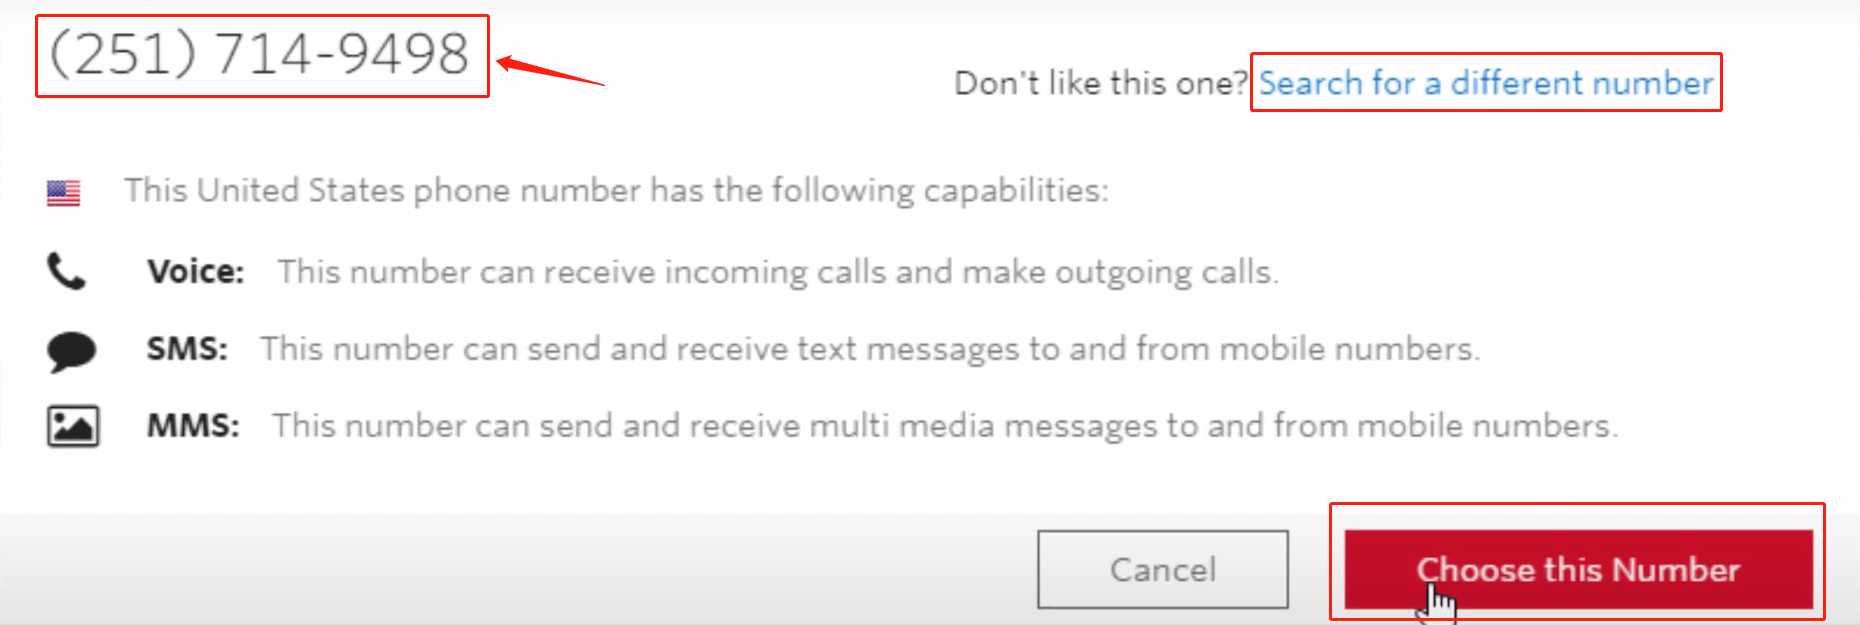
In the pop-up window, the number is shown on the upper left side, click "Choose this Number" or "Search for a different number". Then you have your own number!
Connect to Provider
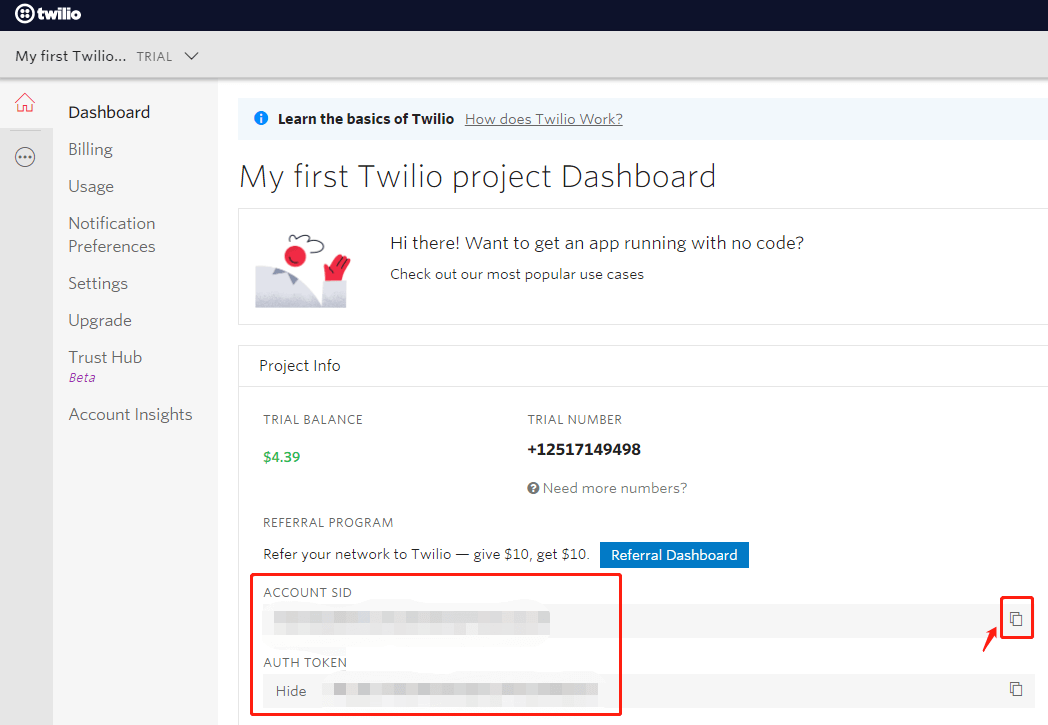
In your provider Dashboard, click the little button on the right side to copy your "ACCOUNT SID" and "AUTH TOKEN" value back to AbsolutChat:
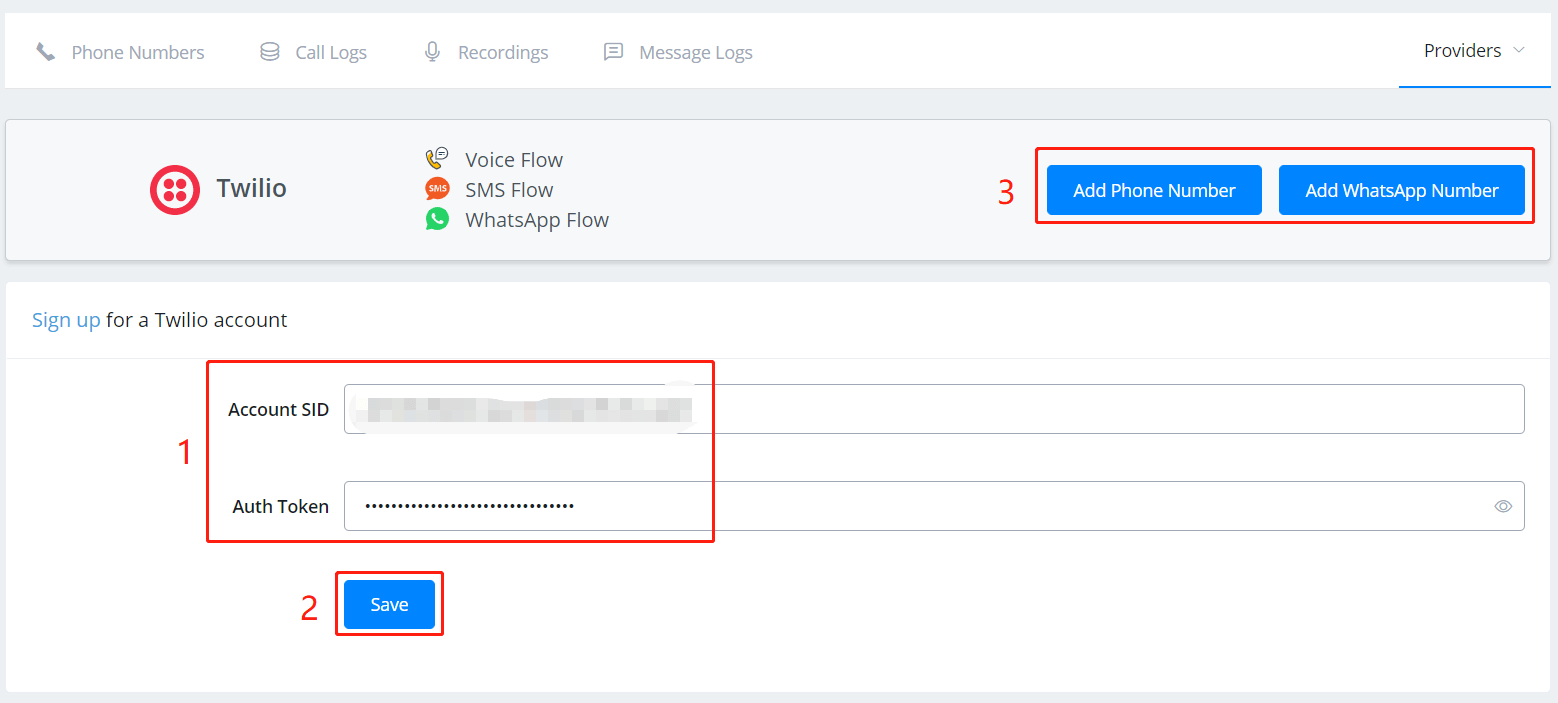
- put your copied values in corresponding fields.
- click "Save".
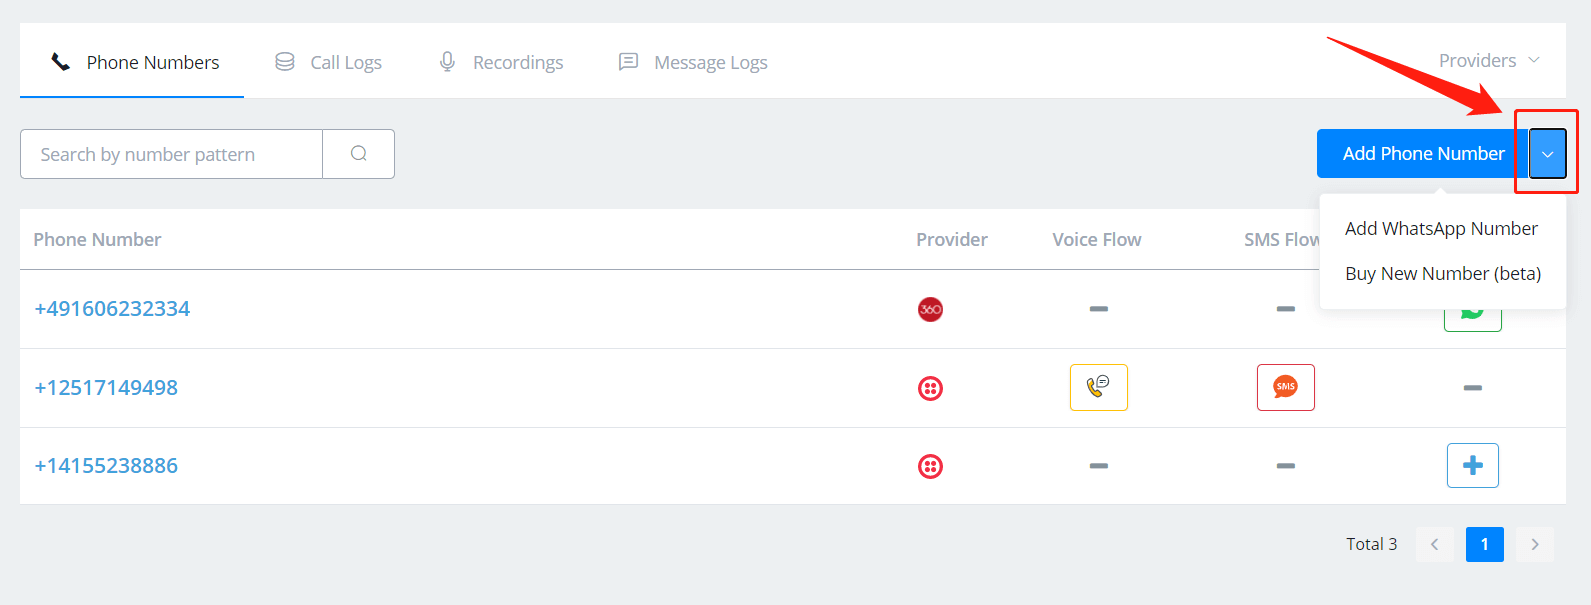
- click "Add Phone Number" if you are building an SMS or Voice bot, otherwise, "Add WhatsApp Number".
- More information click -> Twilio Docs(opens new window)
- More information click -> 360Dialog Docs(opens new window)
WABA prerequisites
Before a business can access the WhatsApp Business API, each client has to go through an approval procedure.
To start using the WhatsApp Business API, you will need the following:
A Facebook Business ID (with a verified Business if possible)
A valid phone number with the ability to receive phone calls or SMS
A referral link (supplied by your Software Partner or 360dialog)
A callback server (typically provided by your Software Partner)
The approval procedure includes the following steps:
1. Facebook Business ID
You need to have a Facebook Business ID before you can proceed to the WhatsApp approval process. To find your Business ID, log into the Facebook Business Manager of the business and navigate to Business Settings. The Business Manager ID is displayed under the business name.
If you don’t have a verified Facebook Business account, you need to create a Facebook Business Manager. To create a Business Manager:
Click Create Account.
Enter a name for your business, your name and work email address and click Next.
Enter your business details and click Submit.
More information about the creation of the Facebook Business Manager you can find here.
2. Message oon Behalf request
After the Facebook Business Manager ID is provided, you will receive a Message on Behalf request. You need to accept it, so 360dialog can send messages on your behalf with your Facebook Business Manager ID.
Please navigate in your Facebook Business Manager Account to Requests > Received to accept the request.
Only the admin of the FBM account can see this request and accepted it .
3. WhatsApp approval procedure / Verify your Business Client account
Start the process of verifying your business in Facebook Business Manager. This procedure helps to protect users from false information. Attention: Once you’ve completed the official form with the legal business details, you won’t be able to change them.
Go to Security Center and click Start Verification. If you haven’t logged in to your Business account, the button will be grayed out.
Enter your business details, click Next and select your business from the list.
Select a phone number and confirm details.
After you received the verification code, click the Submit button.
It can take some time for Facebook to check all the details and approve your Business Verification.
4. Phone number, Display Name & Review Process
After the verification is successful, you will be able to add your phone number and the Display Name for your WhatsApp business profile.
During the WhatsApp approval procedure, the WhatsApp team reviews the client’s request according to the WhatsApp Business Policy. You can check the status in the Facebook Business Manager account.
For more information, please read the official WhatsApp API FAQ.
- More information click -> SignalWire Docs(opens new window)
- More information click -> Message Media Docs(opens new window)
Add Numbers Click "Add Number" in area 3 in the above picture after connecting your provider with AbsolutChat.
Click "Find Number", the system will search all the numbers that are under your provider account. Click "Add" to add one of the numbers.
Thereafter, you are able to see all your connected numbers under the "Phone Numbers" page in "Integration".

Add new numbers from the drop-down list as below: ("Buy Number" is disabled at the moment)
tip
If you would like to disconnect the WhatsApp / Voice / SMS flow with your number, or create a new flow for that number, copy the number and click "Release Number". Then your flow will be disconnected but stay safe in your "All Bots". Add the number again to create a new flow with it.
After adding phone numbers:
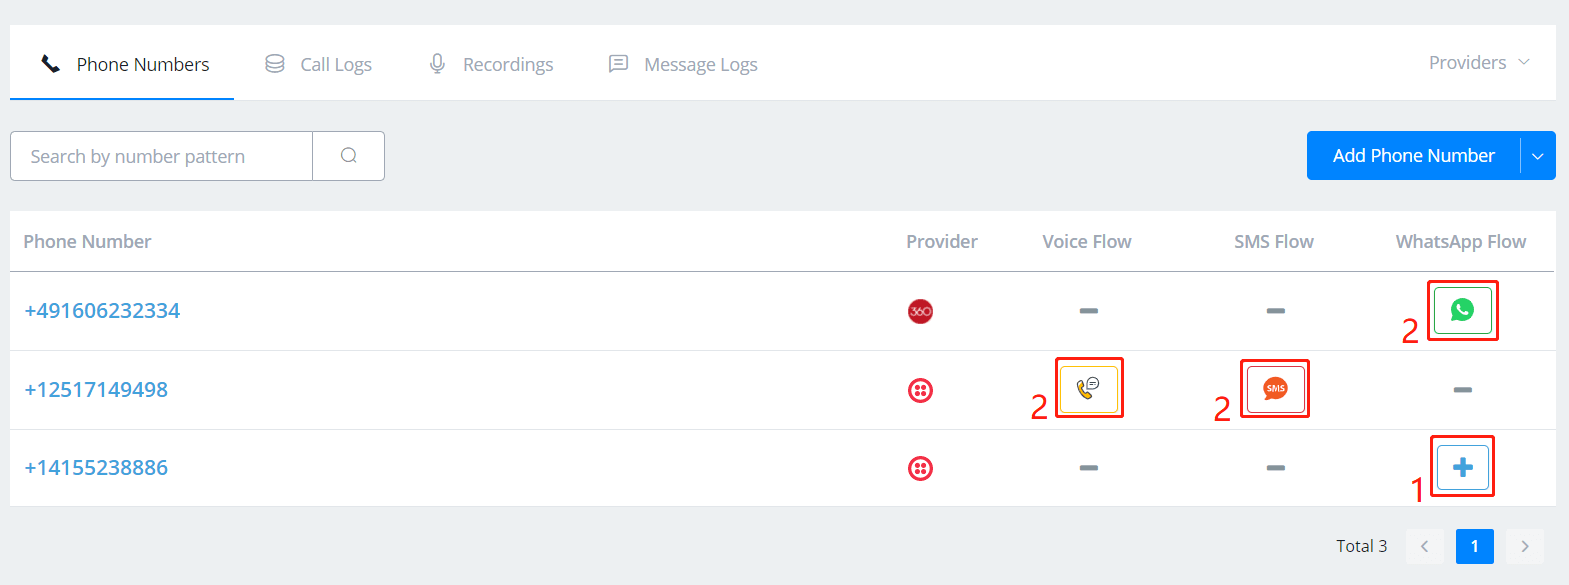
- use the plus button to create new a flow.
- button 2 is for "Open Flow" of this phone number.
Talk to the Bot
- WhatsApp - add the phone number as a new contact and send messages to it
- Voice - call the phone number
- SMS - send SMS messages to the phone number
WhatsApp + 360Dialog Sandbox
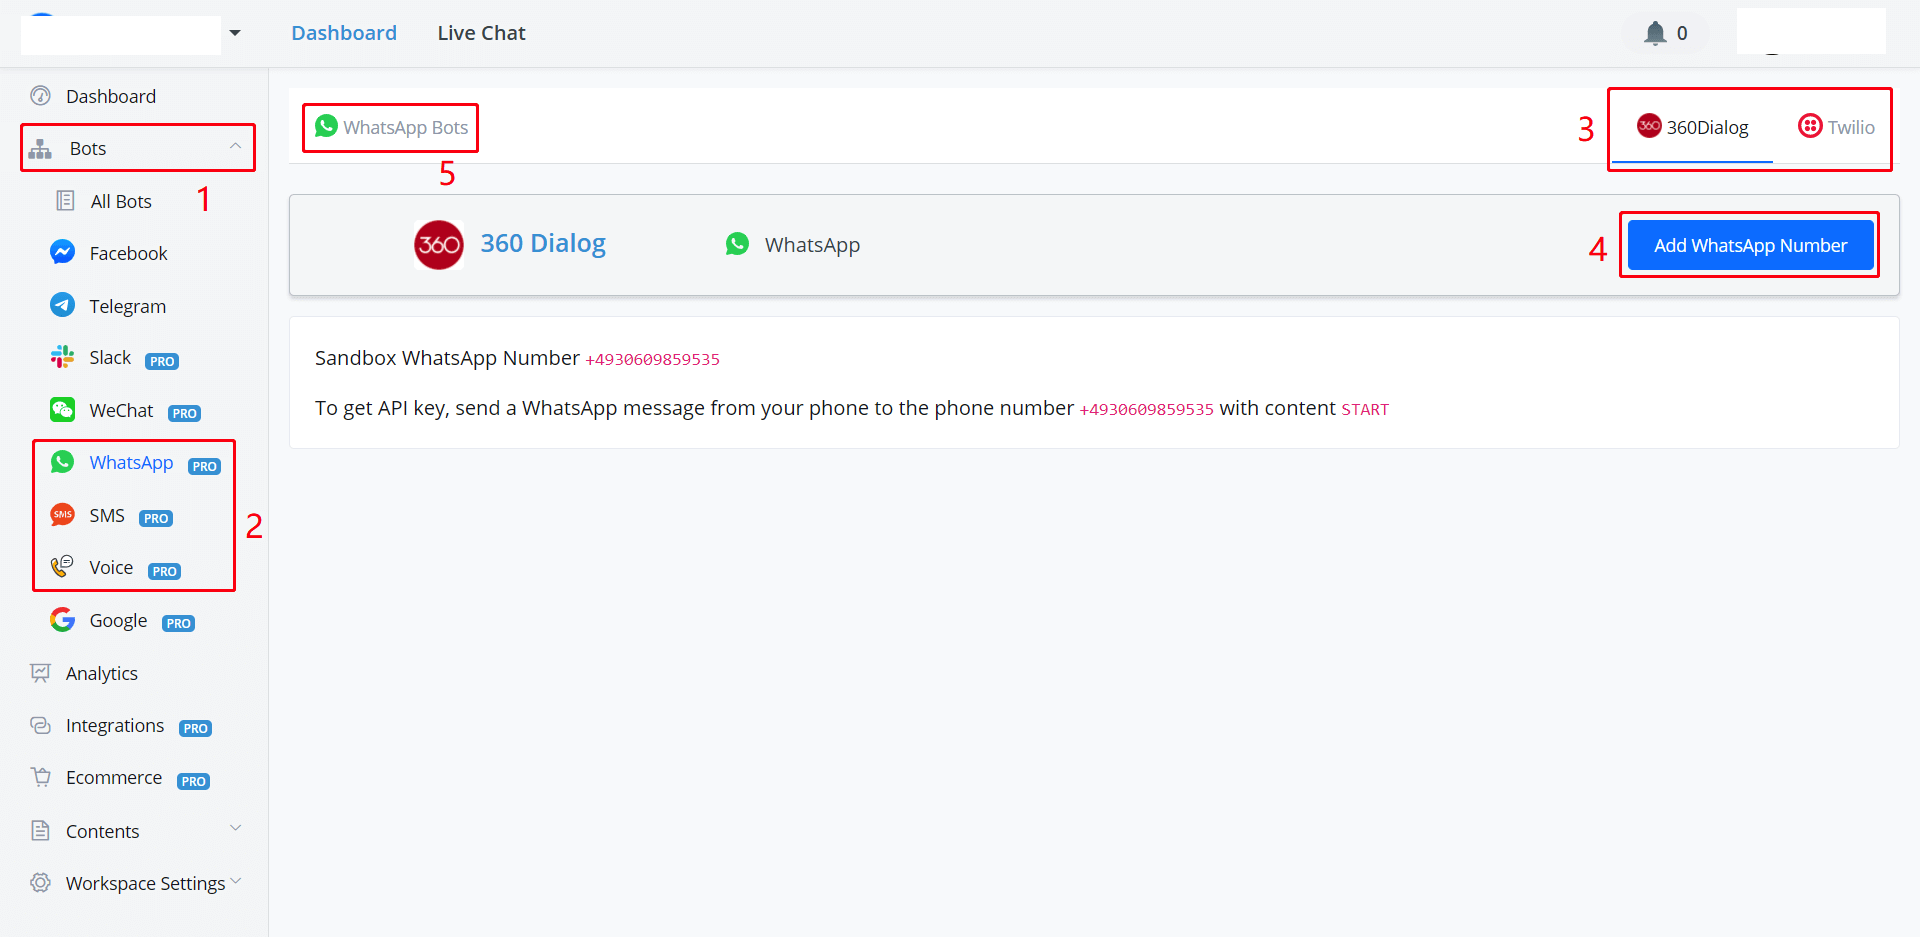
Go "Bots" -> "WhatsApp" then "360Dialog" on AbsolutChat and in your WhatsApp App, add "+4930609859535" as a new contact and sent "START" to it.
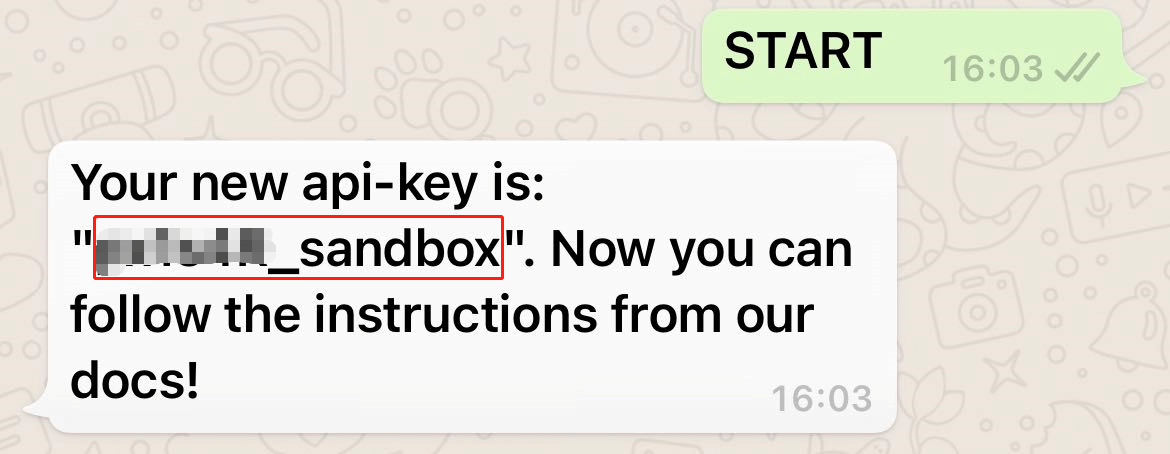
Copy the "api-key" back to AbsolutChat, click "Add WhatsApp Number":
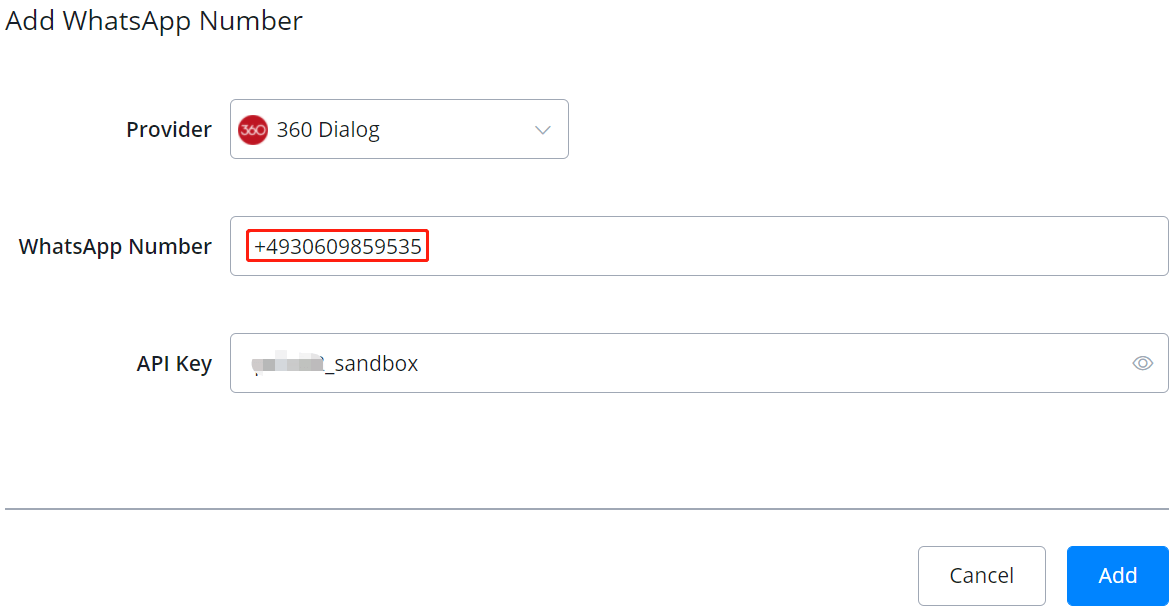
Again put the number "+4930609859535" here and paste the API key. After adding this number you can click the "Create Bot" to start building a flow.
To use 360Dialog sandbox, please note that:
only the phone number which requests the API key can test the bot
you can send "START" to get a new code, but make sure you update the key with your bot.
360Dialog doesn't allow sandbox users to access their media recourses. For example, if you use a question step to ask for a photo and store the URL in a text variable. You are unable to visit this URL to get the photo because you are using a sandbox.
Google My Business
The whole process will be:
connect Google account
create agent, build flow & test
verify agent
launch chatbot
go live
Connect Google Account
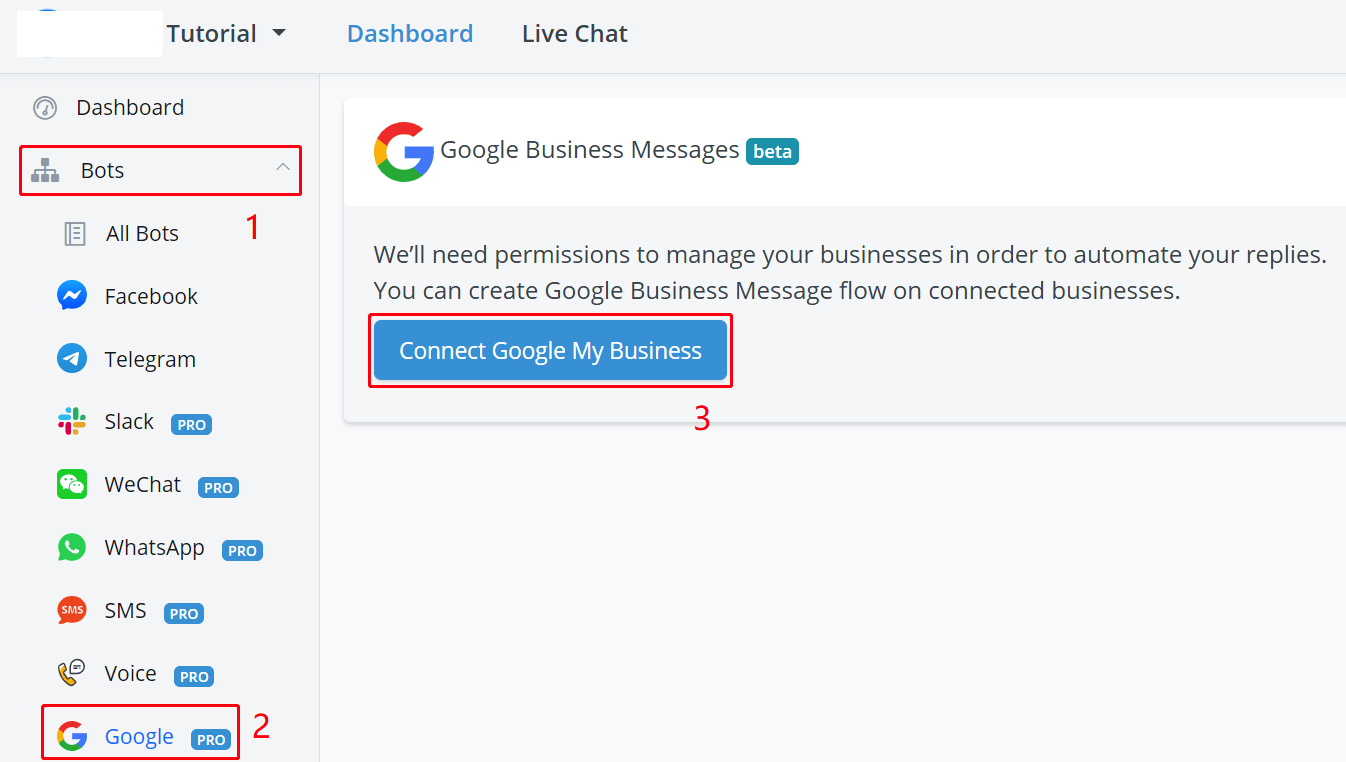
Follow steps 1, 2 and 3 to connect to your Google account.
NotePlease note that this Google account must have access to the business (either owner or manager). For agency, you will need to be invited to be the manager of your client's business.

After the connection, in the above screenshot:
click "Sync Locations" to pull all the businesses that associate with this Google account, whether they are verified or not.
create agent then create flow
scan the QR code or visit the URL link to test the bot in Google Map
Create Agent
Click "Create Agent", fill in the profile information including:
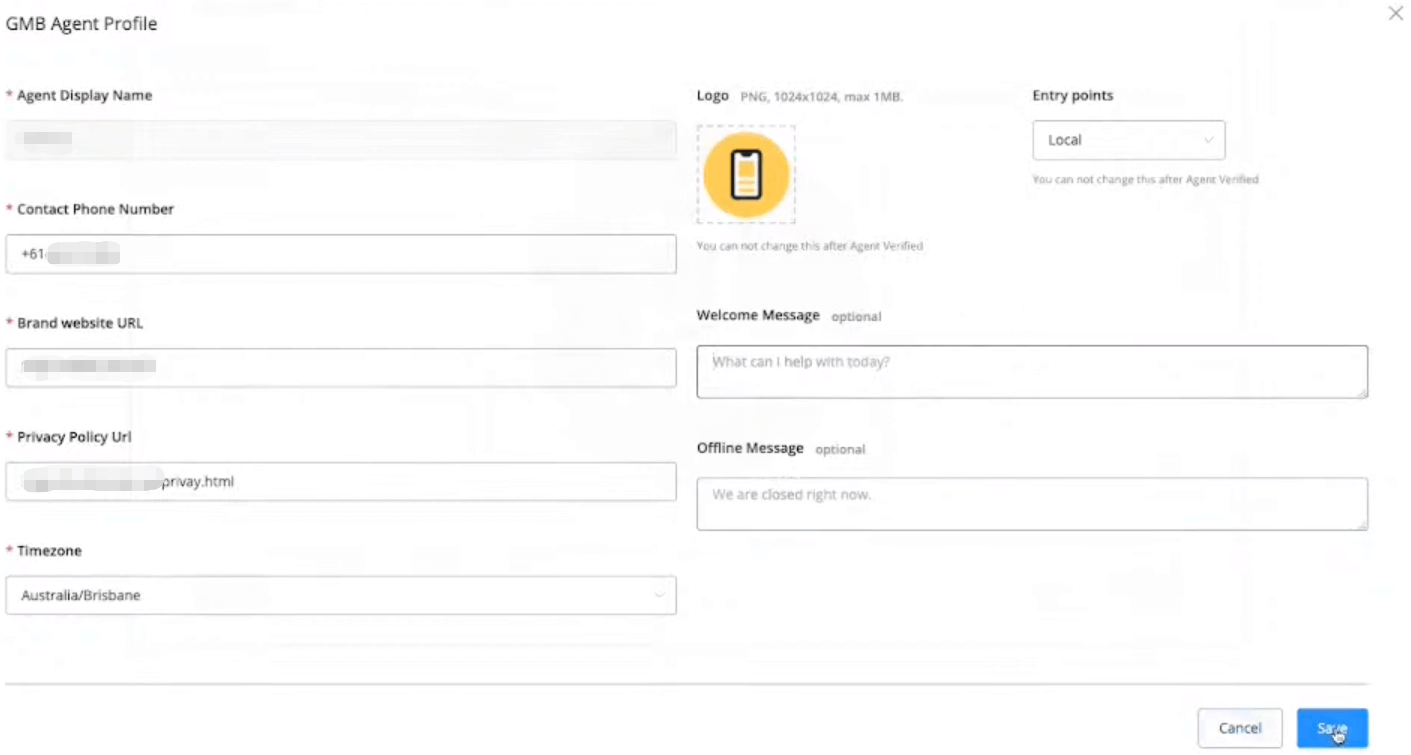
phone number
website address (same as your business website address)
privacy policy URL
timezone
logo
entry points (local, non-local, both local and non-local)
welcome message
offline message
tip
If you get an error saying that fails to create an agent because the location is not verified, try to click cancel and refresh the page. The "Create Flow" button will show.
Local or Non-Local
| Type | Agent Verification Process | Entry Points |
|---|---|---|
| Local | Automatically | Google search & Google Map |
| Non-Local | Manual Process | Google search, Google map, site links, answer card, website buttons etc |
Chat button on Google search example:
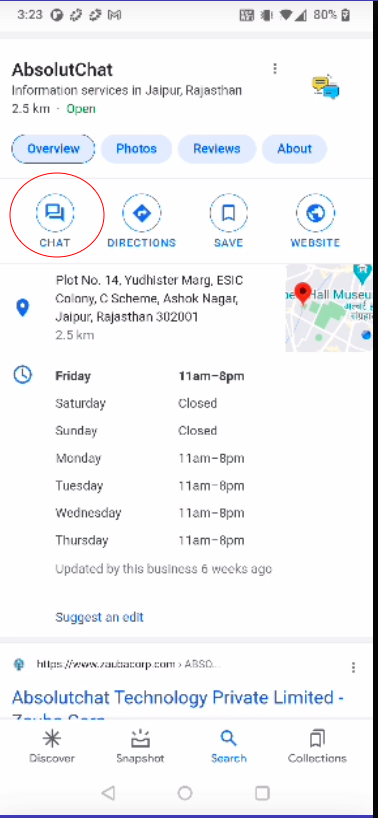
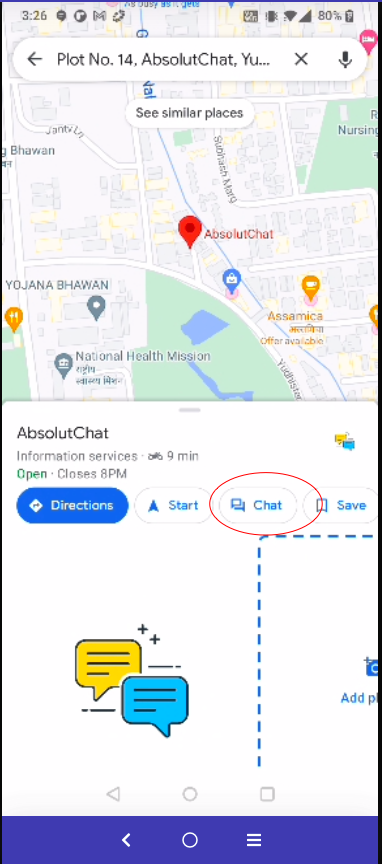
Chat button on Google map example:
Build Flow & Test the Bot
When your agent is created, click "Create Flow" to start building your bot. Check "Flow Builder" documentation for how-tos.
Verify Agent
IMPORTANT
Build and test everything before you request an agent verification. Because once verified, it's very difficult to change the agent information. You will need to contact Google yourself.
Before you send the request, check this:
Did I choose what suit my business best, local or non-local?
Am I happy with all agent information like logo, contact phone, etc?
Do I have a contact email that shares the same domain as my website?
Click the button next to the "Open Flow" button, then click "Verify Agent".
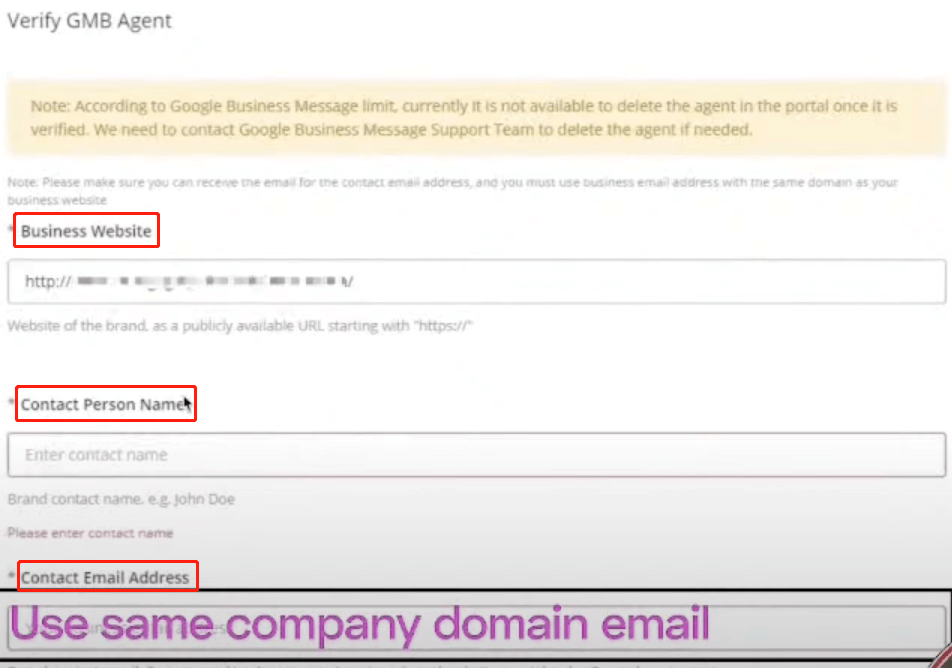
Provide a business website, contact person name and a contact email that share the same domain as the brand website. For a local business, if your business is already a verified business, your agent can be verified automatically and immediately. You will see the green "Verified" label. Thereafter, you can launch your chatbot.
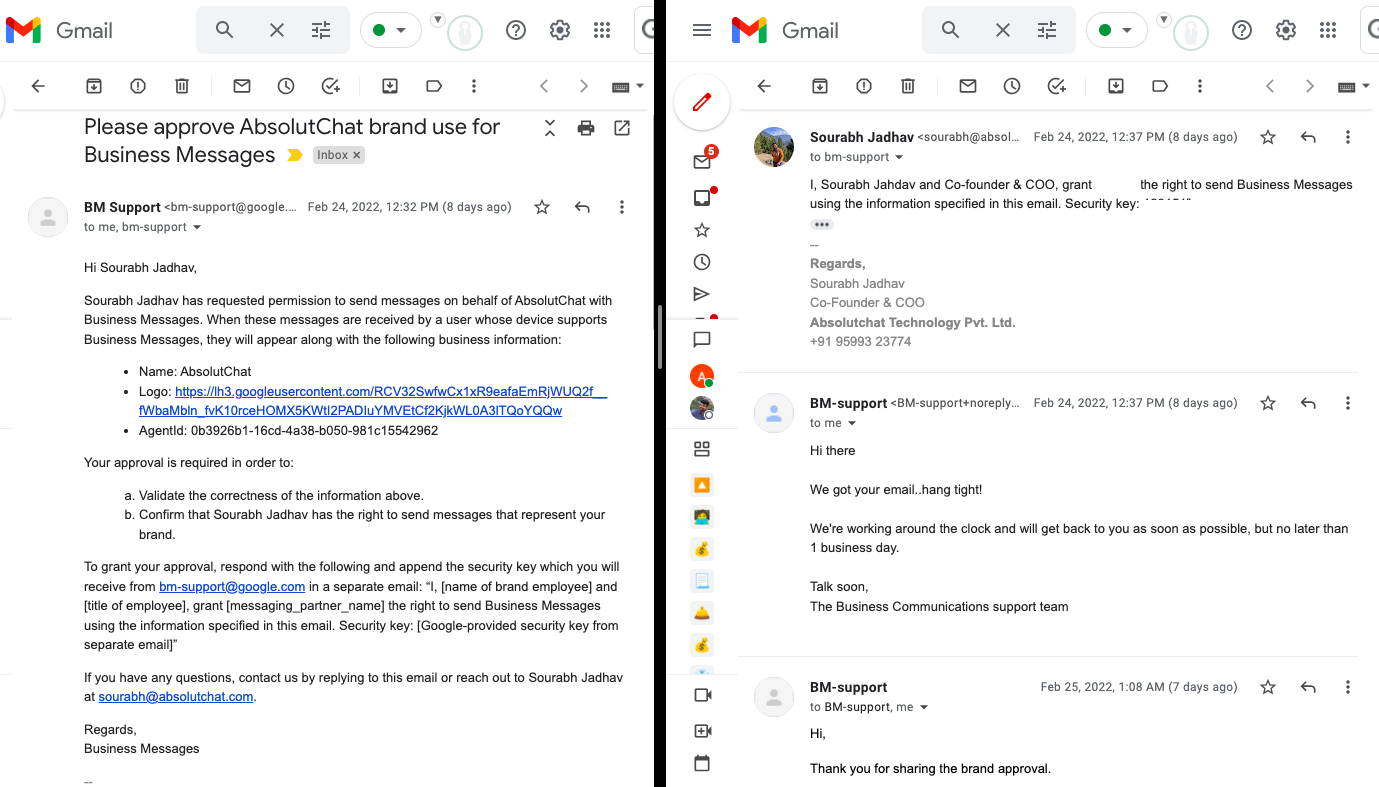
While for a non-local business, after submitting the request, you will receive 2 emails from Google. One email asks you to reply for approving AbsolutChat to help with the bot automation in a specified format (security key needed). Another email will give you the security key. It will take you a few days (up to 7 days) to get your agent verified.
Launch Agent
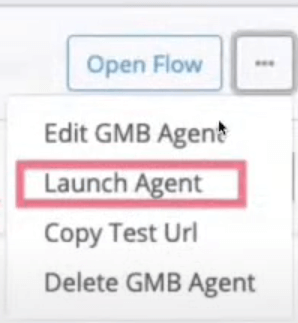
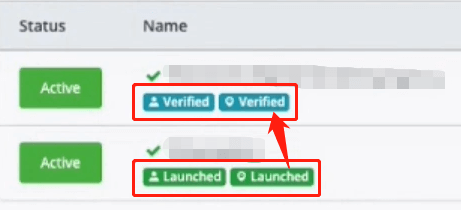
When your agent gets verified, click "Launch Agent" and a chat button will show with your business after 4-6 hours. You will see the green "Launched" label.
Unlaunch Agent
If you wanted to stop the bot automation, click the green "Active" button under status. And to stop showing the bot with your business, you need to unlaunch your agent.
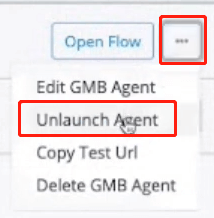
Click "Unlaunch Agent" and again, you will need to wait for 4-6 hours to see the "Chat" button disappear. By then the labels will look like this:
To launch it again, just click on "Launch Agent" again.