Integrations
AbsolutChat has integrated with various third-party applications that you are familiar with, including:
| Application | What services do they offer |
|---|---|
 | Accept payments |
| manage customers/products/discount | |
| book appointment | |
| send notification | |
| task automation | |
| task automation | |
| task automation | |
| train your bot to understand more human language | |
| manage user data | |
| manage user data | |
| send emails | |
| send emails | |
| send emails | |
| customer relationship management | |
| customer relationship management | |
| serve your users by video/call | |
       |
Wonder how to utilize these applications in your flow? Check detailed Guides for each integration.
Shopify
With Shopify, your bot can show and gather information during conversations, including customers, products, discounts and shop details.
Setup Shopify

By following the above 4 steps, jumping to Shopify's website and logging in yourself, you can easily connect your Shopify account to AbsolutChat.
After connection, you will then be able to use Shopify in your Action step. As follows are the functions you can utilize. Descriptions for each field will be put on corresponding photos.
tip
The functions work via API calls. This means that, by giving some inputs, you get your outputs from the servers. The outputs are saved in custom fields for future uses.
Warning
You might need to know how to build flow and use variables before you read the following functions. See links below for guidance.
JSON Operation
Use Shopify in Action Step
#Search for Customers
#Get Customer Info
#Get Customer Orders
#Get Customer Abandoned Checkout
#Search for products
#Get Product Info
#Get Product Images
#Get Product Variants
#Search for Custom Collections
#Search for Smart Collections
#Get Collection Info
#Get Collection Products
#Get Shop Info
#Lookup Discount Code
#Create Discount Code
In Progress
text tutorial about this page is in progress. Sorry for any inconvenience.
Slack
With Slack, your bots can send various types of messages to your Slack group or contacts, mainly for notification purpose for now. However, we are working on building Slack flow. So there will be more functions with Slack shortly.
Setup Slack
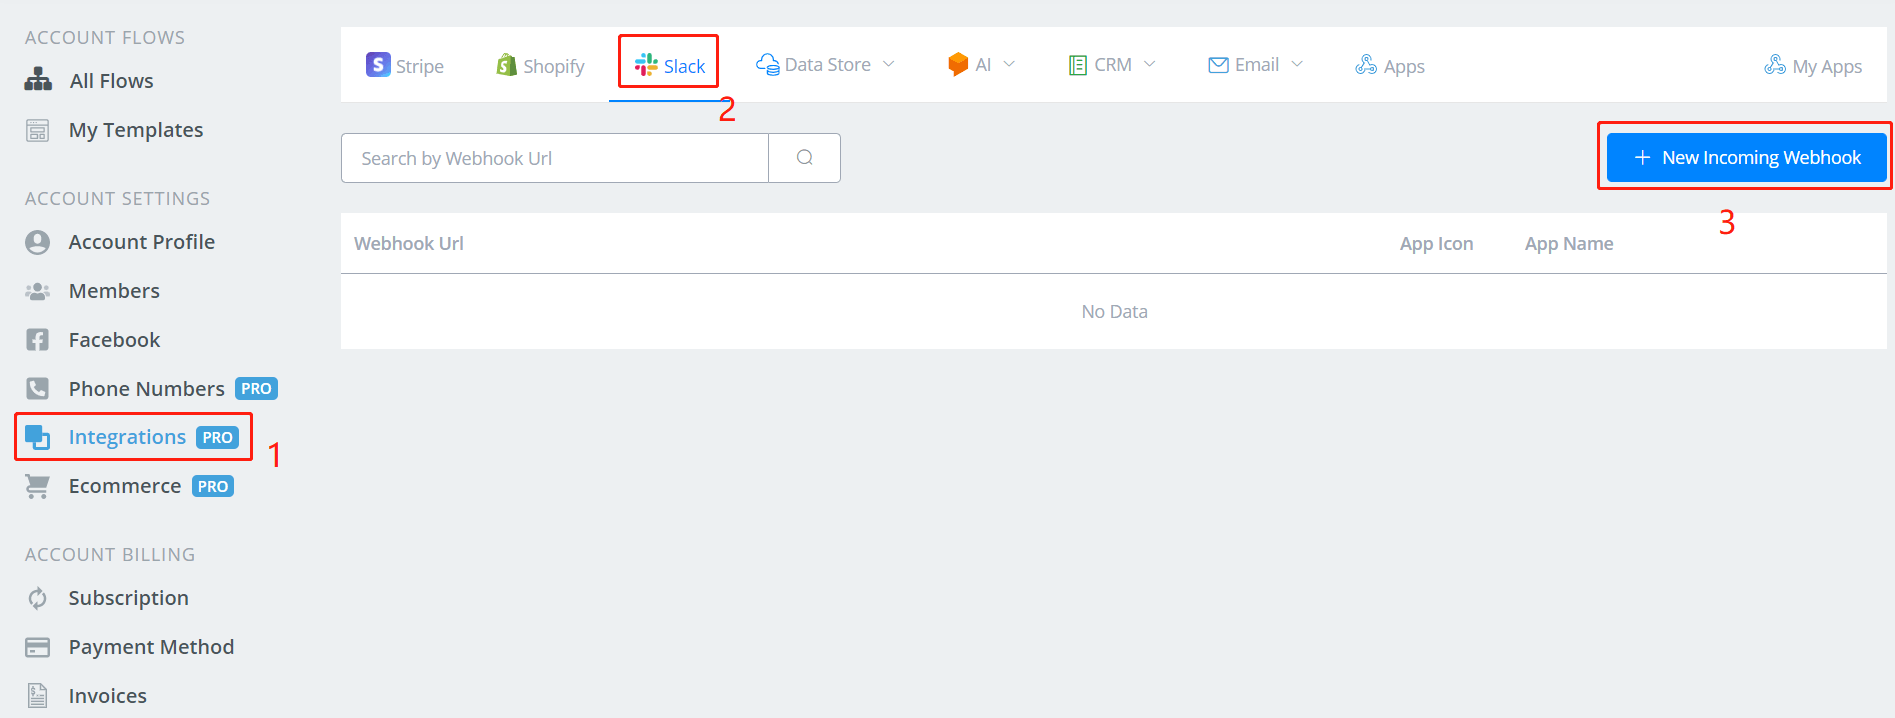
To send out notifications to your Slack group or personal channel, you will need incoming webhooks first. Follow step 1, 2, 3 above and a window will pop up:

There are 2 ways to get an incoming webhook URL:
- from Slack Incoming Webhooks App
- from your own Slack App
Get an Incoming Webhook URL from Slack Incoming Webhooks App
Visit Incoming WebHooks, login yourself, then:
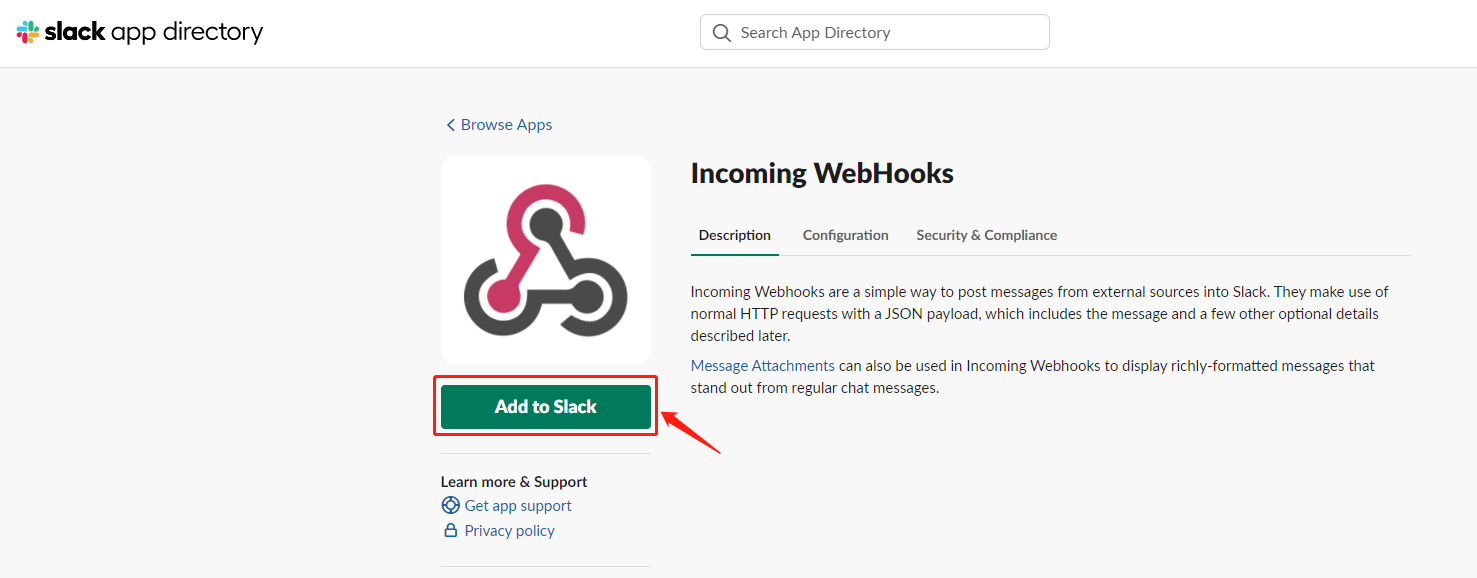
Click "Add to Slack".
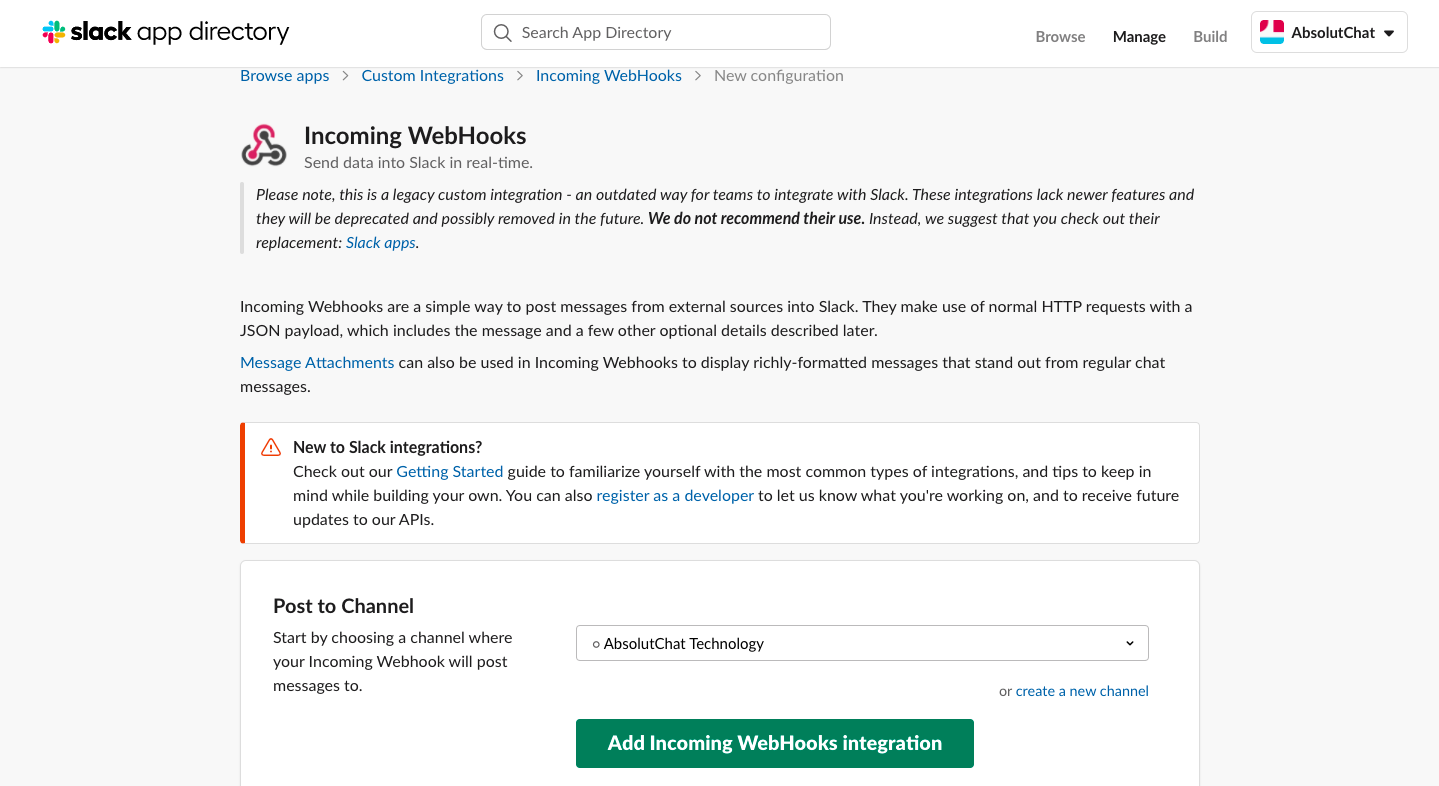
Pick a channel you would like your bot to send notifications to, then click "Add".
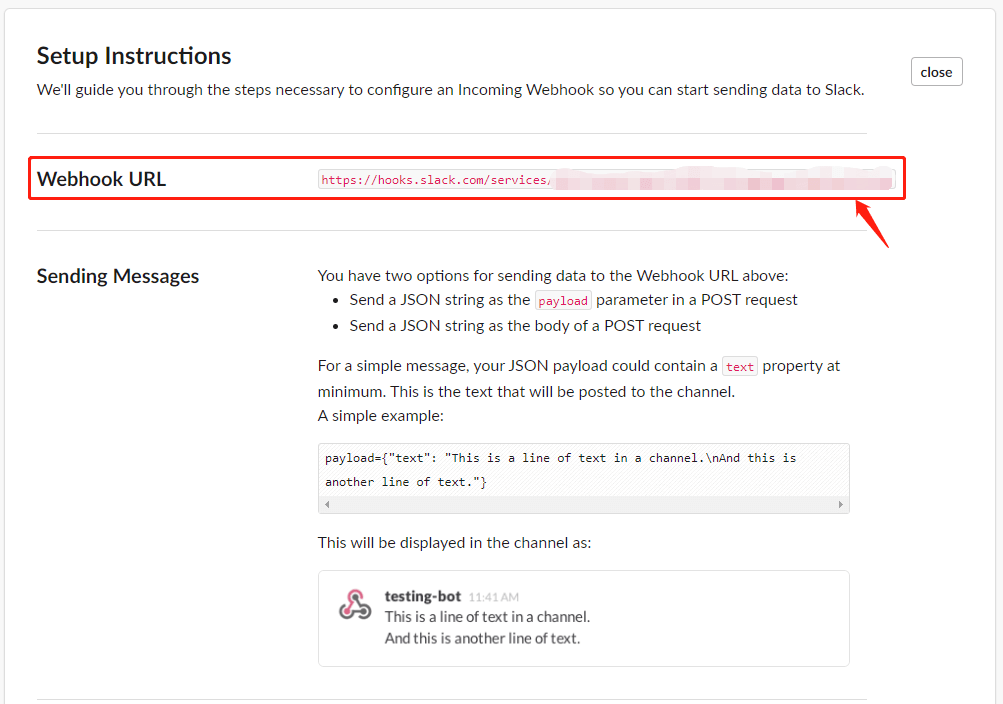
Ta-da! Here you are the URL.
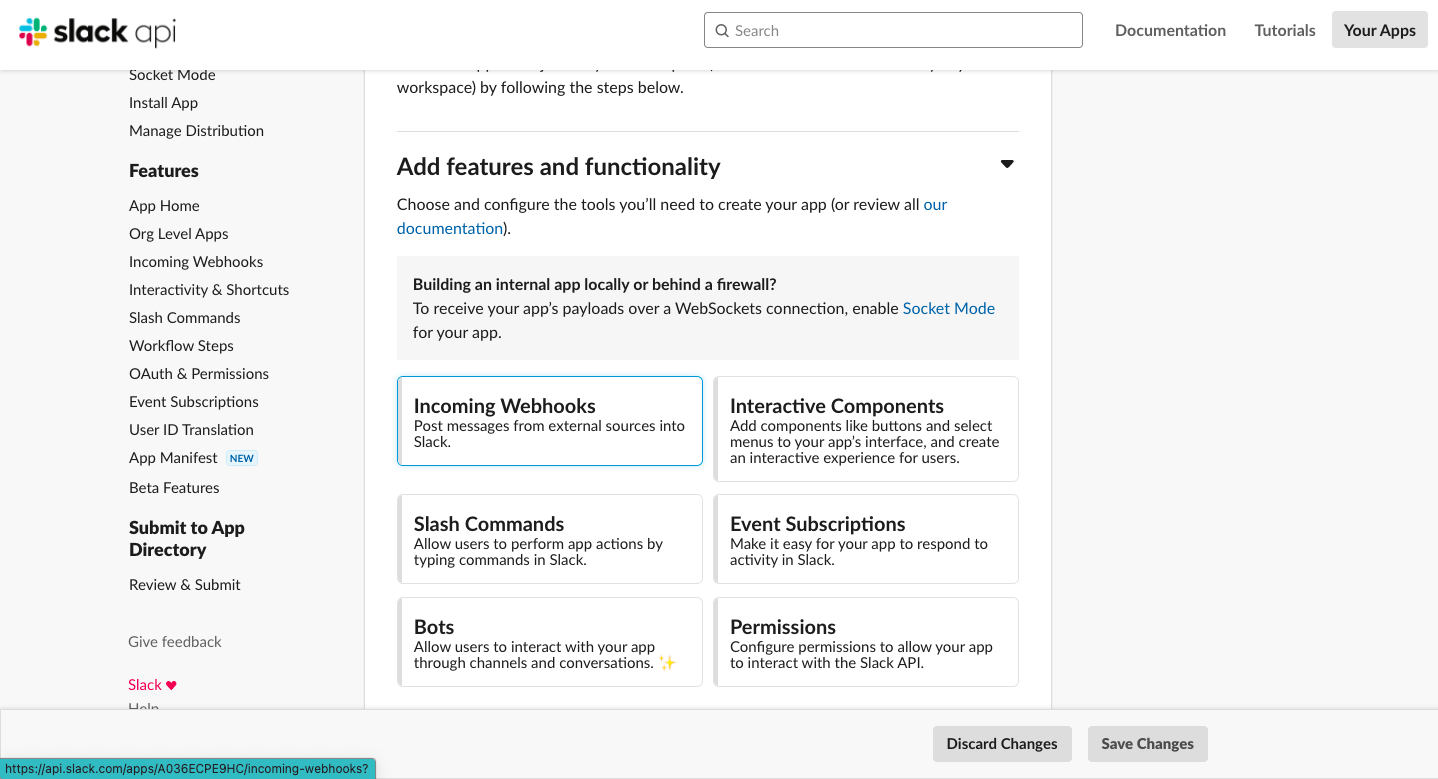
Get an Incoming Webhook URL from Your Own Slack App
A wave of buttons is coming, click on them one by one:
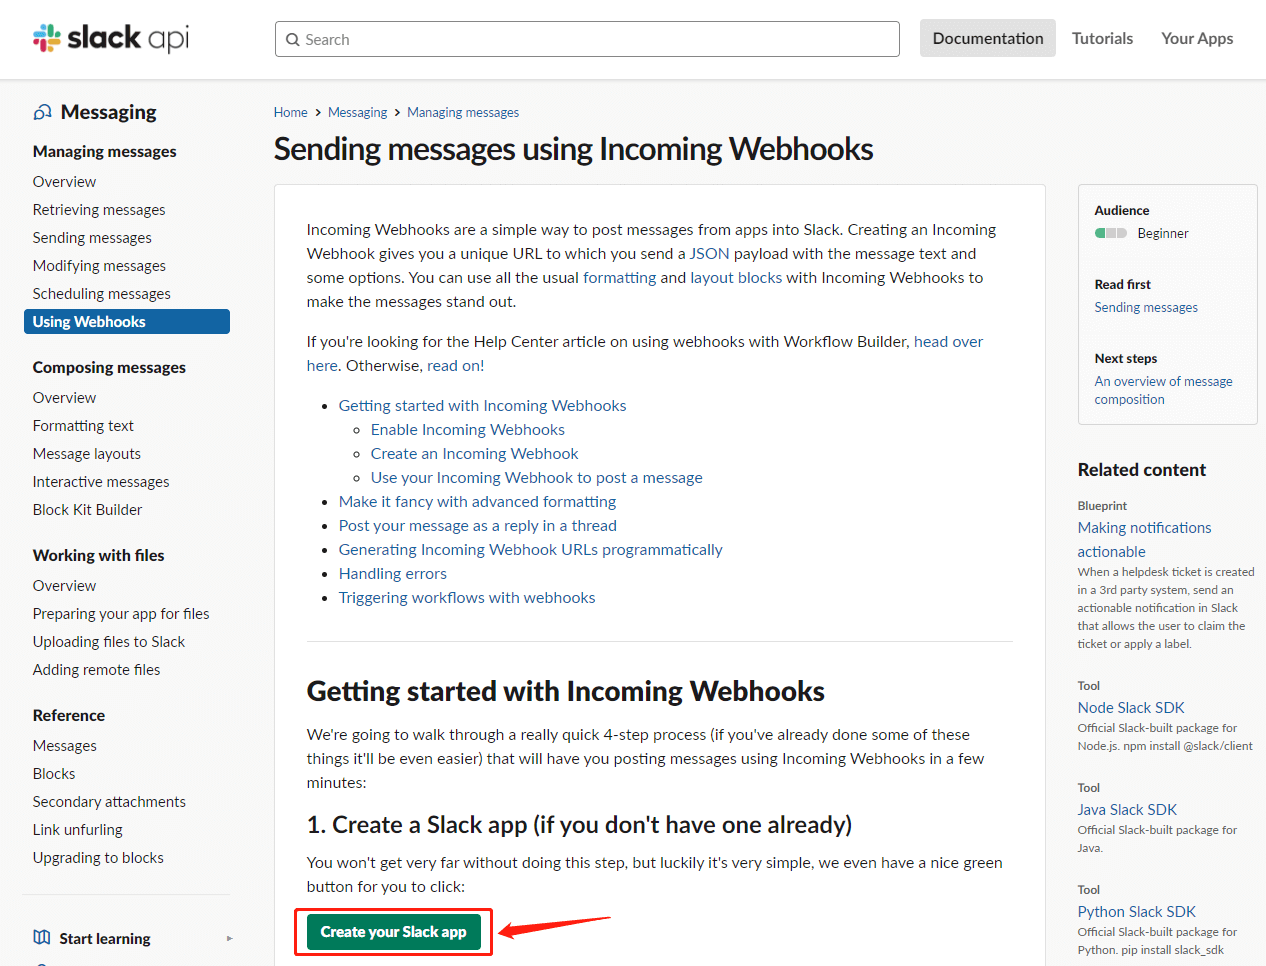

Give an App name.
Select your workspace.
"Create App"
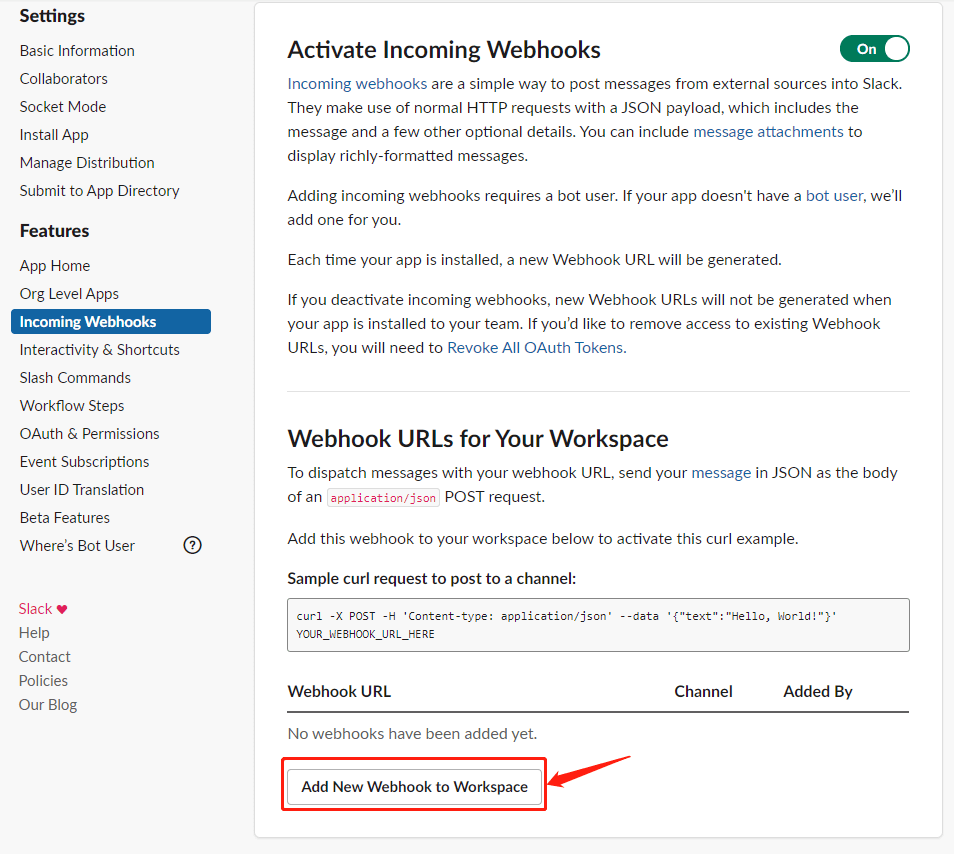

select a channel
"Allow"
Finally, you see your URL!
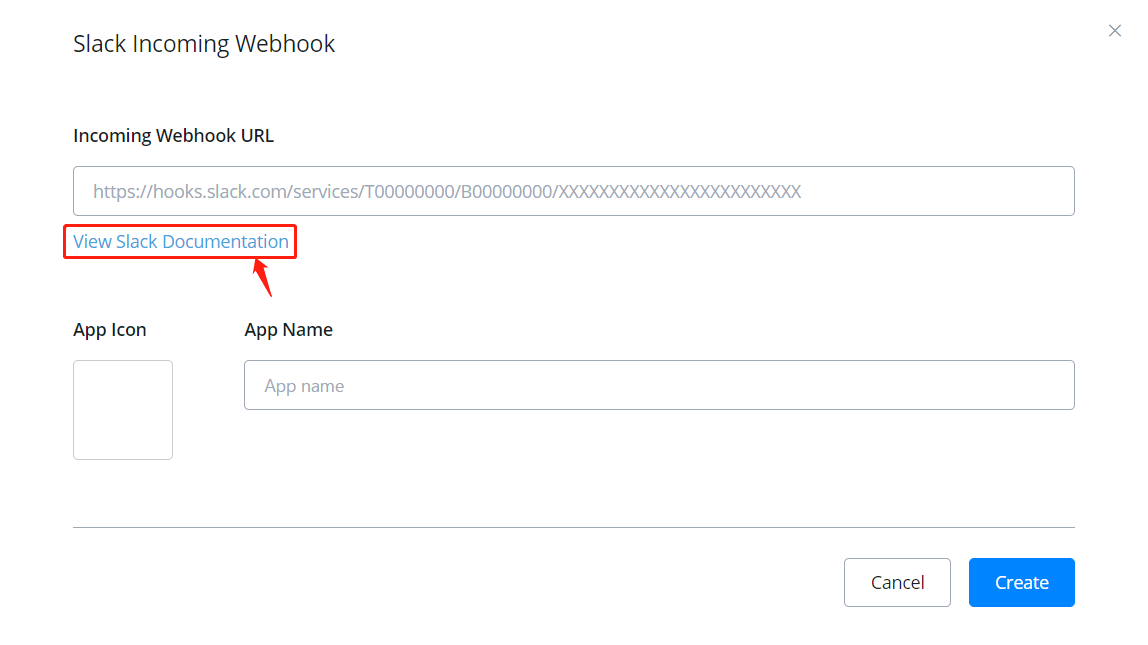
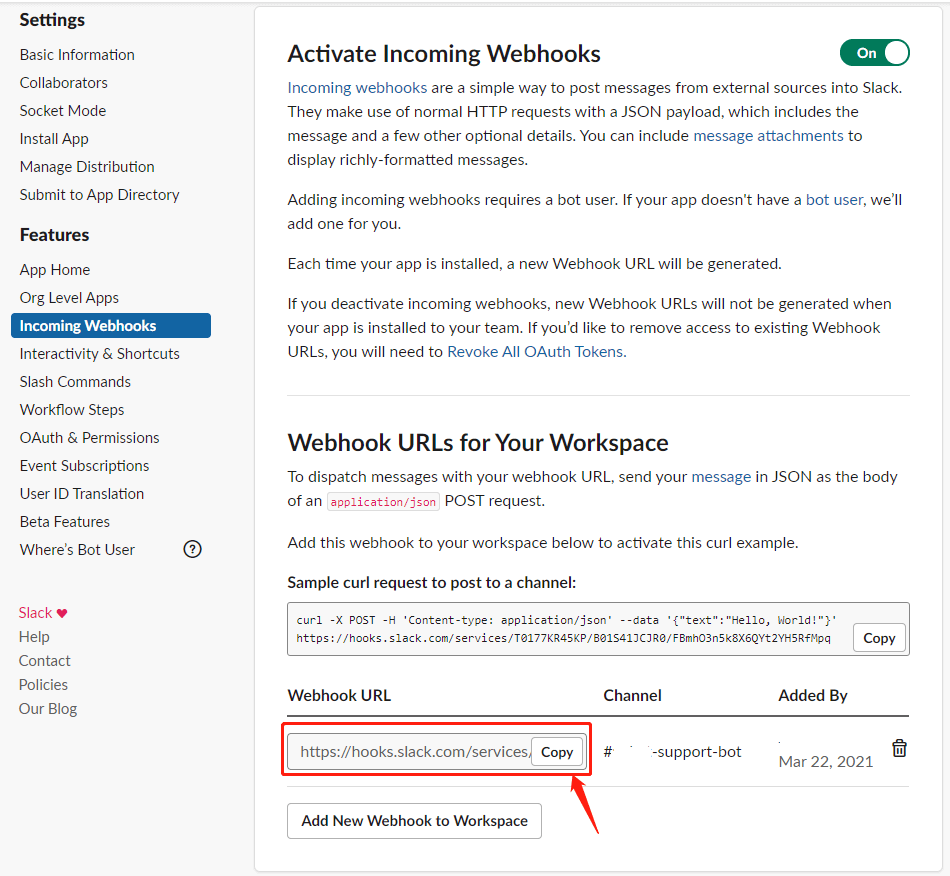
Add Incoming Webhook
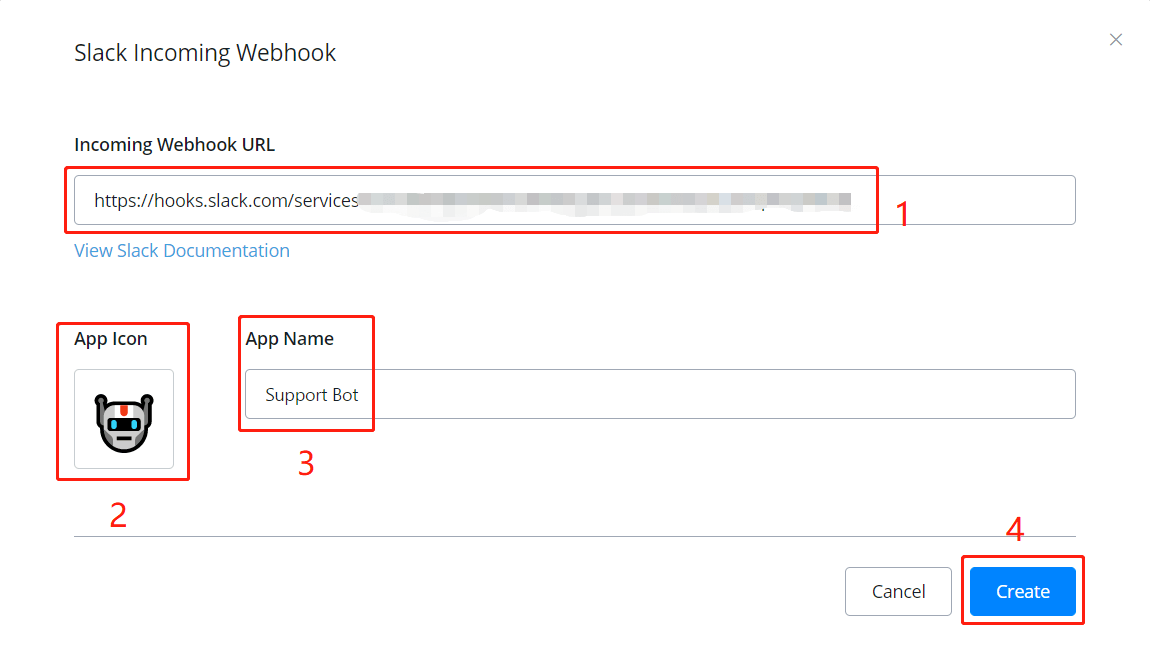
paste the URL you got in either the first way or the second above.
pick a lovely icon.
name it.
and click "Create".
All done! This is how it looks like:

Send Slack Notification
A common usage for slack integration is to send slack notification. For example, to back up your bot, set a "Talk to Human" button. And when user press it, send a slack notification to a support channel or a support staff. Check how to send slack notification.
Data Store
Data Store is a built-in data storage system provided by AbsolutChat. With Data Store, you can easily add, delete, update, check up your data either manually or in Action steps.
Setup Data Store
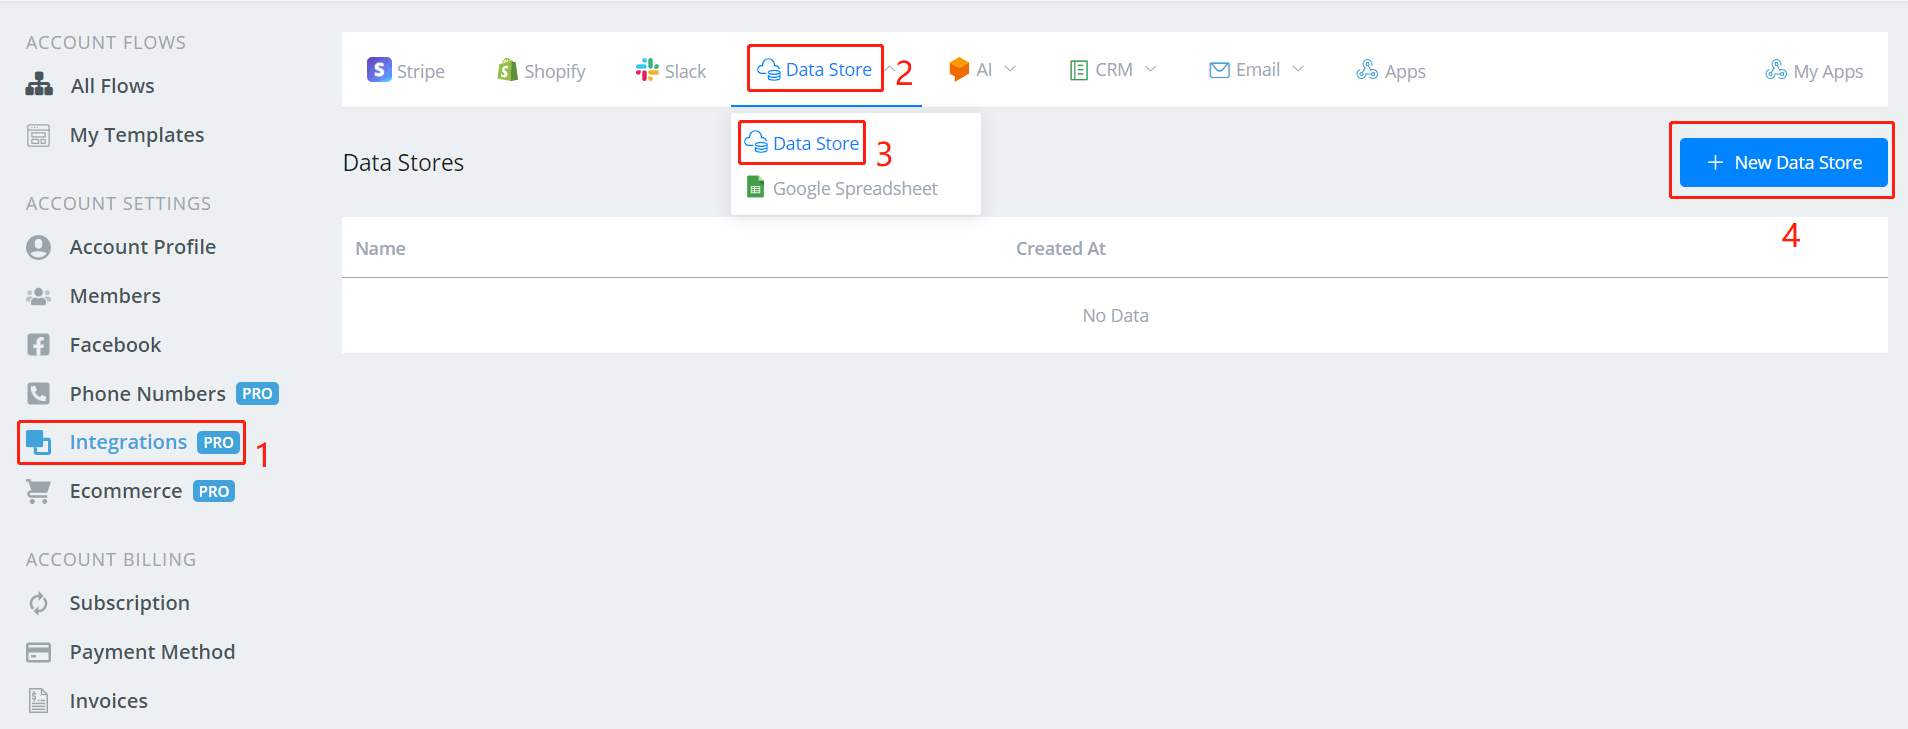
On your Dashboard, click 1 to 4 to add a new data store.
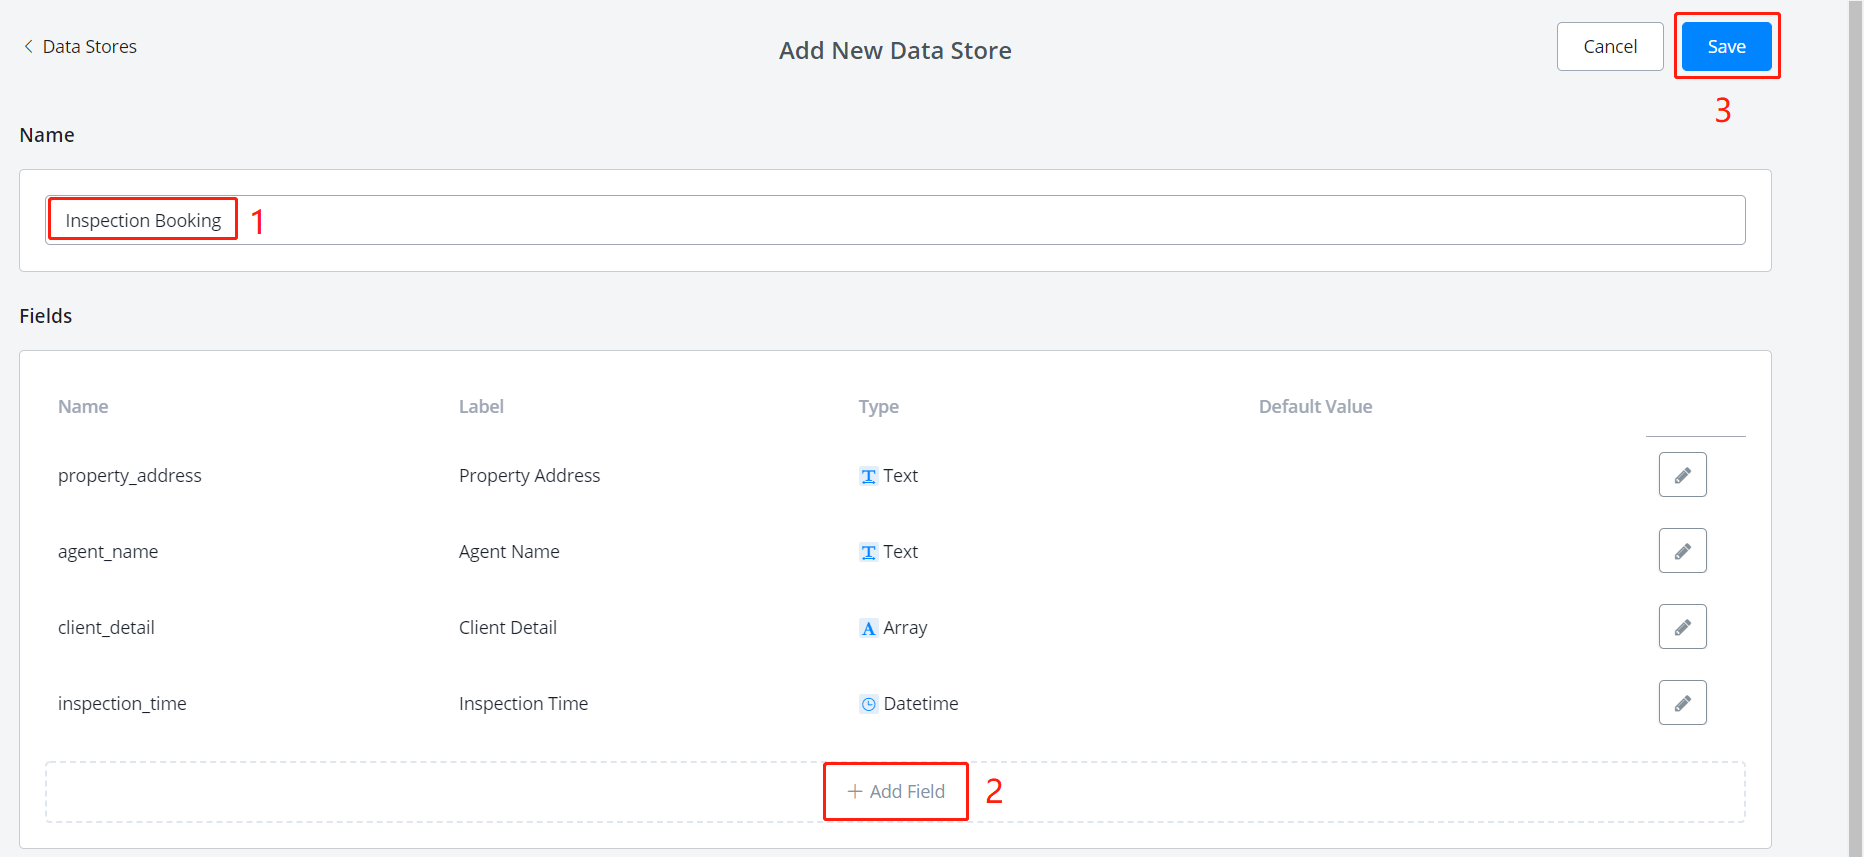
- name the Data Store
- click "+ Add Field", the following window will pop up.
- when finished, click "Save".
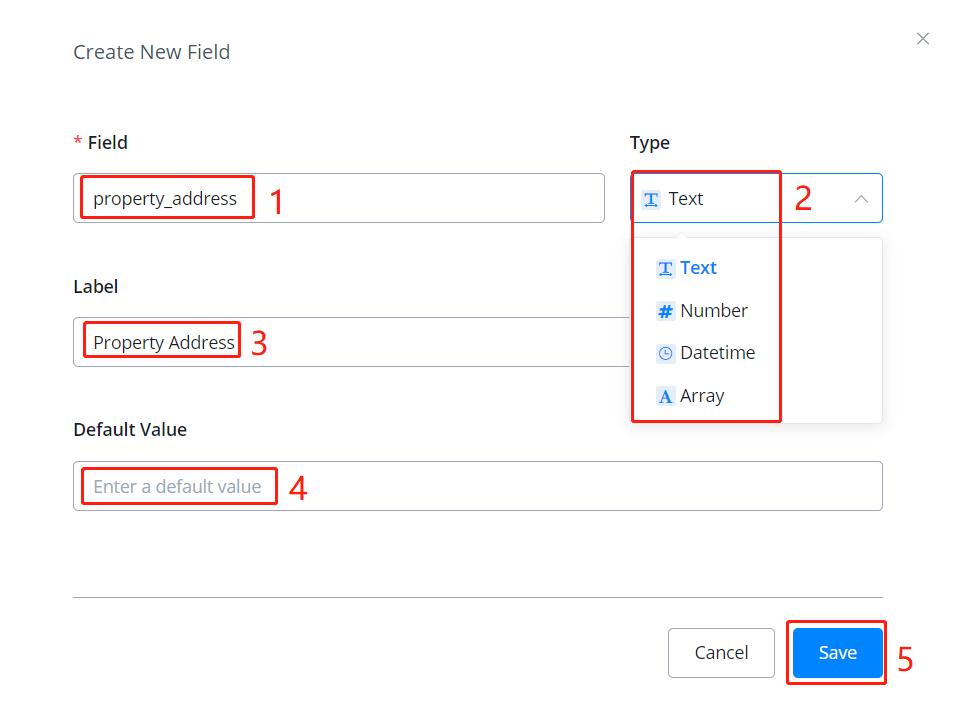
name the field (used in the system, no space allowed)
choose a value type (an Array can have several values like JSON variable)
give a label if needed (for prettier display)
give a default value if needed
once finish, "Save"
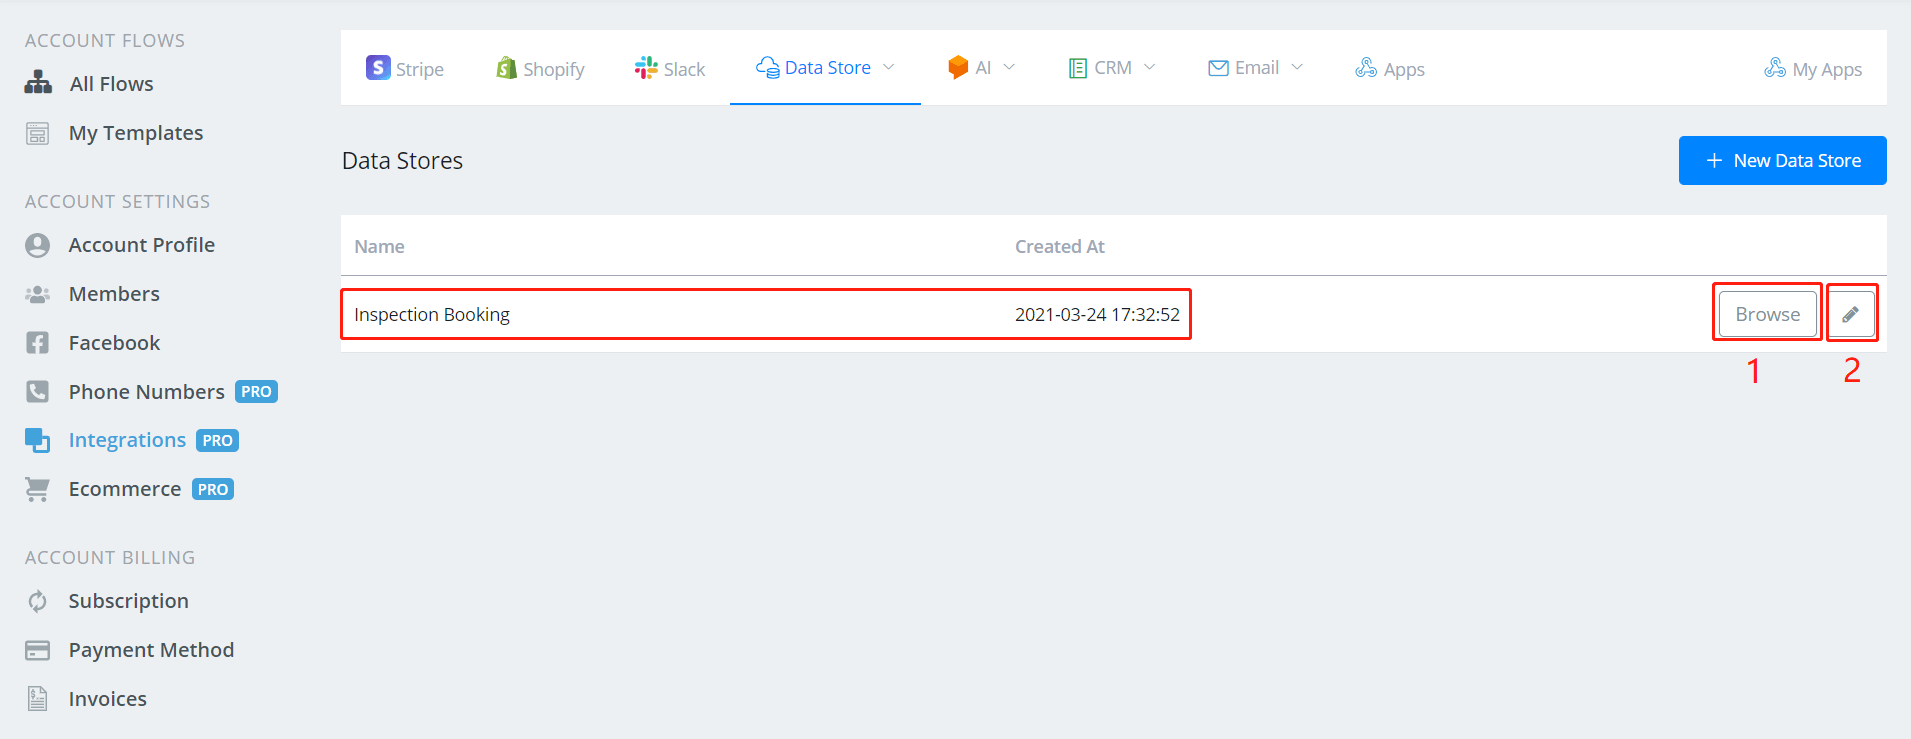
click "Browse" for viewing and editing records
click the pencil for editing fields of Data Store
You can add/edit/delete records in the data store in 2 ways:
- do it manually in the "Browse" window in the following picture
- Nput it in the Action step and the flow will automate the process
Please note that
When you add a new record, the system will assign a unique "Record Id" to it automatically. You can access this value by using the field name "_id".
Manage Records Manually
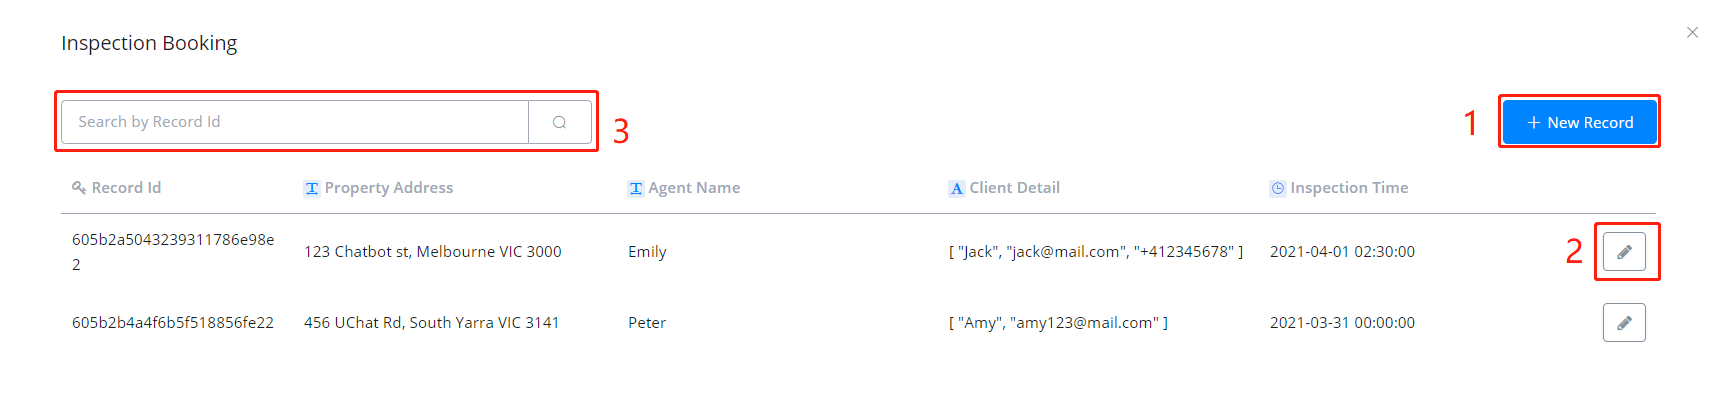
- add new records, see picture below
- edit/delete records
- search records
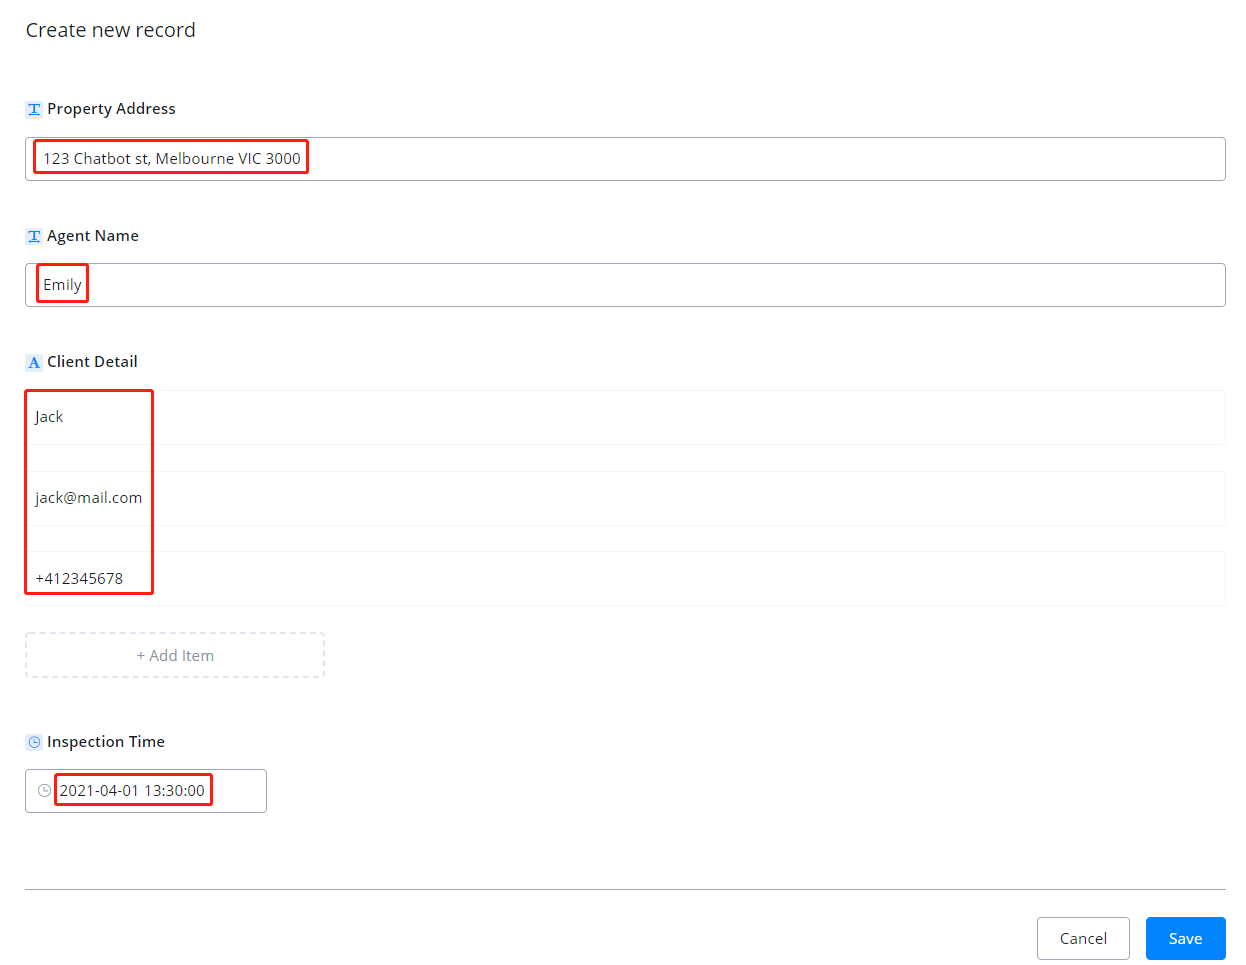
A new record requires values for the fields you set in the data store (value can be blank). There will be a "Delete" button in the editing window, and the rest look the same as above.
Manage Records in Action Step
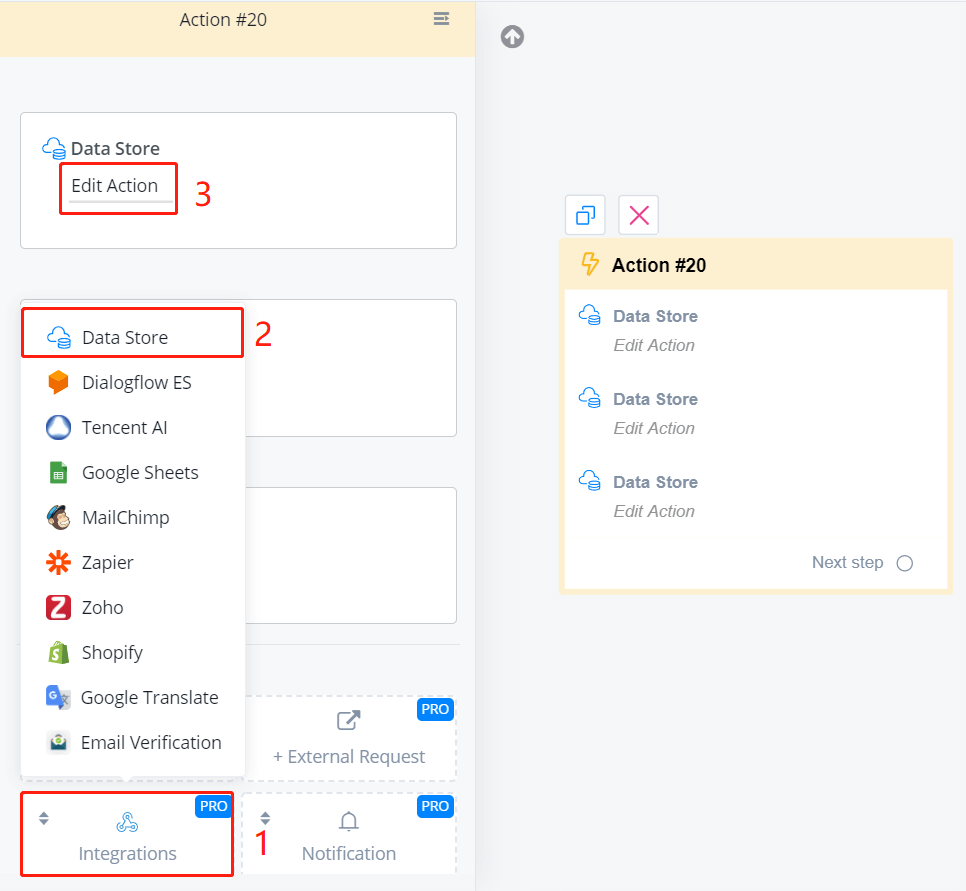
In an Action step, follow steps 1 to 3 in the above picture. Then you will see a list of functions.
tip
The functions work via API calls. This means that, by giving some inputs, you get your outputs from the data store. The outputs are saved in custom fields for future uses.
Warning
You might need to know how to build flow and use variables before you read the following functions. See links below for guidance.
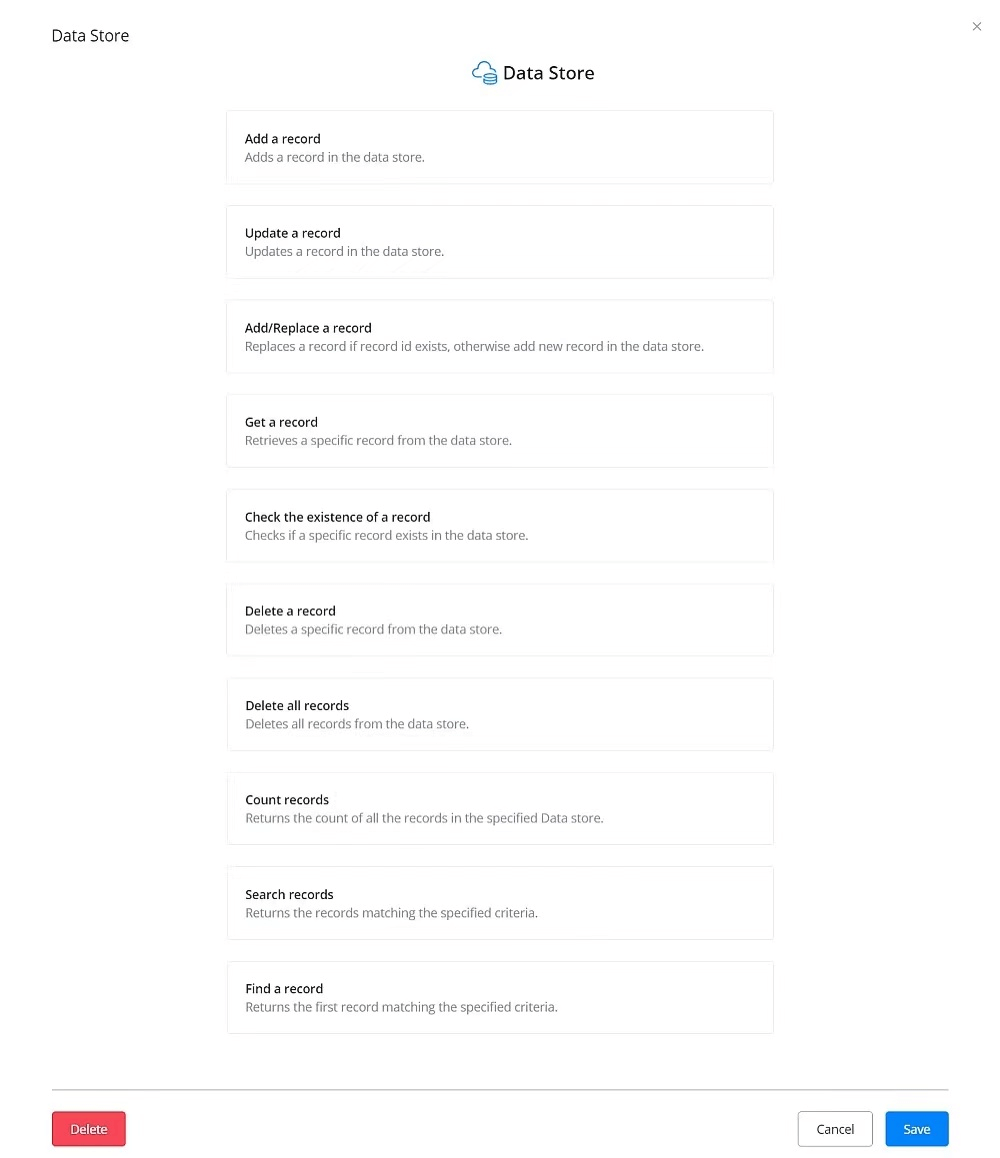
Add a Record
Update a Record
Add/Replace a Record
Get a Record
Check the Existence of a Record
Delete a Record
Delete All Records
Count Records
Search Records
Find a Record
In progress
text tutorial about this page is in progress. Sorry for any inconvenience.
Google Spreadsheet
With Google Spreadsheet, you can add, update and look up your data in a spreadsheet as well as process the data with various built-in tools with Google.
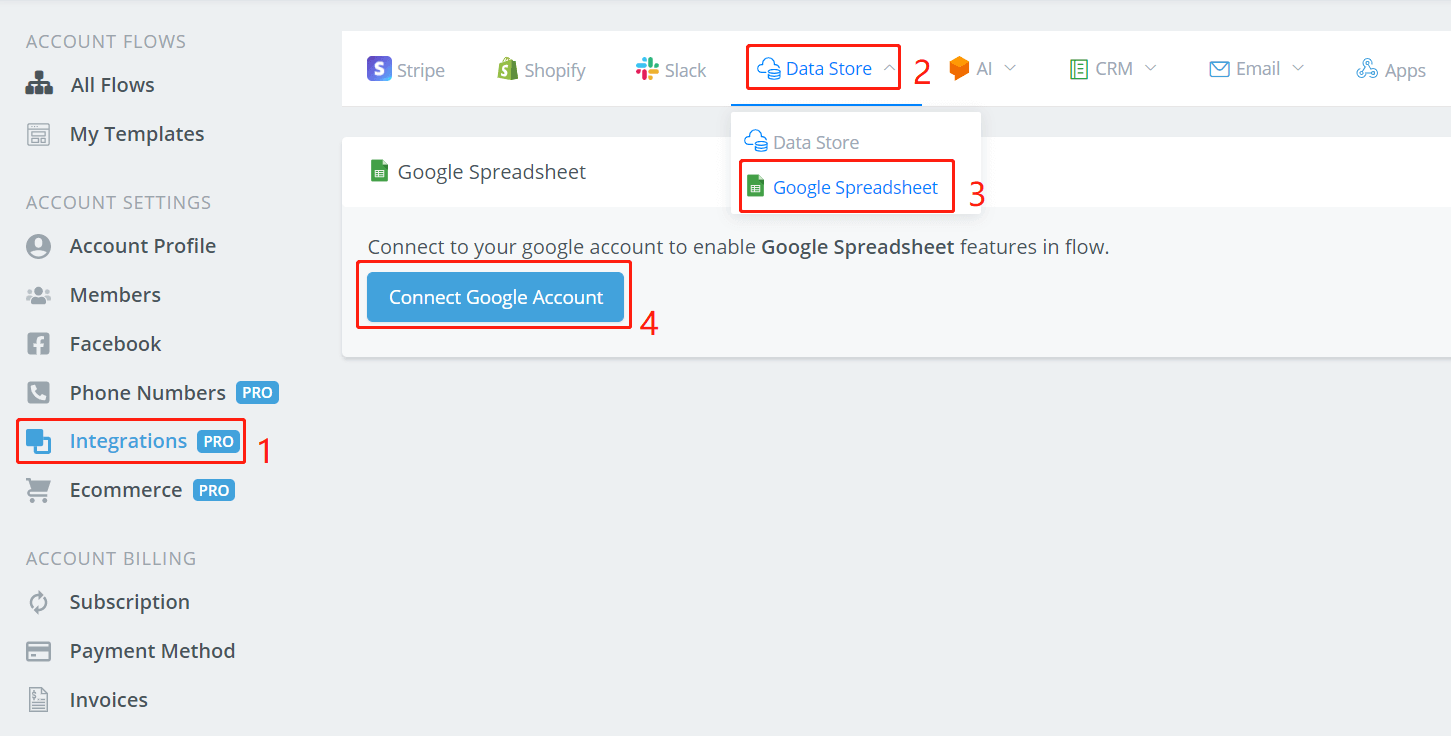
Follow steps 1 to 4 to connect to your Google account. Allow AbsolutChat to access your Google spreadsheet. When you come back, if nothing changed, click step 1 to 3 again to refresh, and you will see this:

Create a new spreadsheet or make sure you have one in the Google account that you just connected to.

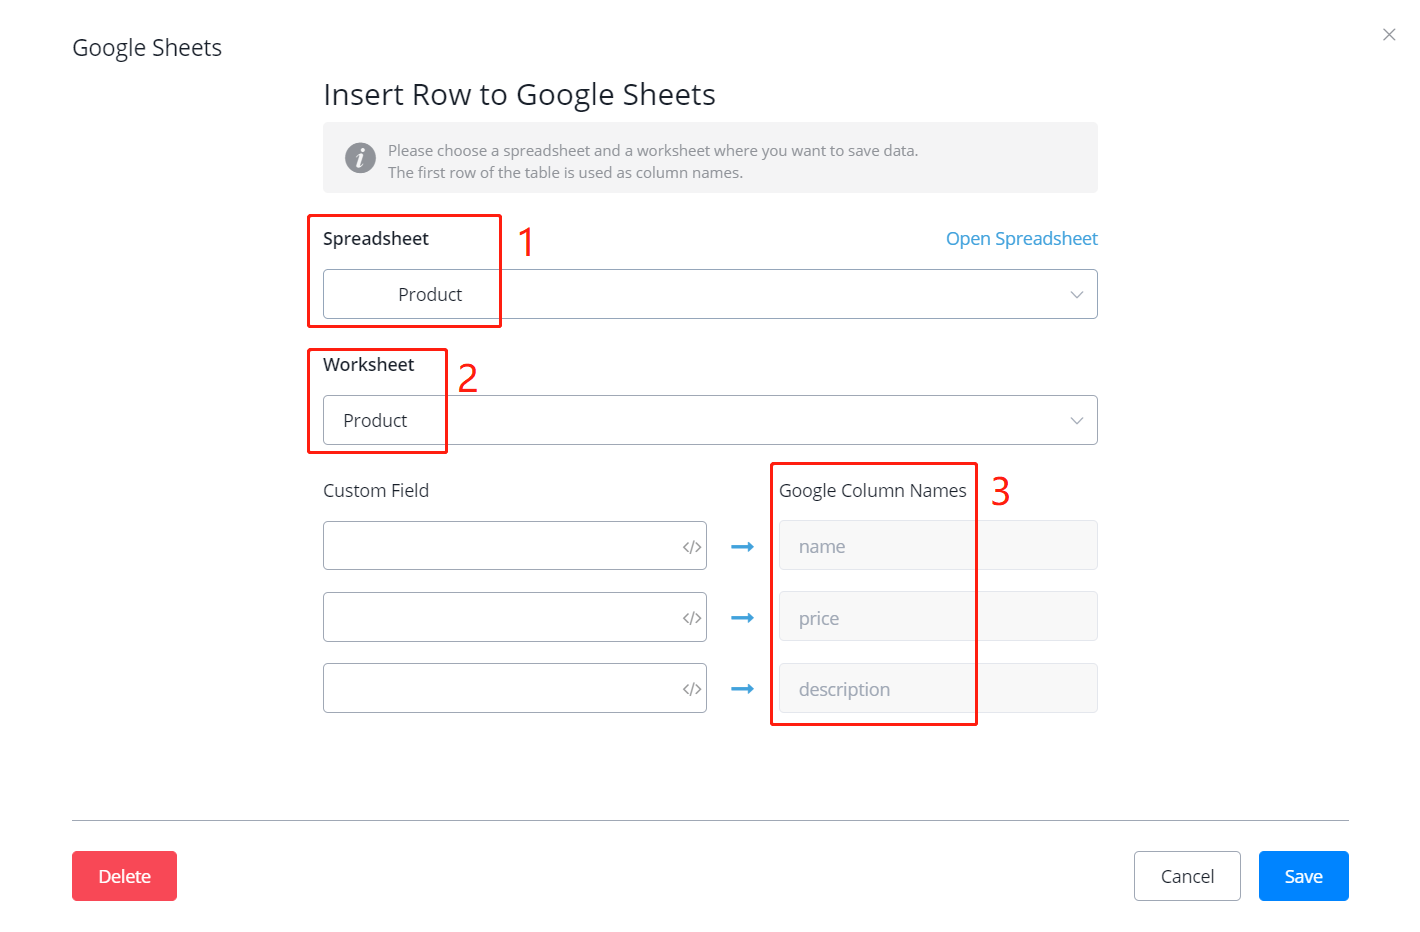
Warning
Importantly, remember to give column names for the worksheet in the first row (see area 3 in the above picture). You must do this by manually type in what fields do you need. For example, this is a product worksheet and each product has a name, a price and a description.
Later when you manage your data, this is how it looks like when the column names are set correctly (area 1,2,3 in the above picture are correspond to 1,2,3 in the following picture):
Manage Spreadsheet in Action Step
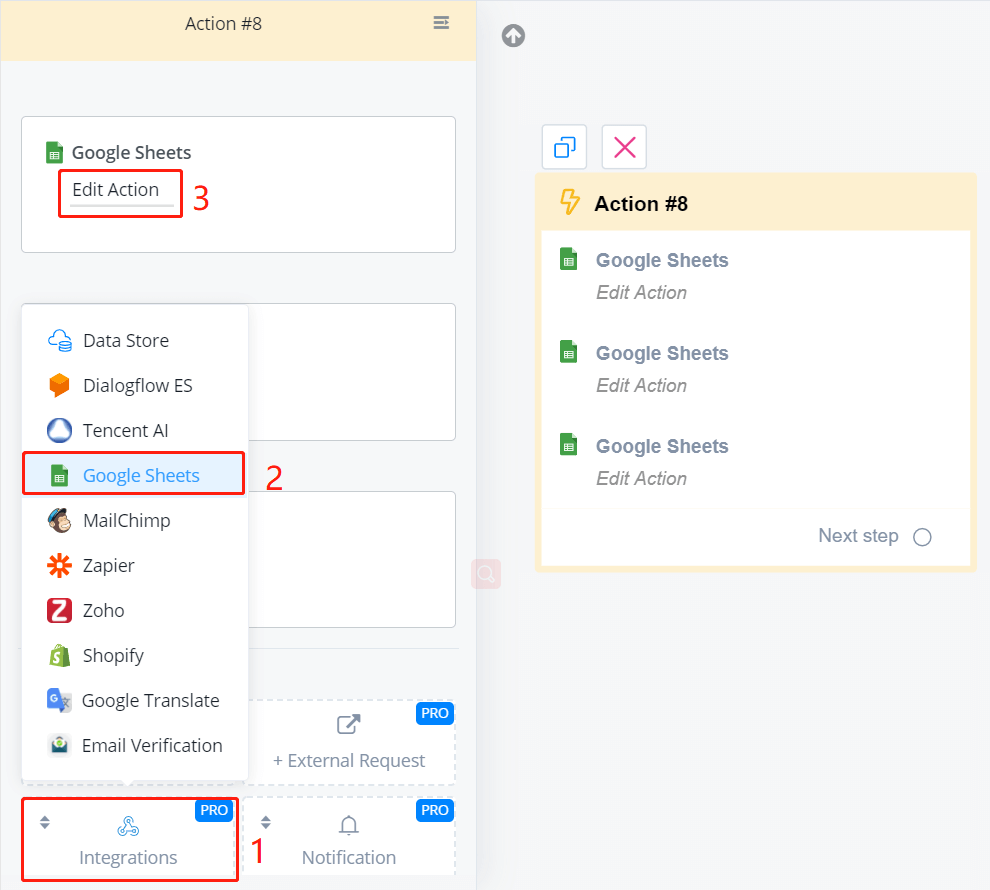
In an Action step, follow steps 1 to 3 in the above picture. Then you will see a list of functions.
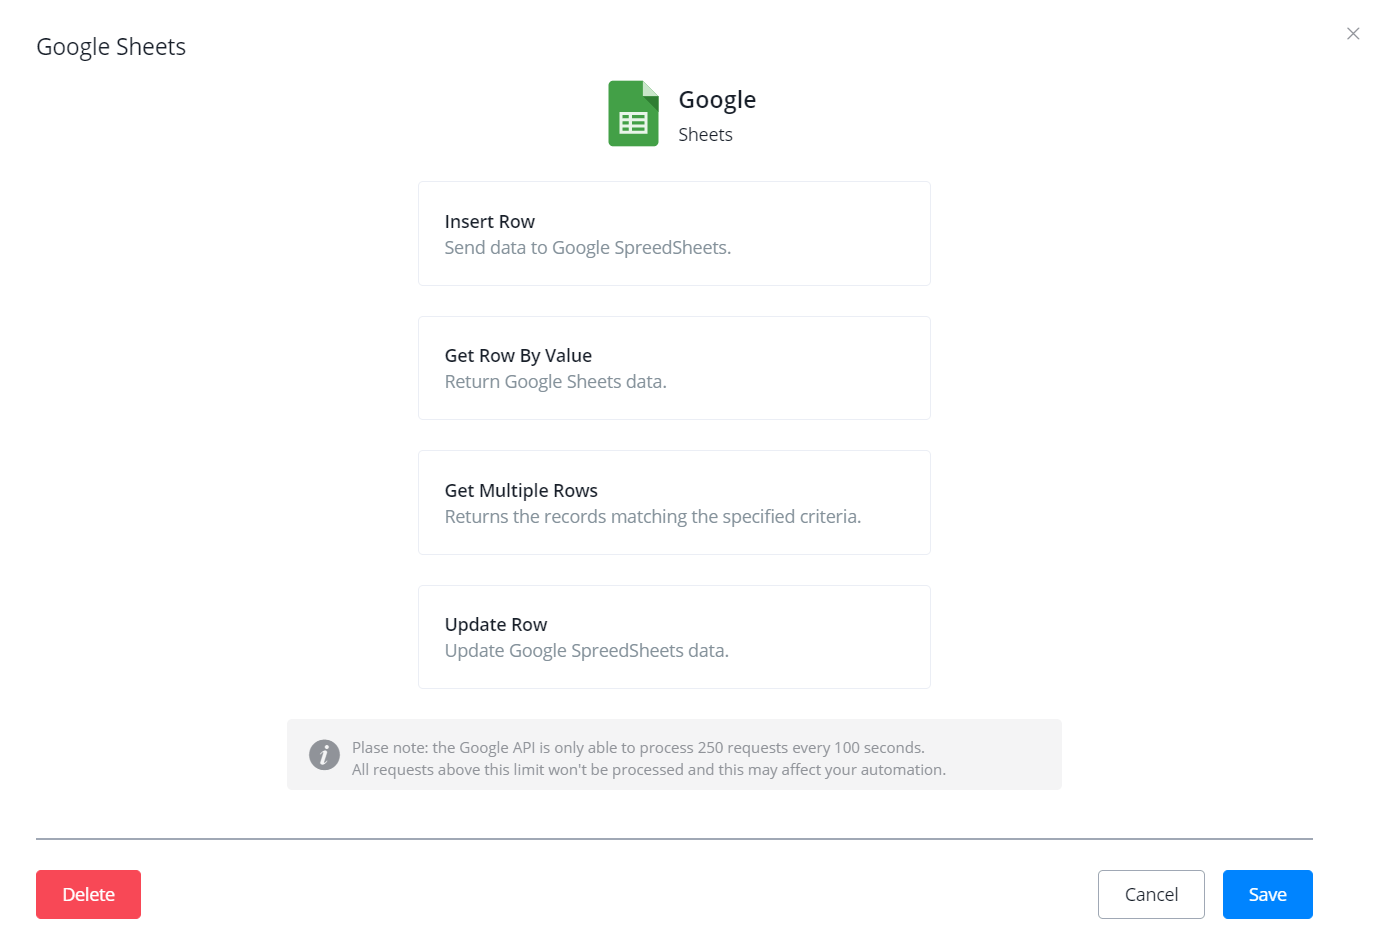
Insert Row
Get Row by Value
Get Multiple Rows
Update Row
In Progress
text tutorial about this page is in progress.
Dialogflow
With Dialogflow, you can pre-set some frequently asked questions, and your bot can deal with the simple queries on behalf of you and transfer the difficult. Besides, you can train your bot to understand more human language including greeting, gratitude, basic interaction, etc.
Setup Dialogflow

Follow steps 1 to 4 to connect to your Google account. Click the blue "Allow" button to allow AbsolutChat to get access to your Dialogflow account.
Visit Dialogflow Website, login to your Google account, then you will see your Dialogflow Dashboard like this:
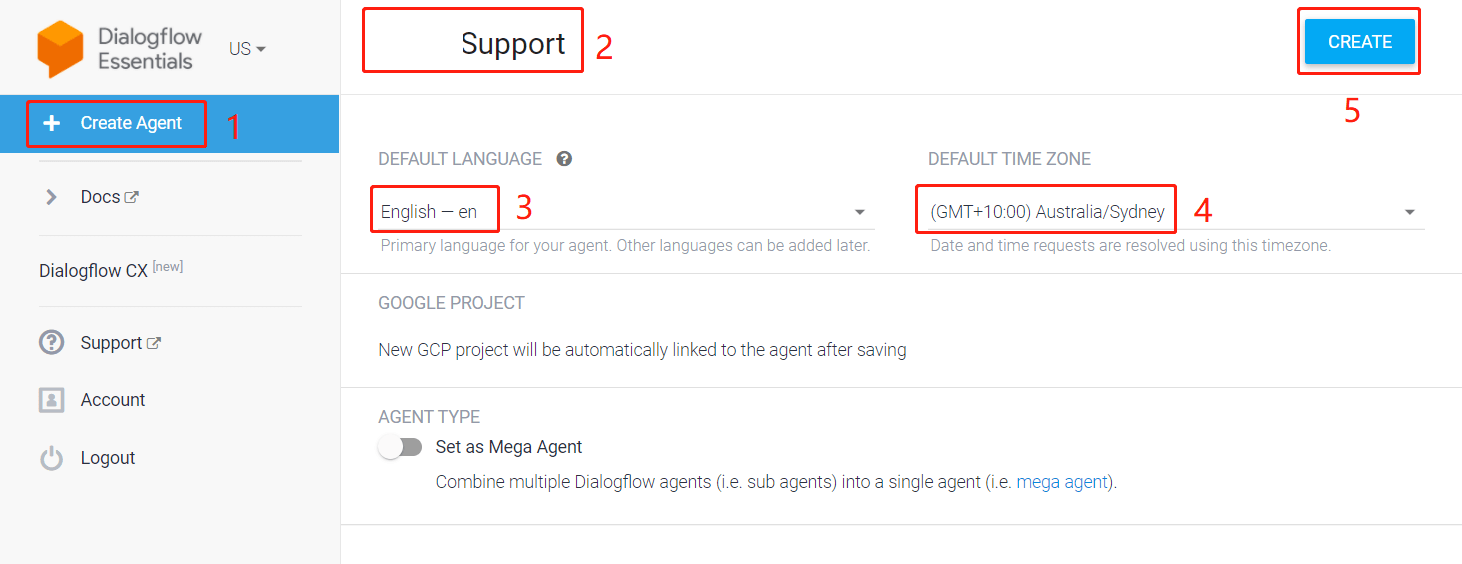
Click "Create Agent" on the left sidebar
name this agent
pick a default language for the bot
choose a default time zone
once finish, click "CREATE"
danger
"Google Cloud Platform service has been disabled" If you fail to create an agent with an error saying "Google Cloud Platform service has been disabled. Please contact your administrator to restore service", it is possible that because the google account is from your organisation like YourName@YourCompany.com. You can solve this problem by either contacting the administrator in your company for Google cloud platform authorization, or using your own Google account instead.
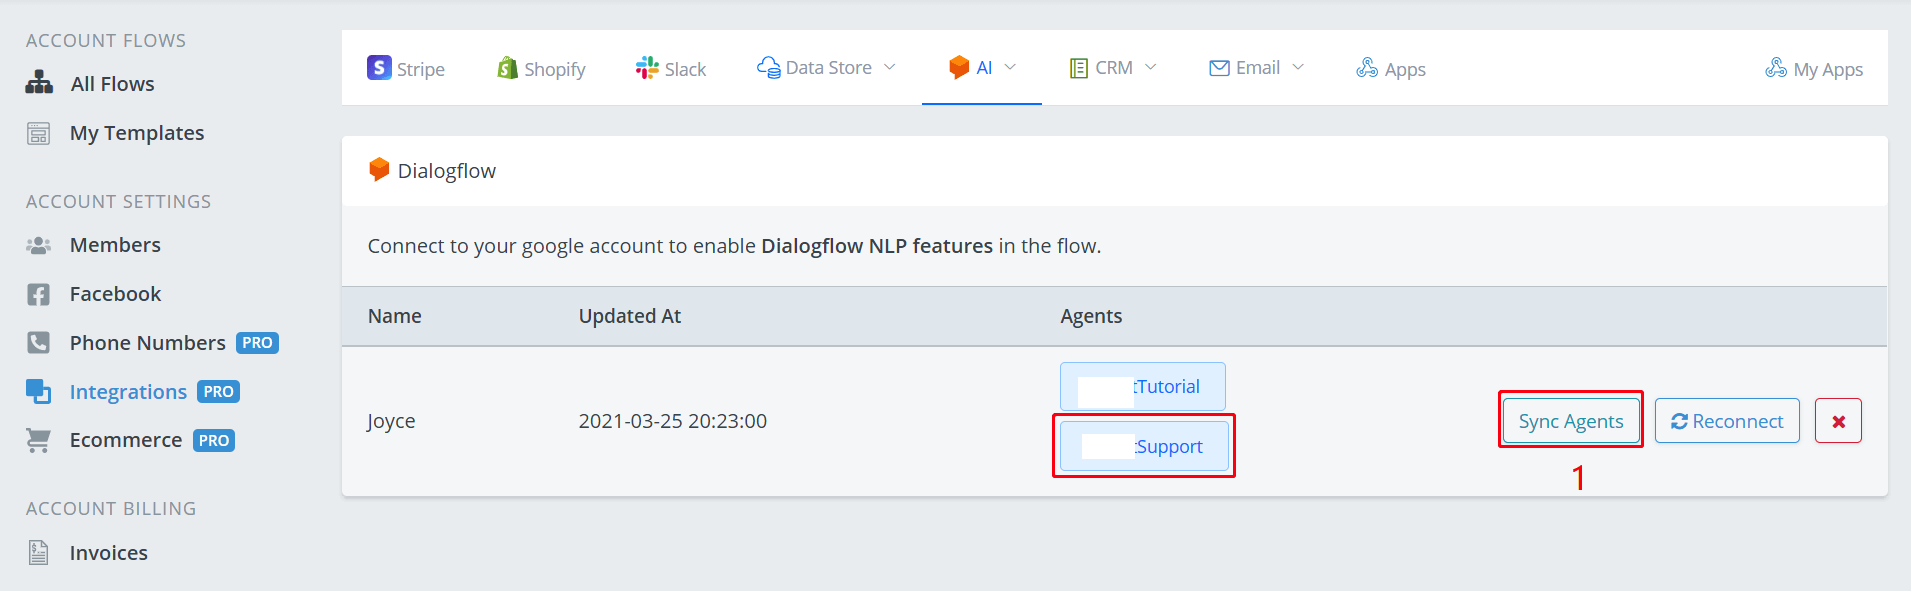
After creating a new agent, come back to AbsolutChat, click "Sync Agents" as below. All your agents will be listed here.
Use Dialogflow
Choose one of your flows that you would like your Dialogflow agent to manage.
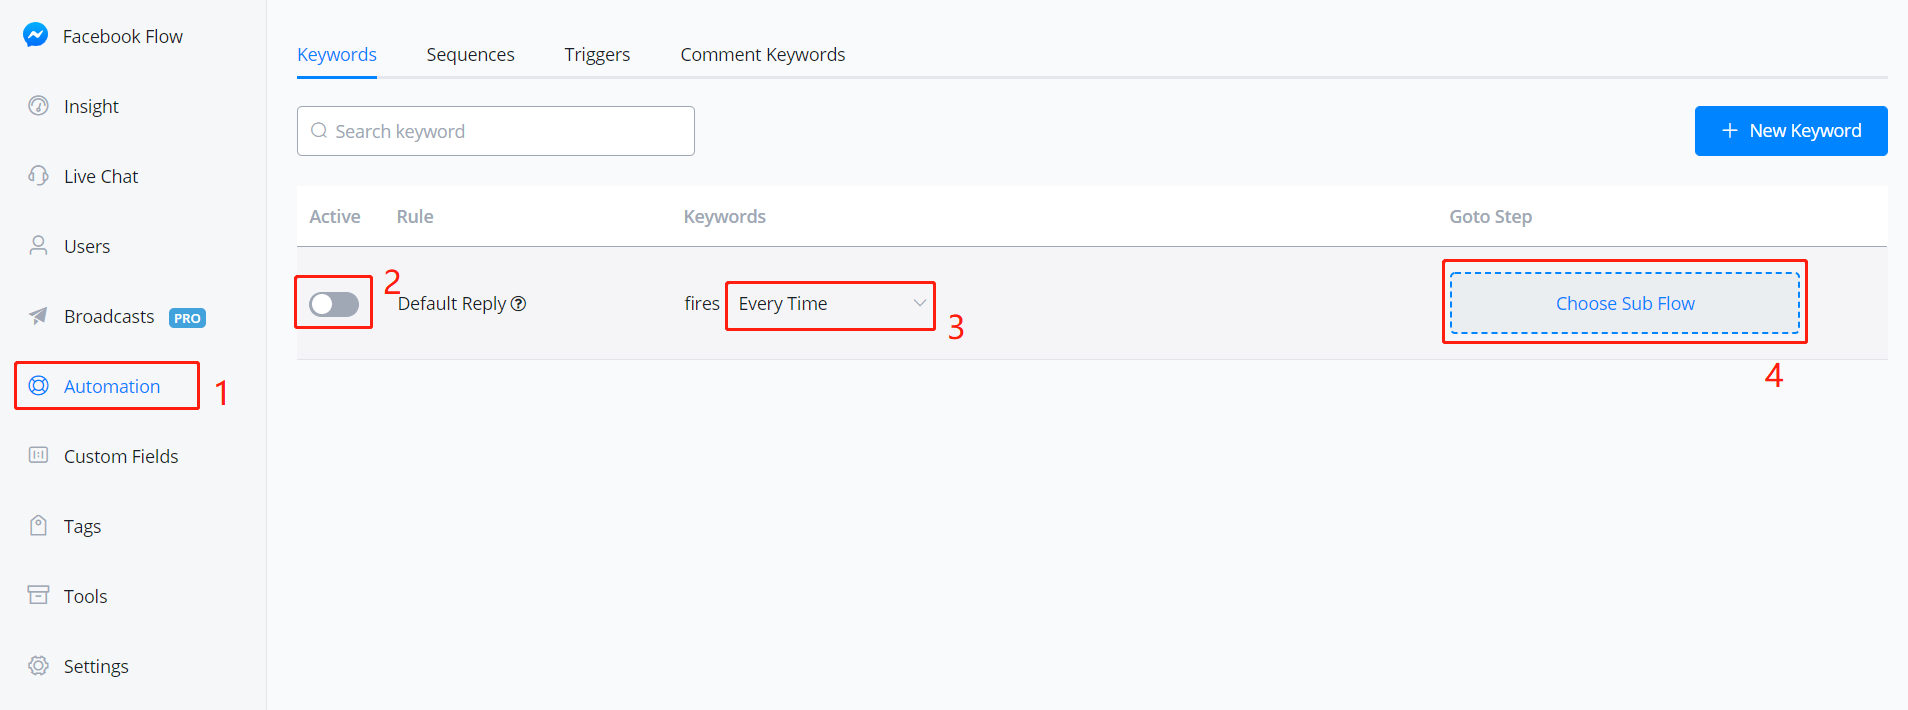
In the workspace of the flow,
click "Automation" on the left sidebar
activate the "default Reply"
Select frequency, usually "Every Time".
Click "Choose Sub Flow"
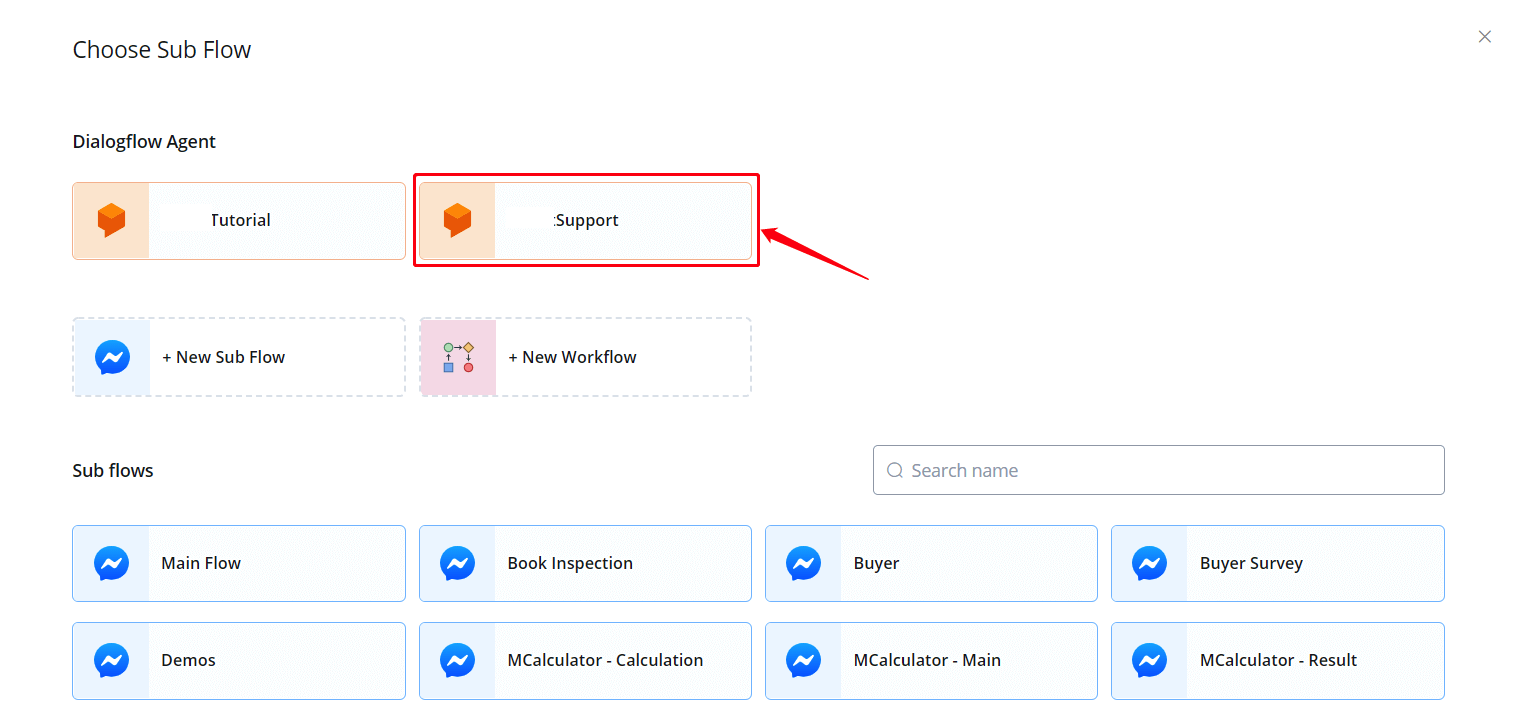
Select your agent, and you are then able to manage your FAQs. Enter FAQ interface by clicking the "Manage FAQs" button as below:

This is how the FAQ interface looks like:
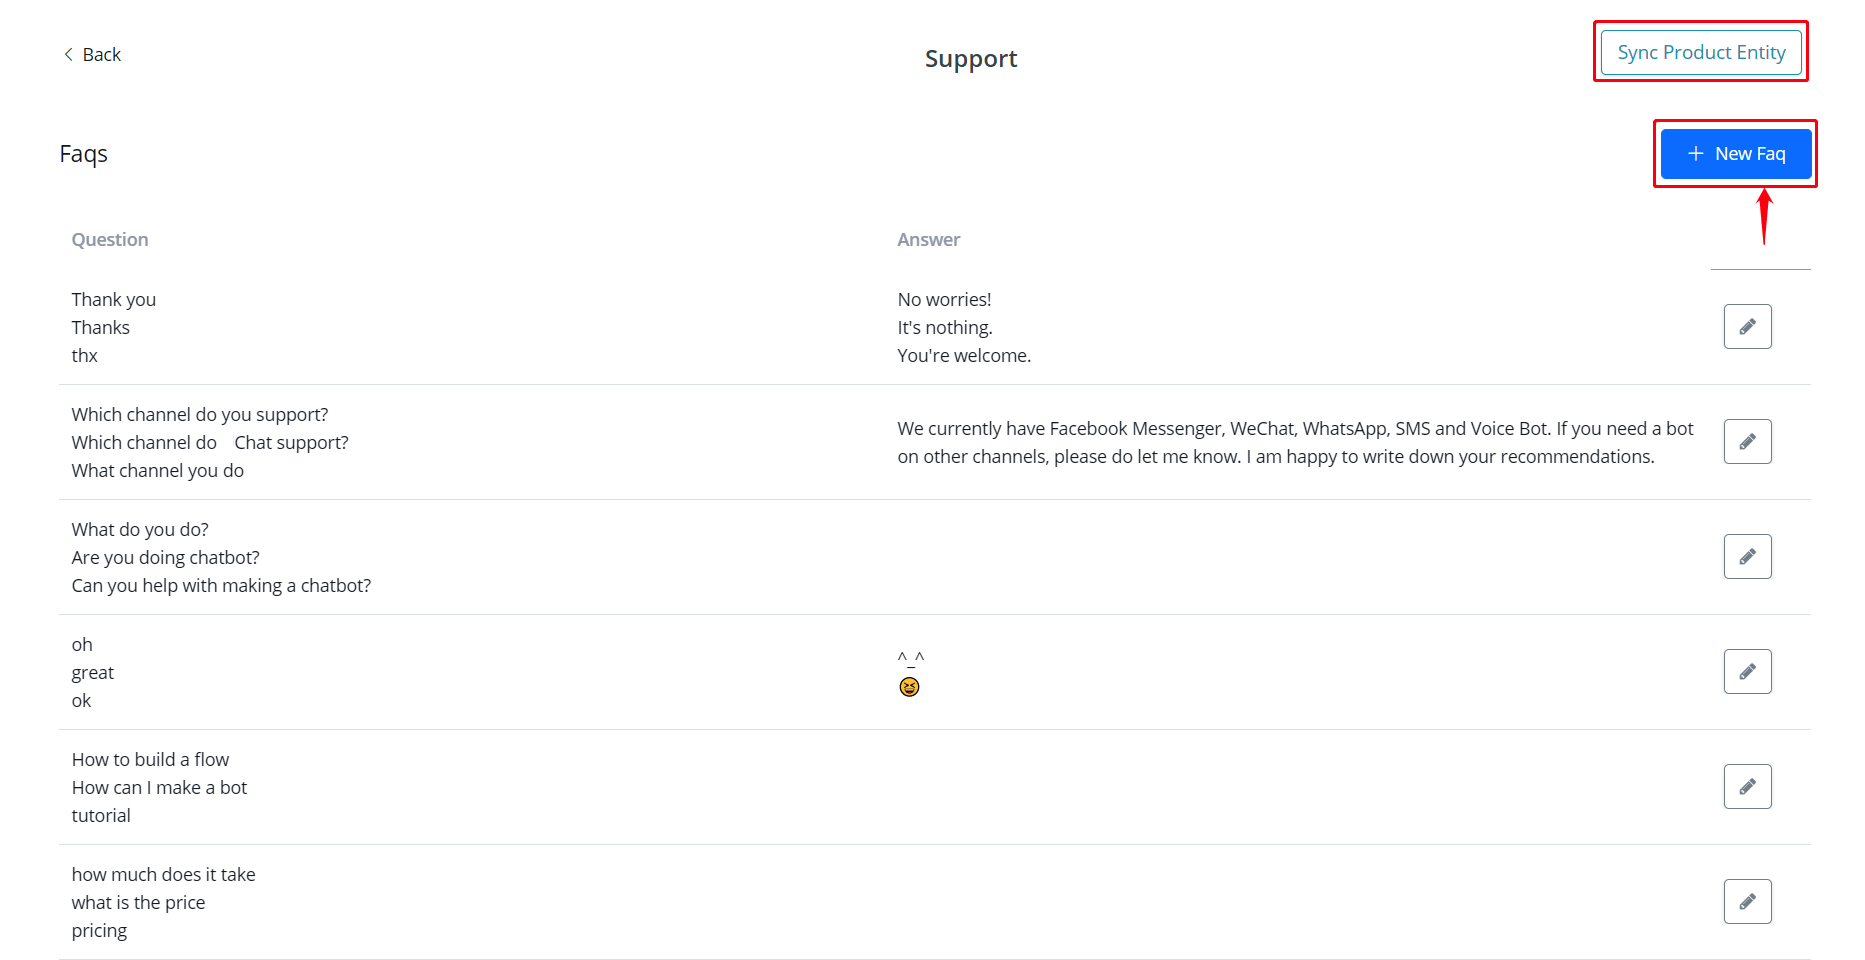
The "Sync Product Entity" button is for Ecommerce usage. By synchronizing product information in your Ecommerce system with Dialogflow, you can then recognize and reply to related products when users ask about them. To quote a product name, type "{{"to see the picture below

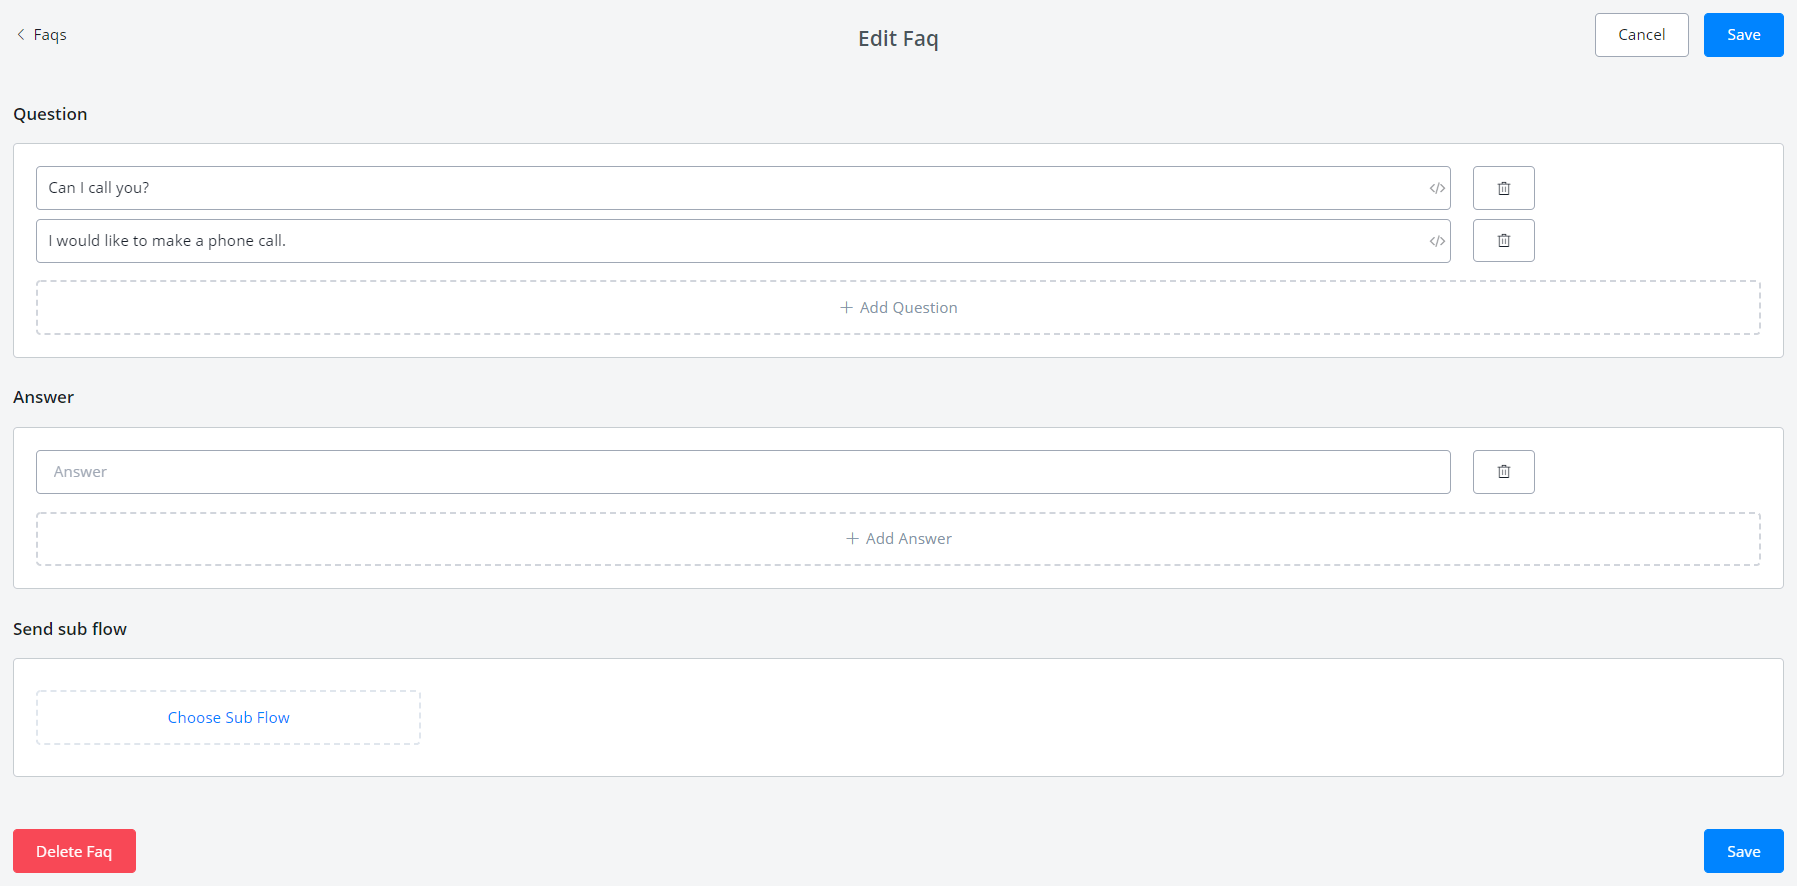
Click "+ New FAQ" to start building your smart dialog:
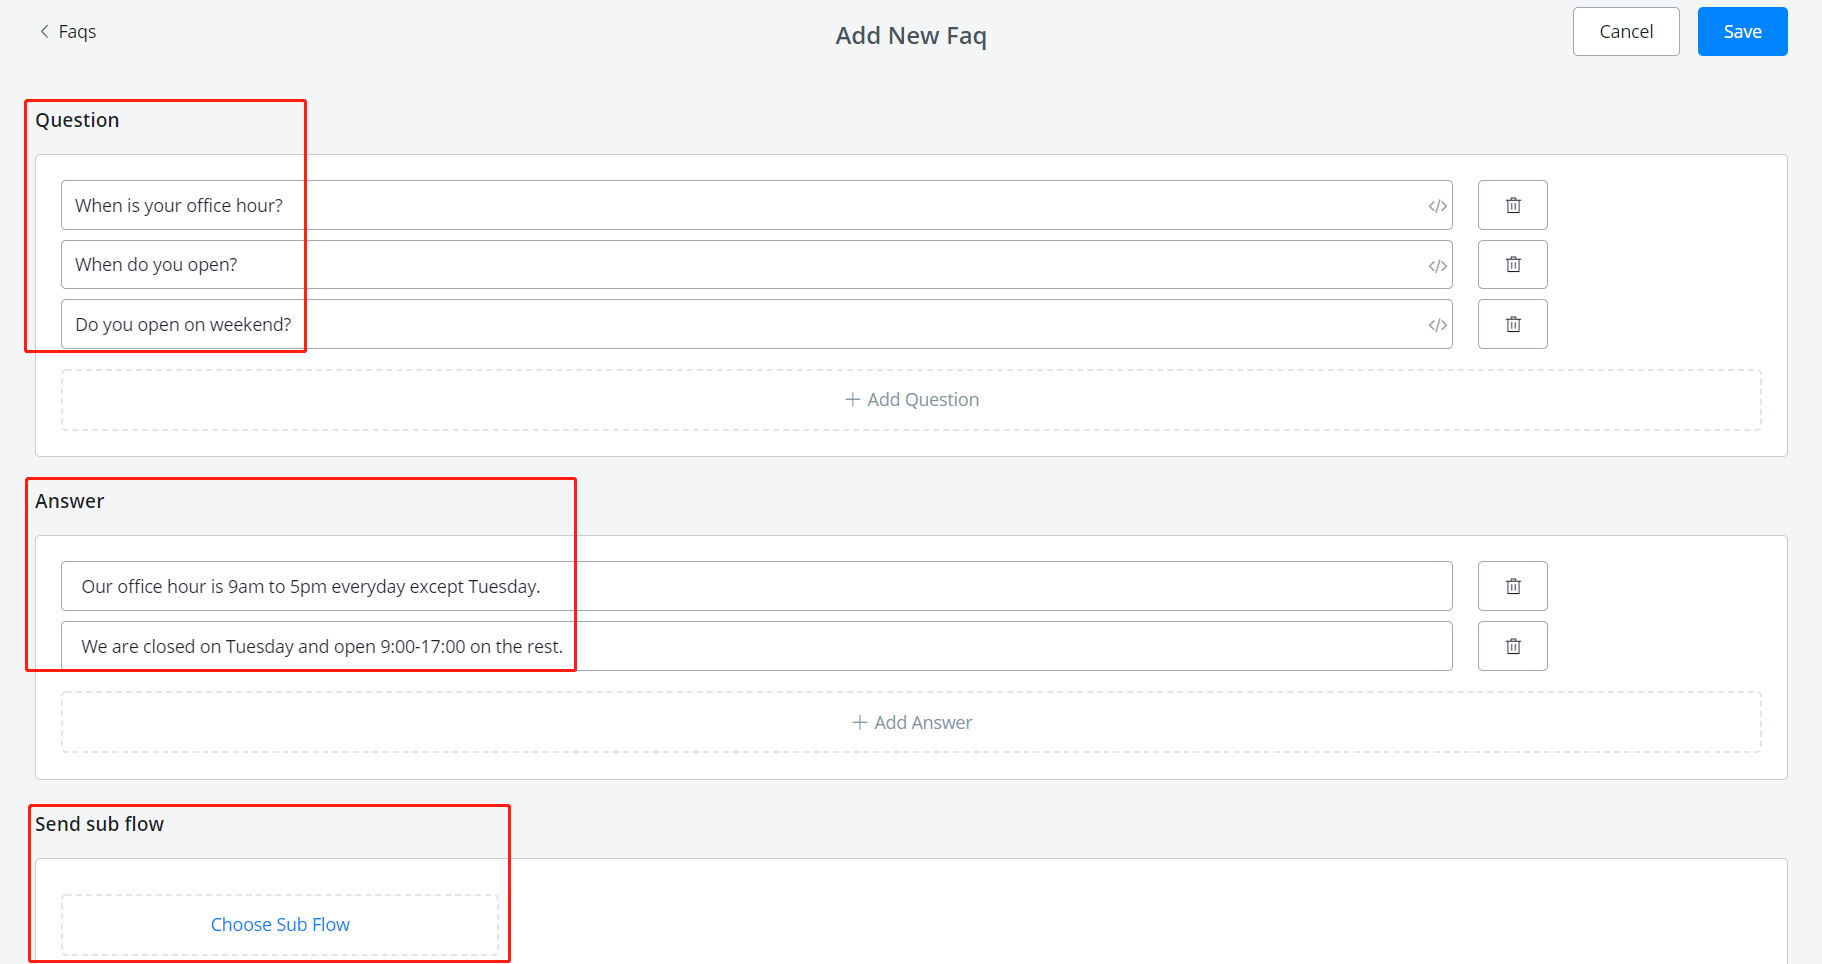
For each frequently asked question, put as many synonymous sentences as you can in the question area, and Dialogflow will help with the rest.
You don't need to worry about too many details because Dialogflow is using fuzzy matching. For example, you have already put "When is your office hour?" and "When do you open?". The bot can recognize it is asking about opening hours whatever user send "office hour?", "when u open?", etc even there is any abbreviation or grammar mistake.
The answer area is telling the bot what to reply when a question matched. The bot will randomly pick one answer from the answer list to send.
In "Send sub flow" area, choose a sub flow if needed. The sub flow will be sent just after the answer.
Finally, click "Save" and here you go, 🎉 your first FAQ has done. The bot is now understanding more human language! Keep testing and improving it.
Improve Dialogflow
Back to Dialogflow Website (opens new window), you will see AbsolutChat created many FAQ intents on behalf of you:
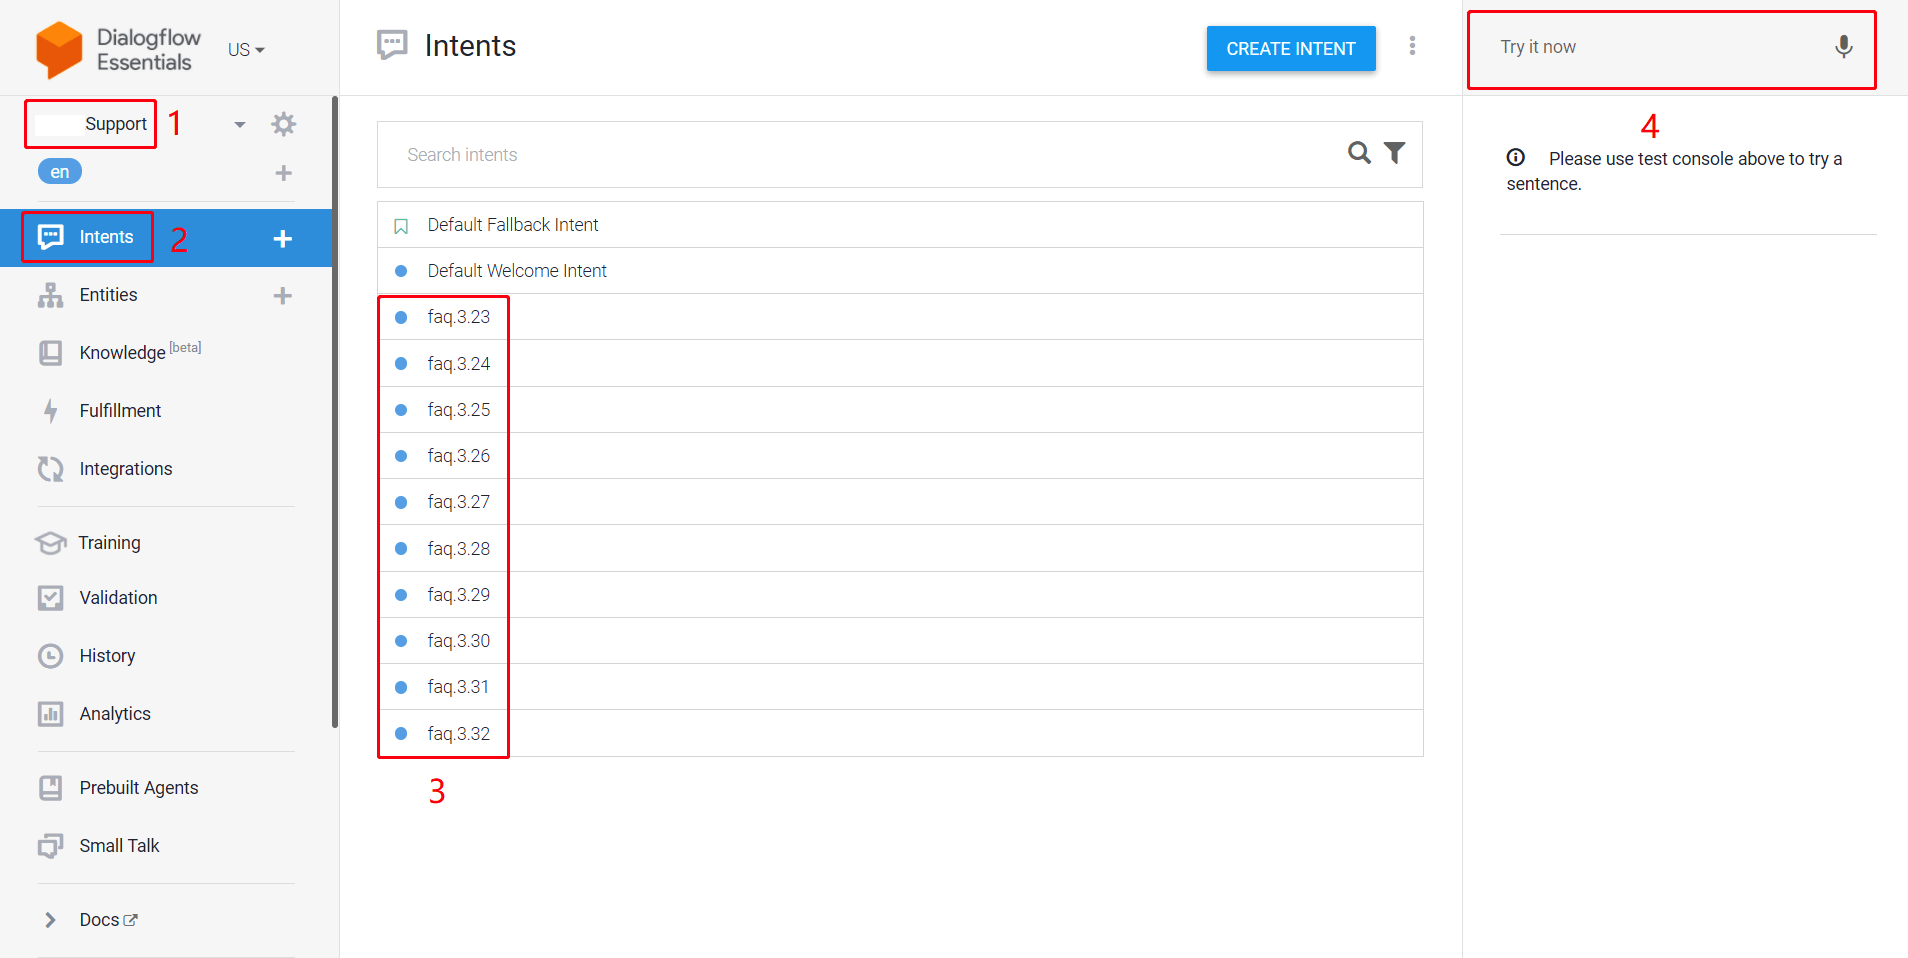
choose your agent
click "Intents"
these are the intents synchronized from AbsolutChat
Test your bot here, see whether it understand which FAQ you are asking about.
Check and adjust "Default Fallback Intent" or "Default Welcome Intent" if needed. "Default Fallback Intent" is matched when none of the FAQ is matched.
Select any intent, give it some more editing to help the bot understand more:
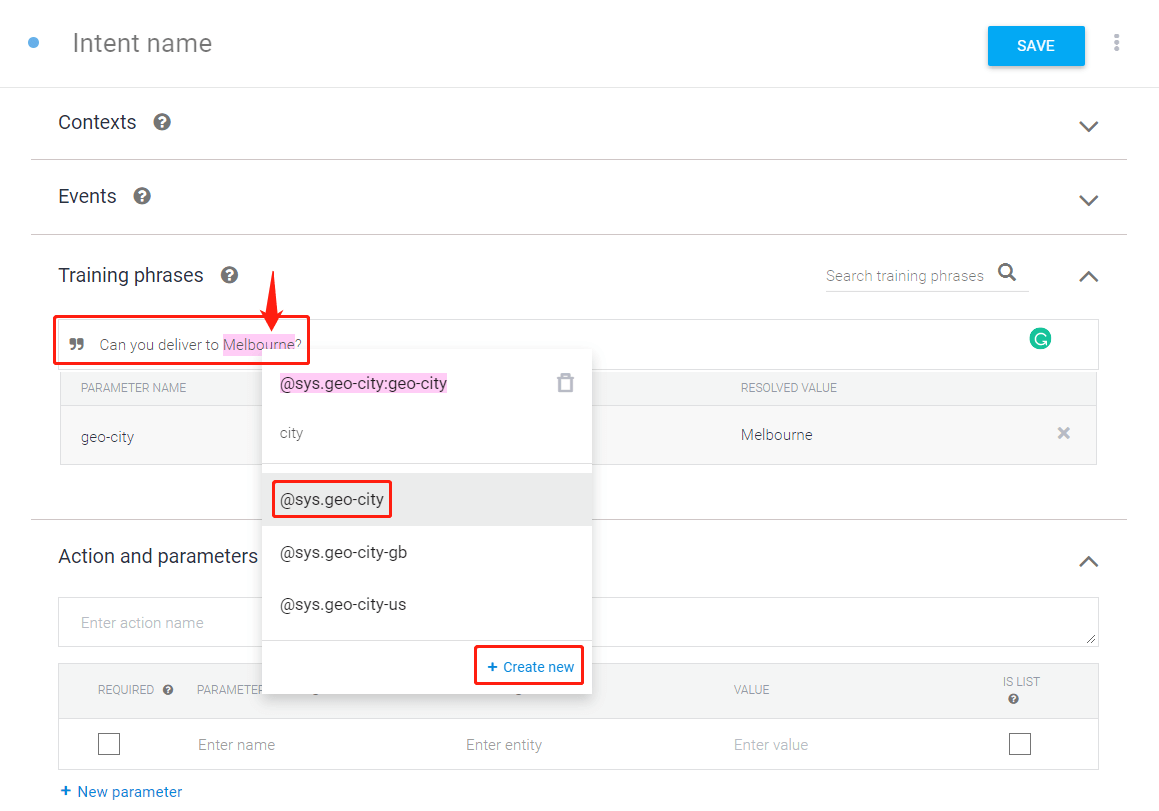
For example, in this case, double click to select "Melbourne", then enter the keyword "city", click on "@sys-geo-city". This is telling the bot that the word "Melbourne" is a city. So next time when users asking "Can you deliver to Sydney?" or other cities, the bot can file the question to this FAQ.
There are various practical built-in lexicon includes color, time, post-code, country, street name, language, etc. You can even create your own!
Dynamic Content Response
Response answer is not limited to just text. Try custom payload! To begin with, create a FAQ in AbsolutChat with only questions, no answer or sub flow.
Wait a moment and refresh your Dialogflow intents until the new intent shows.
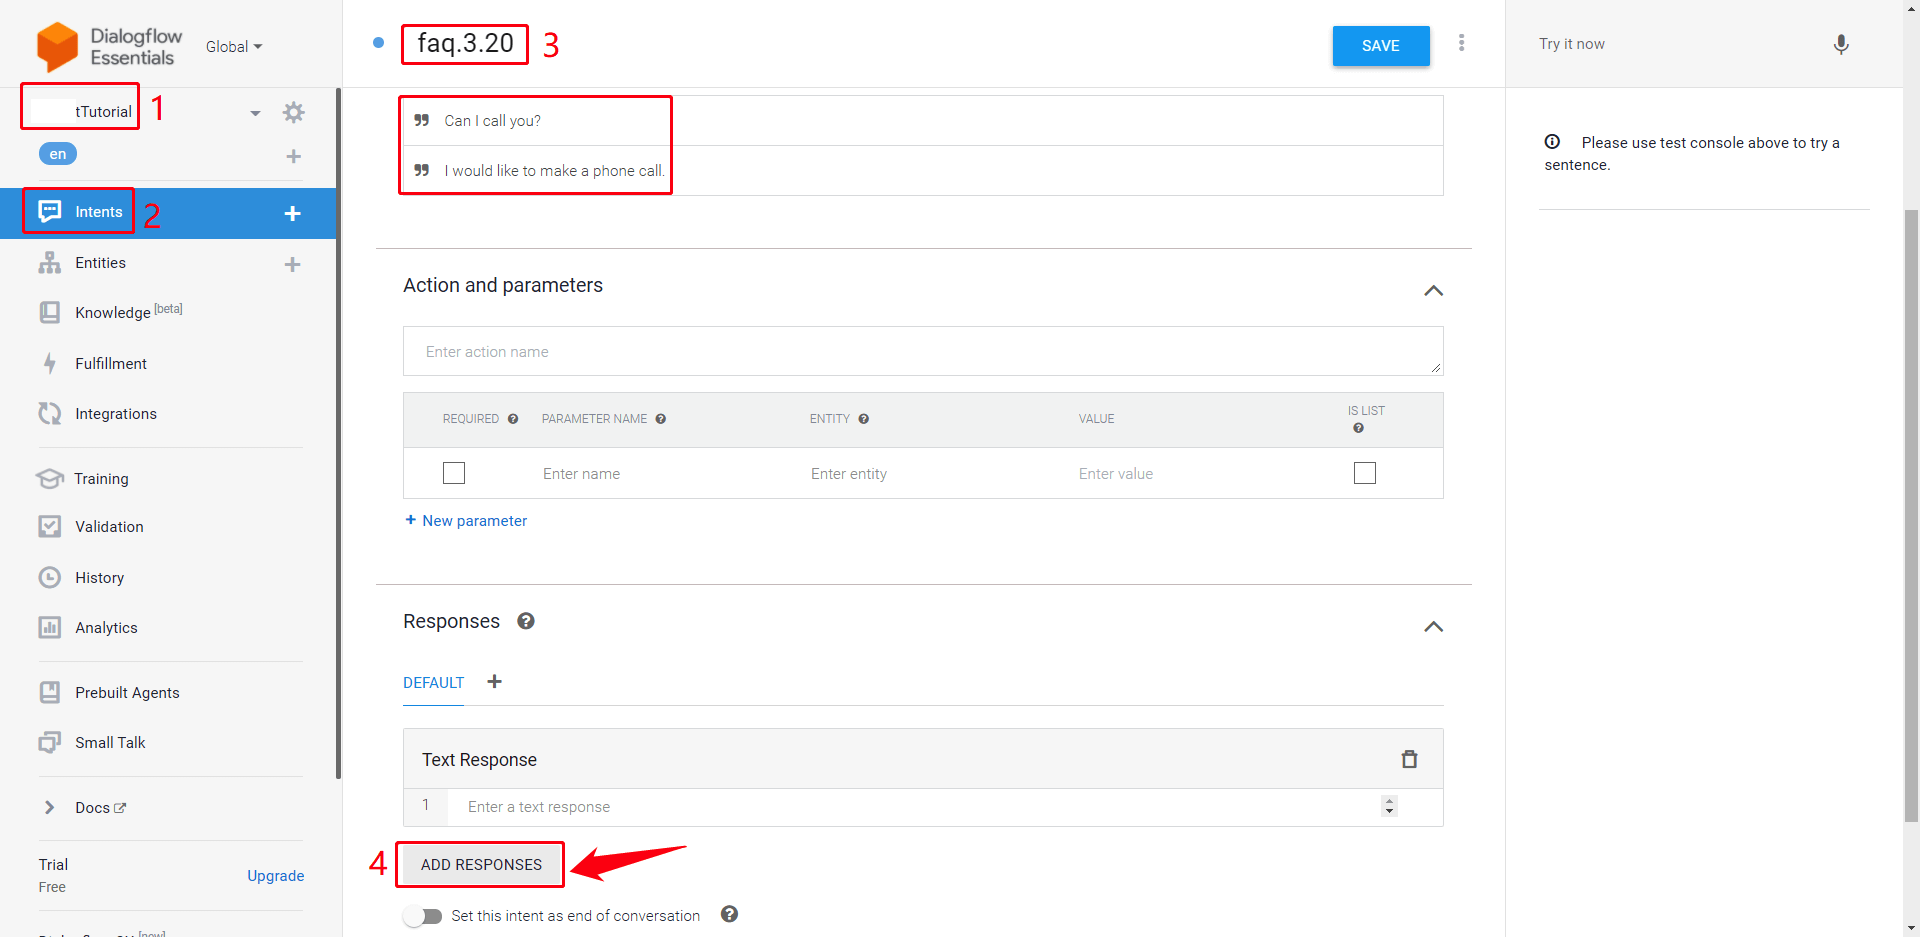
In the new intent, click area 4, "ADD RESPONSES", then "Custom Payload". Copy and paste any needed response format here, such as text/media/files, buttons, actions, quick replies and so on so forth.
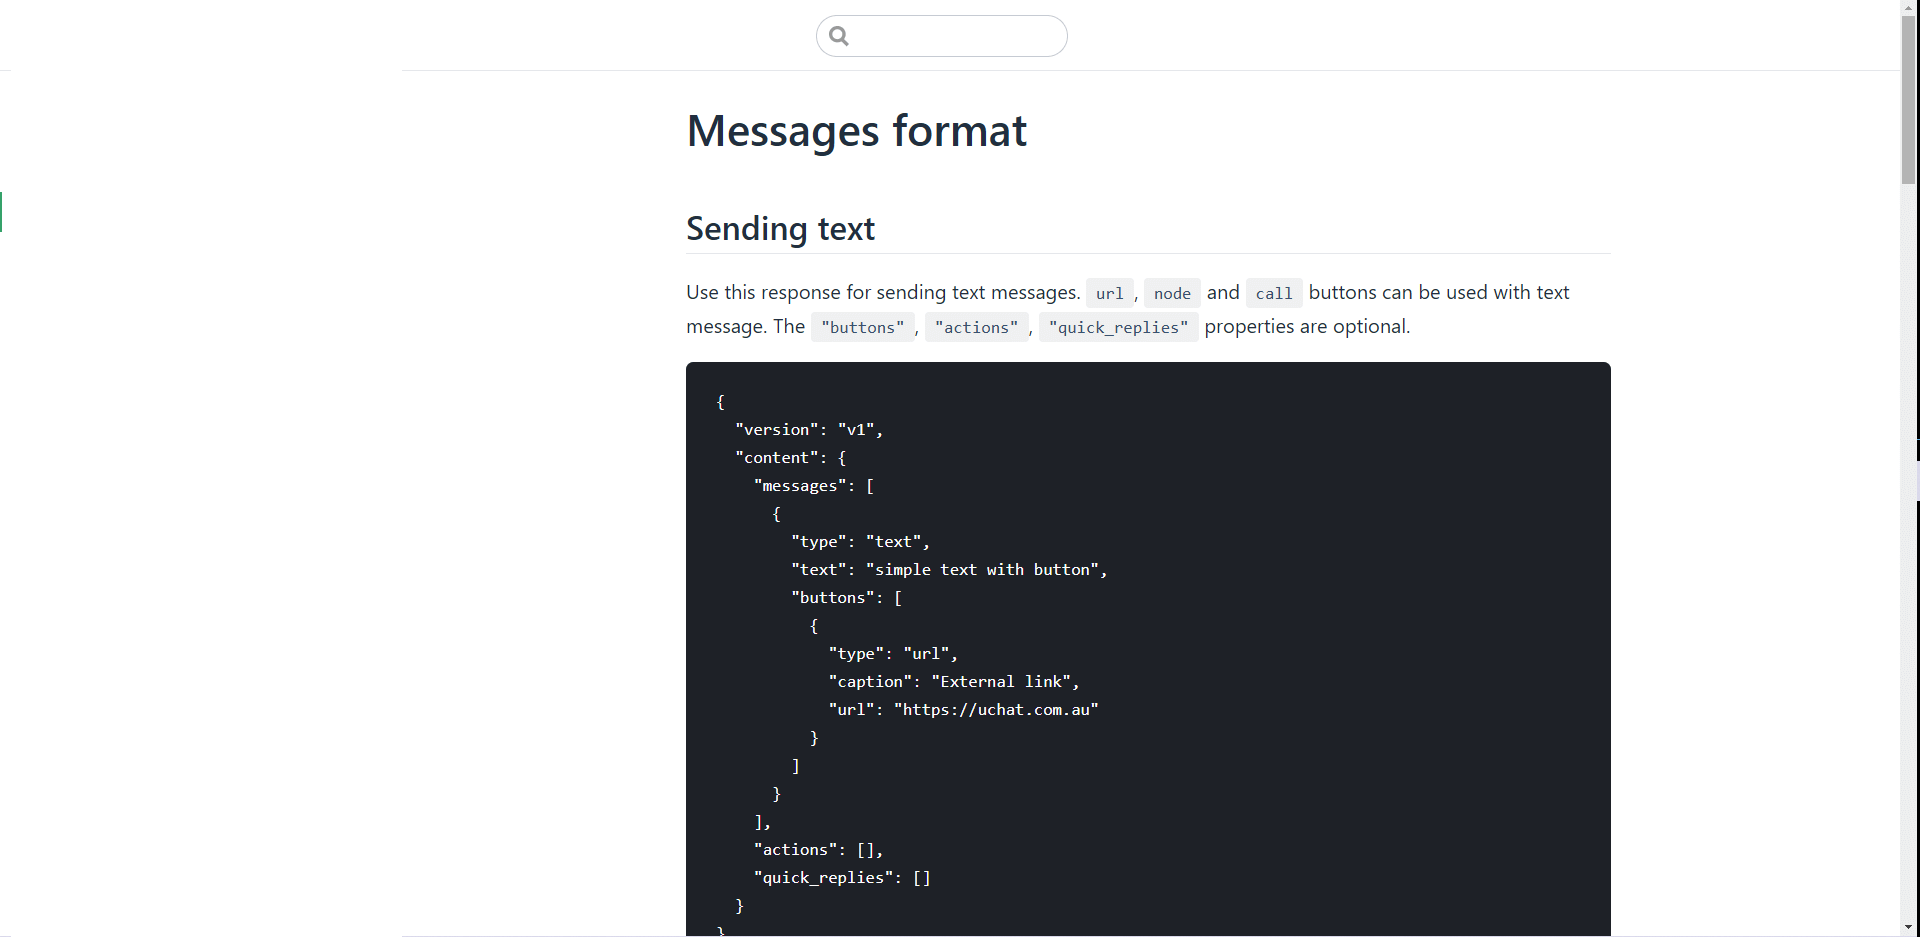
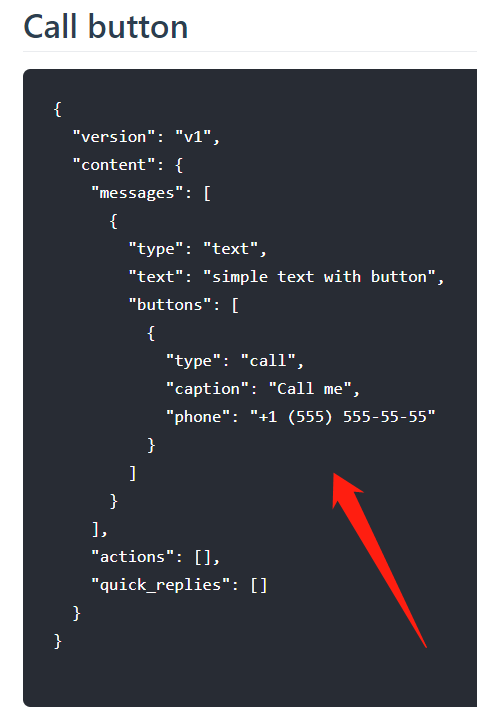
In this case, a call button will be sent. So copy the following code to Dialogflow:
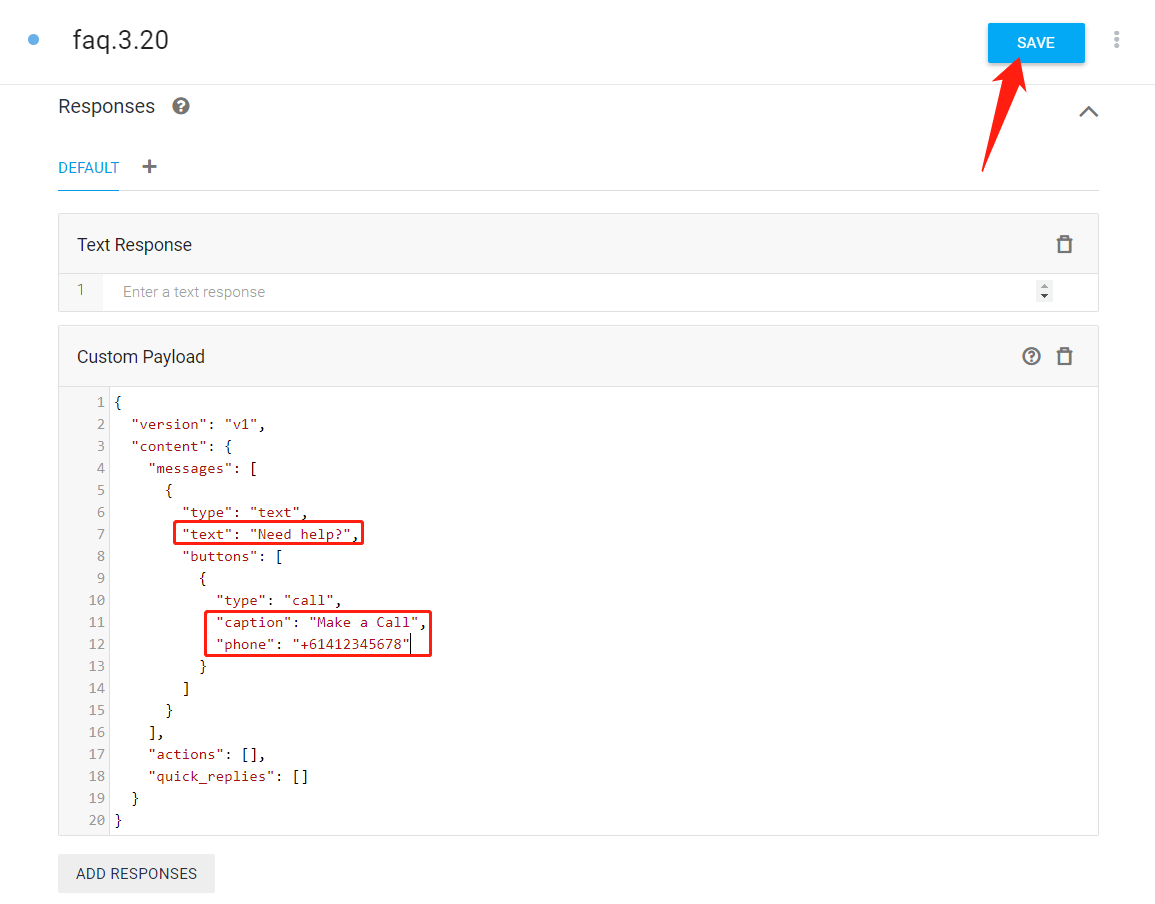
Adjust text, button title, number, etc as needed and click "Save":
Well done! the bot recognizes that "can I call" is asking FAQ3.20.
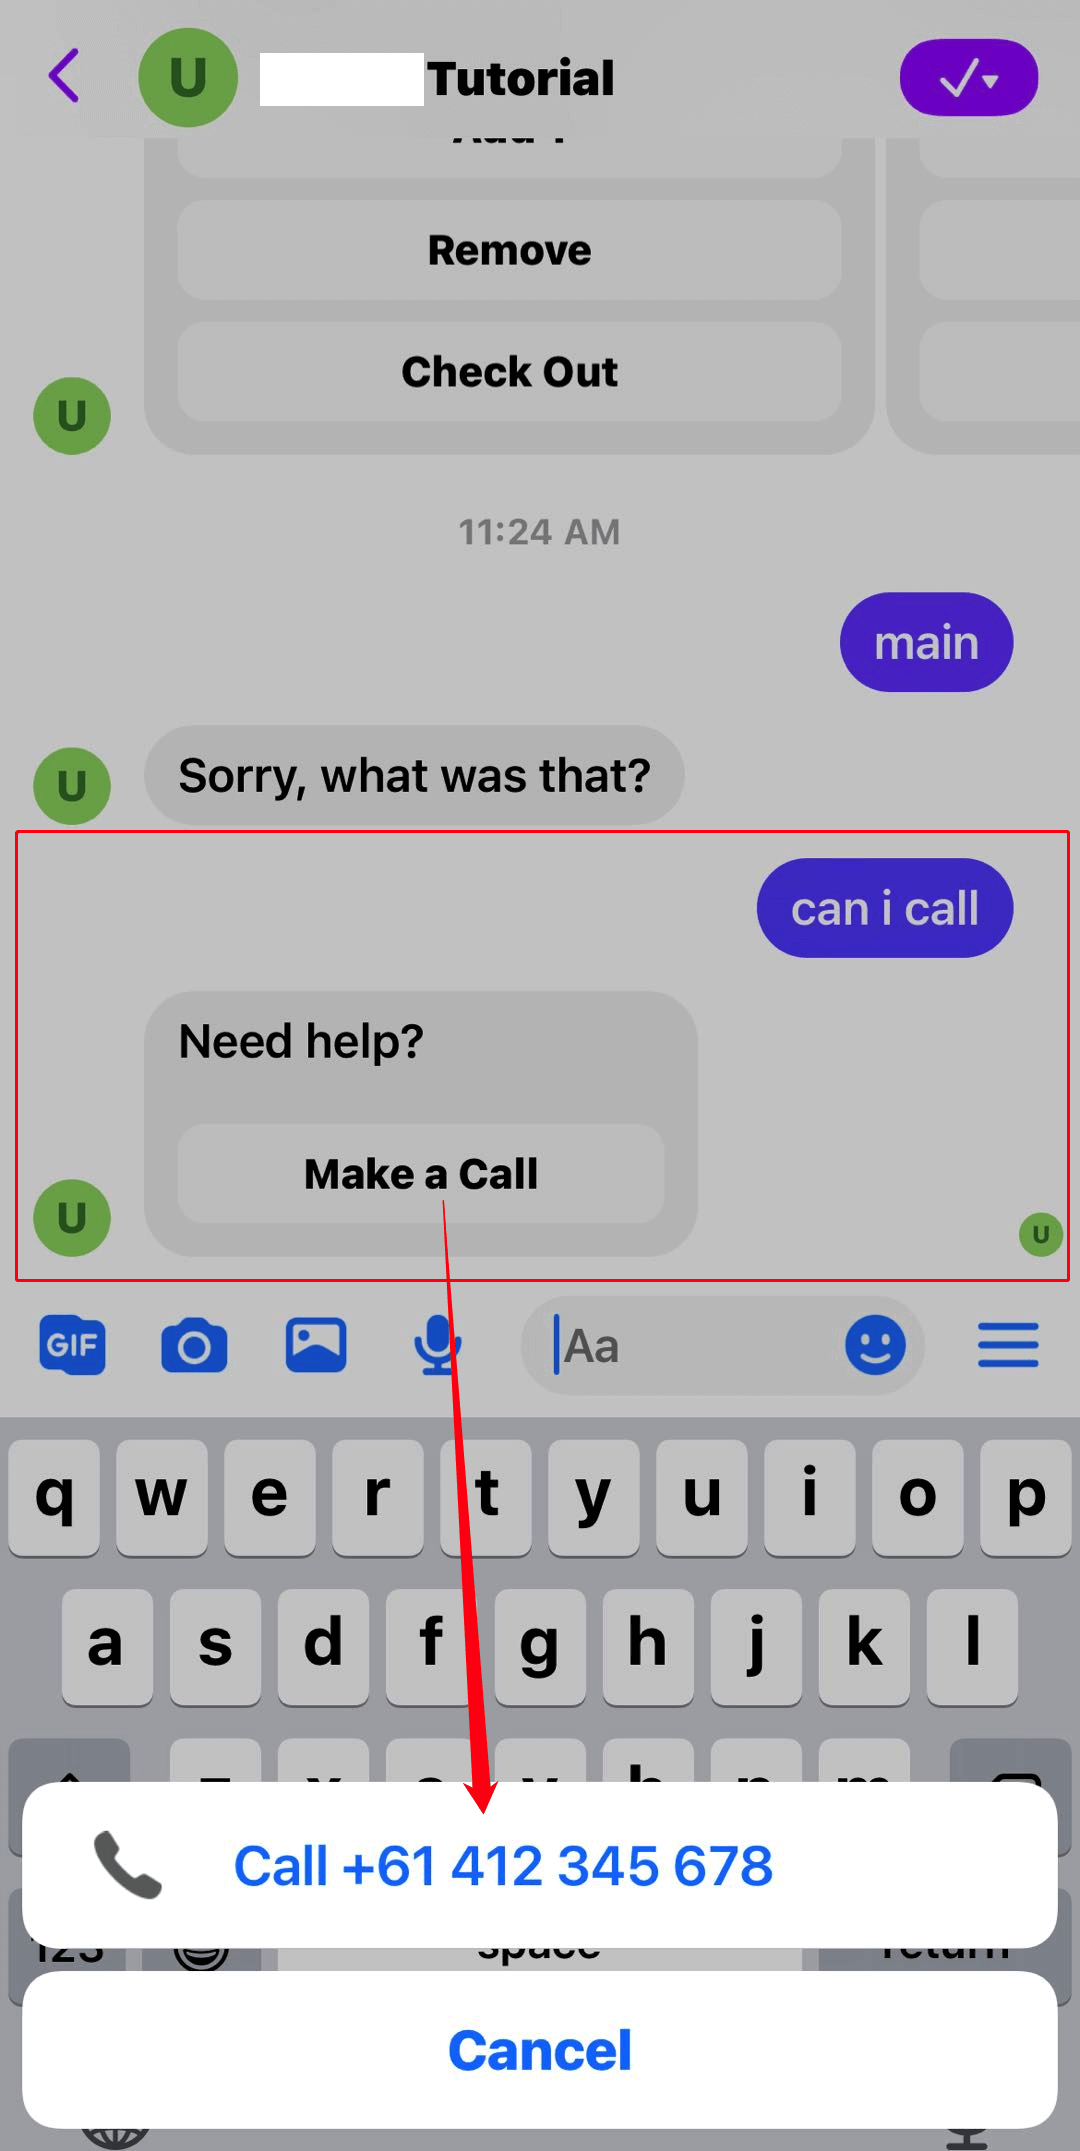
The user side looks perfect as well. Feel free to explore other response types!
Zoho
More details click -> Zoho
In Progress
text tutorial about this page is in progress. Sorry for any inconvenience.
Email (SMTP / Gmail / Sendgrid)
In Progress
text tutorial about this page is in progress. Sorry for any inconvenience. You can contact support@absolutchat.com
Integration page is in progress.